Followers

3/30/2016

Embossing over Watercoloring Thank You

Welcome. The card in this post has been received, so time to share it here. This one is based on a video by Gina K on the technique of Stamping over Watercolor.

- Used Zig brush markers over watercolor paper, spritzed - just as in the video. Then versamark applied to the clear stampings*, embossed with Ranger's Queens Gold. (*meant to say, applied versamark to a clear stamp and then stamped it!)

- Distress Inks in Iced Spruce and another blue shade were sponged over the results. Had tried using the darker inks as Gina does, but found I liked the results of this sponging best. I've tried Memento Paris Dusk (navy) over clear and also tried the black. Not happy with the looks that resulted for me, but I really liked the look Gina achieved.

- die cut this piece with a rectangle shape, layered a Memory Box Postage die cut under it (snippet). The gold edging done by sponging versamark at the edges and heat embossing with Queen's Gold. Black mat layer. The edges are not exactly even, but hey, this is not Hallmark!

- White card base sponged with more Distress Inks to try to compliment the colors in the focal piece as none of the tons of cardstock that live here, seemed to look right with the other elements.

- Impression Obsession sentiment die from white snippets, heat embossed with Queen's Gold. This die is best cut with the metal Sizzix Precision plate.

This was a special thank you to a very generous & sweet person, so I hope she liked it. I always hesitate to send my work to someone who is such an awesome designer herself. Am I the only card maker who feels this way?

Ya'll have a good day, and come back when ya can! Hugs.

3/28/2016

Thinking of you - With Snippets

Good evening, and hope that you had a wonderful Easter Sunday. We had some overcast skies with a damp chilly feel all day, but then had a nice supper with the family. A little drizzly rain as we left the restaurant. Today has been sunshine, which always makes me feel happier. The pretty white blossom tree behind us, is shedding blooms when the wind blows, and it looks like we're having a snowfall.

Recently a friend lost his Mom, and we needed a card. Since I've been trying to shift the Crapalanche, used some bits & pieces (AKA snippets) for today's card.


- Card front is recycled from an advertising card sent to us by Hallmark. The back side of the card had this design, so saved it for future use. The front side of the Hallmark card was a birthday card for DH. Used the scorpal to add double score lines at the bottom edge and along the border, but the side score lines don't show in the photo.(does this qualify as a snippet? Perhaps)
 
- Butterfly was embossed with a old brass stencil, sponged, colored (?don't remember how!), then glossy accents added. Fussy cut and the piece has been in the 'pile' for a long time. (definitely a snippet!)
 
- Stitched circle cut from a past play day background using sprays & paints. (Oh yeah, snippet)
 
- flowers & sentiment done on watercolor paper, using Zig markers, while on one of our trips to Florida. (um...s'pose it could be a snippet? Yeah?)
 
Put it all together, asked DH if it was fit to send to our friend, and he said "Send it".
 
Here's the inside:


- Impression Obsession die (Thanks Lis for using this die in your pretty card to us). It was cut from a snippet of previously created background and just enough left to use this die. I did discover that using the Sizzix Precision Metal plate would be a good idea with this die! (ask me how I know this? but it still cut ok with regular cutting plates, just had to do a little scissors snip-snip in a couple places).

With dies like this, I think it will be easier for me to go ahead, finish the card when I make it.....

Ahem, since I hear there has been some excitement over at the Snippets Playground, & since Parsnip & I exchanged some sweet chockie kisses on my last trip (since I'd been MIA for so long, and Sweet little Bear still let me sneak in!), I'm off to check out things. I heard Parsnip got some chocolate on his white fur, and I want to see what THAT is all about! C'mon, let's go have some fun at Snippets Week 222.

Lots of blog commenting in my future, folks! Thanks for popping by.


3/27/2016

Happy Easter Ribbit

Good afternoon and a most Happy Easter to you all.  How fast this year is speeding past us.

So many of you chuckled at the reference to my Crapalanche desk pile, and I mentioned that the bloginition came from Hettie, but I didn't provide a link (was writing the post in a hurry.) I did want to give all the credit for that amazingly apt description to Miss Hettie of Hettiecraft, so am providing a link to her delightful blog. She also shares good stories and funny jokes, along with her amazing crafting projects...so do pop over to say Hi to Hettie, and at least let her know you appreciate her witty description of our 'piles of schtuff'.

Ok...the only card I got finished for Easter & I'll bet you know who it was for (a hint: I finished it about 1am this morning.) Smack me for being so lazy of late. (Nope, doubt that will help the problem, but go ahead anyway!)


- think the image was a Whippersnapper one (it's been colored so long I forget! & yes the stamp is probably still in the 'other pile' waiting to be stored - somewhere!)  His eyes, the egg, the brush and his bow tie have glossy accents. When that was put on the eyes, his little eyeballs - which had been enhanced with a black marker - began to smear. Hence the wobble eyes, which the recipient liked best of all. This image was purchased exactly for this Sweet Person and yes, he did realize that.
 
- S/B die cut using a created background, done on watercolor paper, so used the metal plate for intricate die cutting and with a couple of passes, it worked great. The paper was a smooshed project, using various materials, one of which was some Inca gold.. you can see little spots of the gold in the frame. 
 
- S/B Fleur de Lis border die (thought it looked ok with the square die's shape) cut from the same w/c paper.
 
- Since the inside has a snippet oval with the sentiment stamped upon it, and since the image had the Easter Ribbit, decided to skip any sentiment on the front!
 
I am so happy all of you liked the new Spring look, and now I'm off to do some afternoon visiting, before we get presentable to go out for an Easter dinner with relatives. I hope that you are able to enjoy the day with your loved ones as well.
 
Oh yes, I'll snap a pic of the rehung swing & share soon. It looks the same as it did before, just a bit more 'weathered', even though it was placed under a tarp for the winter, and placed alongside the wall at the front of the house. Of course right now, we have yellow pollen everywhere, so if you sit outside, you best wipe off the surface first.
 
Big hugs, & thanks for visiting this afternoon.


3/25/2016

March 2016 Rudolph Day

Hello - hope that your Good Friday was as pleasant as ours was. We spent some time with my 2 older brothers, had lunch with one of them, and when we got back home in the afternoon, managed to accomplish a few house chores. All in all, a productive & happy day. Also spent some time remembering why we Christians observe the Holiness of this day, and what it leads up to.

Did you notice the fresh Spring look on the blog? The delightful banner? My friend Loll was so kind to do a 'new look' for me, and I'm beyond thrilled! We both hope you'll like it...Loll is amazingly talented at whatever she puts her hand to. (and if you don't visit her blog, you're missing something really special too). Thanks so much Loll, for all your creative skills to make my Spring blog so pretty!!! (also a different watermark, and a cute signature - with - of course, my cardinal!)

Since I missed last month's Rudy Day, I wanted to be certain to get a card finished this month. The last few evenings, I've spent collecting bits & pieces off the desk Crapalanche pile (thanks Hettie for that terminology...it's really so apt!), and trying various bits this way, that way, to see if a card would 'appear'. Over the next few days, I'll try to schedule some posts. At the bottom of _this_ post, I'll share some pictures of the greening up & blooming that is going on around our house. Mr. rehung the porch swing last week too, so it's quite nice on some mornings to sit out & have coffee again.

Rudolph Day Challenge opens on the 25th of each month and is open until the end of the month. The only requirement to jump right in, is to make a Christmas themed card. There's nice prizes available, and lots of wonderful cards submitted. So I hope you'll add another card to your Christmas stash, and come over to play in the Rudy Day Challenge.


- One of the easiest cards I've ever done...and everything is a SNIPPET! The border around the red center, came from a recycled Christmas card. Had loved these berry branches, so of course, it was in the pile "to do something with". (3 months ago, right?). Trimmed to fit a top fold card base.

- red center is the cut out from one of the design papers on this card. Again, in the pile.

- Elizabeth Craft die sentiment, from a snippet of white Xpress Paper (um, yeah, -- in the pile). Got smart & used the metal cutting plate for intricate dies, a couple passes, and this cut very nicely. A few little slubs on the cut edges, probably due to the Xpress paper's composition, but these were easy to smooth off.

- Versamark applied over the die cut, then heat embossed with WOW Gold Pearl Regular. This was my first use of the EP, as Queen's Gold is my favorite gold. Decided to give this a try, after purchasing it in Whimsodoodle, St. Pete, Florida at Christmas. Liked the look of molten gold, but it did not adhere well in a couple places (Operator Error...non-even Versamark coverage). Reapplied Versamark (yuck, got the EP grains in the pad, so it needs to be cleaned!) - sprinkled on some more EP, and I was so pleased with the look of 2 coats. It really has the look of a piece of metal applied to the front of the card. So now I have another gold EP that I'm liking.

Now, I'm off to link up with March Rudolph Days, and since I've been so MIA over at the Snippets Playground, and it's still open, I think I will just hop along over there where it's Week 221, and see if Mr. Parsnip will let me in the gate. It's been so long, he may not recognize me! I expect there's lots of Easter themed cards, but I'm gonna try to sneak in with a Christmas card! Won't ya'll join me?

Do check out the Cards by Friends tab to enjoy some lovely Easter cards we've received from some lovely bloggers. Head hanging in shame: I've not finished the first Easter card. :-(

Thanks for popping in...and my prayers for a lovely Easter weekend. Hugs. Hope you enjoy the spring bustin' out all over around our neighborhood.


Redbud tree in our backyard

White blossom tree in neighbor's yard (behind us)


Flowering Cherry Tree in side yard


Iris in a tub, back deck. This plant came from a very old species that grew wild at my Aunt's house. We're guessing the 'main root bulbs are nearly a 100 yrs old.


Tulips from bulbs planted by Me, about 12 falls ago. Surprised they still come up!

Close up - very pretty colors


Few daffodils from bulbs planted about 8 yrs ago. Not very many of these come up any more.


Greening trees in our neighbor's yard. We enjoy seeing these trees from our front porch swing

3/20/2016

Happy Birthday Kim!

Hi ya! Over at the HLS Blog, one of our sweetest DT members is having a Big Milestone Birthday! So there's a party going on over at Kylie is addicted to Stamps to help Kim celebrate.


Kim always shares some super brightly colored, brilliantly designed, CAS cards. So I thought I'd try to do my version of CAS, with a little bright. I hope Kim likes it!


- Side fold, white card, trimmed off the right edge of the card front. Using Distress Inks in Blue Spruce and Blueprint Sketch, sponged layers onto the white cut-off piece. After getting the depth of color desired, brushed Perfect Pearls over top of the ink, then burnished well. This created a pretty sheen. Added a scant white mat behind this blue piece.

- Zig Clean Color brush markers were scribbled on a piece of watercolor paper, spritzed and let dry.
Stamp TV had a recent video with Embossing over watercolor, which I had tried. Some of my efforts were not the greatest, as I didn't leave enough white space. A recent PTI scribble flower die worked great over this background and the bright colors show nicely against the white & blue of this card. Also used a sentiment die to cut from the same background. Debated on some pearls or sequins, decided to leave things alone.

Oh yes, a bit of Washi tape as a border. CAS is NOT easy for me!  So do please help us wish Kim a big, big Happy Birthday. You'll find the linky tool at Kylie is Addicted to Stamps, and the birthday bash is open from March 20 for 2 wks. See ya there!!!

3/19/2016

Christmas Card Club Challenge - Design Papers

Good evening. I'm a bit early with my card for the Christmas Card Club Challenge, which was selected by Granmargaret of Granmagarets Cards-n-Stuff. Margaret's challenge choice was to use 2 design papers.

Recently saw a Catherine Pooler Patterned Paper Framed Die Cut Card video, and decided to try the technique for this particular challenge. My CASE is not exactly like Catherine's, but I liked the result. Hope you will too. (and check out the video when you have time).


All the papers came from 2 different 6x6 Christmas packs. Use the gray background as a neutral so that the colored strips would show better.
 
- Rectangle dies from Mama Elephant for the narrow strips, then added a different MFT stitched rectangle to make the larger strips. The hardest part of this: was trying to keep attractive spacing between the strips and keeping the 'points' sort of even.
 
- Die-Versions sentiment die from a white snippet, covered with Versamark, and heat embossed with Ranger's Silver Pearl. After gluing this on the card front, used some Stickles Diamonds to dot some sparkle around the letters. Also added some Diamond Stickles to the centers of the tiny snowflakes on the gray background. IRL it does add some sparkle. This was a cute technique to try, and there's plenty of strips & 'inner snippets from the rectangle cutting' to use on other cards.
 
Please do check out the other club members' interpretation of this challenge. Their blog links are on the right hand of the side bar.
 
A new St Paddy's card was added to the Cards by Friends, so hope you'll have time to enjoy some of the pretty cards we've been so blessed to receive from some lovely cardmakers.
 
Still behind on crafting, blogging, and commenting, but hopefully tomorrow I can do some visits! God Bless and thanks for visiting this evening. Hugs

3/17/2016

St. Patrick's Day Frog

Top O' the Morning!
 
And a Happy St. Patrick's Day it 'tis to ya! Life has been busy at our house of late, just can't seem to get with it on card making and blogging. The 4th Blogaversary came & went, but there IS some blog candy ready, just didn't have time to photo and write a post about it!
 
We got the damaged car back & it seems to have been repaired ok. Today will be my first drive when I go for a much-needed hair trim. DH has driven it, says it seems ok to him.
 
Had made a few St. Pat's cards, but didn't get a single one in the mail in time. So guess that means I'm ahead of the game for next year. But I did manage to finish up one that had been started with Mr. in mind. He likes frogs.


- Whipper Snapper image (I think!) colored with copics, a bit of WoS and some Glossy Accents on the eyes, water splashes & Lucky. Of course photo doesn't show it.  S/B Deckled oval to die cut Mr. Frog.
 
- VOS (very old stuff) design papers and a Sue Wilson die to cut the snippet sentiment. A few tiny green sequins and that's all the luck this little froggie has about him. DH liked him.
 
Please check in on the Cards By Friends tab as there are some cute new cards we've received. Enjoy them with us!
 
Thanks for checking in - hopefully one of these spring days, life will get back to where I will be finishing up some cards and posting. For the moment, Mr. MoJo is on walkabout and Life is busy anyway. Big hugs. 


3/09/2016

Altenew Botanicals and Watercoloring

Good Morning...Happy Wednesday. We're supposed to have a 76F temperature day, but our sunshine is in & out.

Two of my good blog friends have started a new challenge here (Bonnie & Loll) and Our Darnell has NBUS Challenge #6 going on. So I've tried to find time each day to make 'something' that would fit in these challenges;  each day something would come up to delay my good intentions.

This is one of those cards that _should_ have been so easy. Tried several different times working with watercolors and this pretty Altenew Botanical image - each one was a bust. Finally got one I could go with, so here it is:


- Altenew Botanical Clear flower was embossed with Ranger's Gold on Bristol Smooth paper (it's quite like watercolor paper, except a smooth surface). First effort, created the water colored background & stamped, embossed. Decided the flower blossom should not have the background colors. Restamped the flower first; masked it with the Molotow masking pen, which I'd used before with good results. Did a background watercolor wash with Kuretake Gansai Tambi  watercolors which I'd had for about 6 months**, unopened. Results were good, but when I removed the masking, the flower blossom was mottled with the blue ink of the masking fluid. The mask rolled up fine, but it appeared that the fluid had absorbed into the paper. This pen came from another source than did the first pen I had used & had been used on Copic Xpress paper.
 
Anyway, this 3rd effort worked better - stamping and embossing, no masking, just creating the water color washed background.... and at the last minute, decided to use Zig Brush markers to color the flower Lilac.
 
- Die cut with a Lawn Fawn Stitched Rectangle Frames. This is one of those times I didn't look at the die as closely as should have, and discovered it cuts out an inner layer with a stitched frame. Worked great for what I wanted, but something to remember. (I probably won't!). Used the outer stitched frame, and then popped up the inner portion on white fun foam.
 
- Elizabeth Craft dragon fly cut from 2 different snippets of previously created backgrounds, using sprays, brushos or something of the sort.
 
- The motif was layered on a white rectangle- which is just a bit creamier shade than was the card base. I liked the slight contrast. Layered onto a top fold plain white card base. As I looked at the plainness (let's call it CAS, shall we?) I thought about doodling a frame around the base card using a lilac marker. Folks, I was just too afraid that I'd mess  it all up! Like I said, this is one of those cards that really should have been an easy, no brainer. Didn't happen that way!
 
**Lesson learned from not opening packages, instead just tucking away to look at later. When I opened the Gansai Tambi box, several of the pans were broken. I'm guessing this happened in shipping, as I know I didn't drop the box. Set was ordered from Amazon when after seeing the product on some Youtubes. Since it's been a while ago, I can't contact Amazon to complain about the broken blocks of color. They will still work ok, but it's something to remember. Check out your packages when they arrive....don't just stack on Mount NBUS as I've done.  
 
 I'd like to enter this CAS card, with the mixed media techniques:  Stamping, Heat embossing, water coloring, & die cutting over at the CAS Mix Up Card Challenge. This challenge is open for 15 more days, and already has lots of fabulous entries.


Also would like to submit to the NBUS #6 which closes in one more day!


Both these are fun challenges hosted by some fantastically talented cardmaking bloggers, so I hope you'll find time to join in the fun!
 
Thanks for popping in. Hugs

3/06/2016

Christmas Card Club - A Card for Someone Special

Good Morning, and my apologies for being MIA for a while. We were away, then when we returned, still had a house guest. Once our BF headed back home, we were busy with car insurance & repair aggravations. However, I think that is in hand (we don't know yet how successful that will be - but at least it's in progress).  We had fantastically beautiful weather in Florida, and basically I read, relaxed, and enjoyed the family & sunshine. First trip we've taken in recent memory that I took no craft supplies...just my kindle.

As I'm doing this post, it is lovely sunshine outside, about 63F degrees, and shaping up to be a splendid day. Several sweet readers have asked what the card sets on in the photos: It's a Yankee Candle topper. I got the idea from some clever UK folks who were using them when I first started this blog. Although I had a couple of other style YCandle toppers, mine were nothing like what I was seeing the UK folks use. So the hunt was on. There's a picture at the end of this post showing exactly what the one I've used of late - looks like. I watch the sales, folks, and try to find seasonal looks. Sometimes it's not always shaped to have the card set in the opening as straight as it should, which of course, I never see until I look at the photo! Thank goodness for Photo Shop and the rotation feature!

One last comment before the Christmas Card Club part of this post: This blog started on March 12, 2012...so a Fourth Blogaversary is coming up. I've been saving up some goodies - I had hoped that the Blogaversary and 350 followers might just happen close together. Since I've lost some followers, that ain't gonna happen, BUT...the 4 year mark will. So Watch This Space...I hope to find new homes for some surprises to You, my wonderful followers!

{Ahem}: Now for the Christmas Card Club stuff:

Today our challenge was chosen by Our 
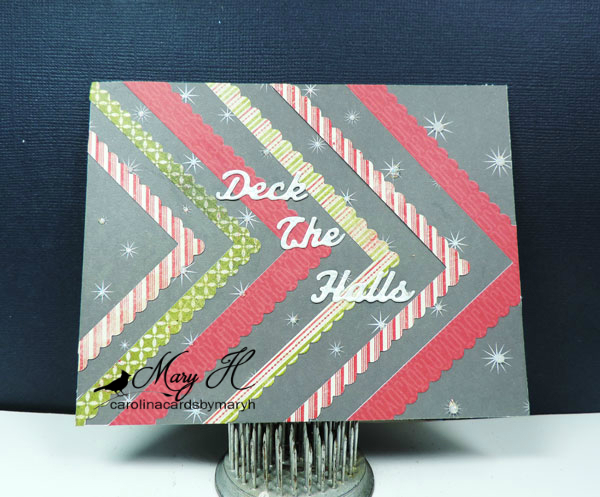
Zoe and Zoe chose the challenge Someone Special. At first I thought this was to be for Mother's Day, which I believe comes in the UK before ours does in the States. So after some thought, I decided to do something with the Most Special Mother of all time: Madonna. I've always particularly loved images & pictures of Madonna and Child, and have some old, very wonderful purchased Christmas Cards with beautiful images on them.

So here's my card in honor of Someone Special:


- image is an old wooden Inkadinkadoo, stamped with Versafine Majestic Blue. Had decided to do no coloring, let this very finely detailed image just be very simply done. First thought of sepia tones, then decided I'd go with the darker blues.  I was quite pleased that it stamped out as finely as it did. The only coloring is some Clear WoS for sparkle on the Mother's veil and the Baby's wrappings. Doesn't show in the photo, but is quite pretty IRL.

- Paper Trey Ink Scroll  Cover Plate for the embossing. Before embossing, used a S/B Large Petite Oval die to cut the center shape larger than the cover plate's opening. My first attempt was to use the plate as a die to cut a frame. However, once the center was enlarged, the frame didn't look right. Then decided to just cut the opening, and then emboss the frame into the design, and this looked much better. The plate's aperture didn't reveal enough of the image.

- used the small & large S/B ovals to cut a textured silver frame to place just inside the navy blue frame; this was a last minute idea.

- Elizabeth Craft sentiment die to cut the sentiment, using 2 layers of snippets white c/s. A pentel Slicci silver pen colored the white c/s, then placed a silver layer cut from the same piece as the framing silver (also a snippet). The 3 layers created good dimension but still let the image remain the focus. The thought process in making this card was geared to Mothers. Didn't want to do a Merry Christmas, but I think Mothers all over the world, would feel Peace is a greatly desired quality to have - and not just at Christmas. I'm certain this particular Mother would have felt so.

Please pop over to my fellow Christmas Card Club members to see what they have shared for this challenge. Their blogs are listed on the right sidebar.

And many thanks to so many of you who emailed to ask about us, while I was missing. You've no idea what a lift that gave to my day, and was so appreciated. My many wonderful friends have been the biggest bonus of this Blogging Adventure! So lots of hugs & have a wonderful day.

Yankee Candle Topper used as easel for photos. This one is a Snowflake pattern.


3/04/2016

HLS Christmas Challenge - March - Shaped Card

Welcome. It's time for Happy Little Stampers March Christmas Challenge, and this month our theme is a Shaped Card.

 Our Challenge is sponsored by Happy Little Stampers.


It's been a while since I did a shaped card, so here goes: (and this is my 2nd card. My first one had some wrinkles in it - and a totally different concept. )

- Pine branches are from a Simon Says Holly Berries clear set. I was inspired by an Ornamental Pine Embossed card done by Dawn. I had been wanting to try this technique, and this seemed like a good time to do so. Used Versamark as Dawn shows, and added the same SU Dazzling Diamonds EP and it really does glitter nicely.
The Lawn Fawn Winter Owl was waiting to be stored away, and thought he'd look good with the pine branches. Used Memento Northern Pine & Olive Grove, sometimes stamping off for the shadows. Add a few pine cones from the Holly Berries set using Espresso Truffle. Stamped some extras for around the sentiment. Added some more shading to these after fussy cutting.
Die cut with a S/B Classic Circle large, sponged SU Espresso around the edges. Came back with Memento Espresso Truffle, and DI Scattered Straw to have a bit of golden look at the edge.
- Owl stamped on watercolor paper with Versamark, heat embossed with Ranger Fine Detail gold. Used Zig watercolor markers to color. (a little hesitant with this, since my w/c skills are rubbish at times. This guy turned out ok, I think. Fussy cut him, not sure if there's a die available on this small set. He's popped up with dimensional foam.
Die cut the card shape using a S/B Grand Circle. Edged the top of this with Versamark, then heat embossed with Ranger Queen's Gold.
HLS Mixed Christmas Sentiments was embossed with Ranger Fine Detail Gold, die cut with a S/B fancy tag, the ends of which have been covered by the embellies. Pine cones from the Holly Berries set, and tiny twigs from an Impression Obsession die set.. these were cut from a green dp, but then colored them with Copics in dark green shades.
Hope you will join in with this fun challenge, and get a head start on your Christmas card stash for 2016!

PLEASE REMEMBER YOU DO NOT HAVE TO USE HLS STAMPS TO ENTER OUR CHALLENGES

Thanks for joining me today. Big hugs.