Followers

4/29/2016

Old Water Colored Barn

Hello, thanks for buzzing in for another scheduled post. We have some house repairs that are being examined, people coming to look at the problem, give advice as to best way to fix, so I'm trying to get a few posts ahead. Basically what we are looking at is a major bathroom redo in our master shower, which originated with what we thought was just a pipe leak. Turns out the shower pan has cracked, has to come out, a new one made to fit the space. To complicate matters,  the walls of the shower surround rest on the lip of the pan, and in addition one wall of that shower is glass block...so major tear out & repair. AND there's 2 shower pans...one where you step into the shower proper, then you step out from the shower area, back into that space to dry off. Both pans have to come out. Also will tear up the flooring when the shower walls come out. We know that the glass blocks will be replaced with a solid glass wall, but we are undecided as to whether to go back to the cultured marble walls (easy to clean, not lots of grout lines to clean such as ceramic tile). Some of the experts are suggesting we should go with tile, as it's the 'in thing' just now. I happen to like the marble, and from what the contractor is telling us, there won't be a substantial savings incentive for us to go with the tile. Additionally our vanity surface matches the marble shower walls, so changing the material would involve changing the vanity top as well. We are not very happy campers about this problem!


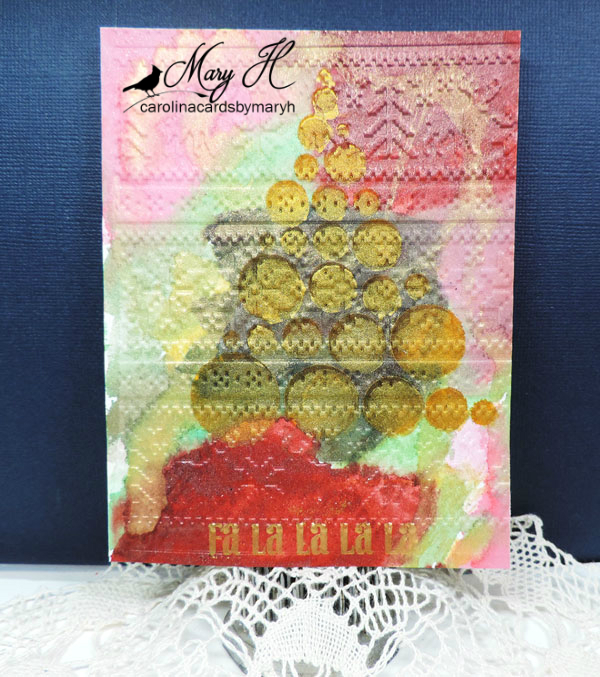
This is a very old effort using an Art Impressions set from many years ago, when I was first trying to learn how to water color. Found this piece buried in a storage box of 'schtuff', trimmed it with a die...decided to try to use it. Used a Lawn Fawn Stitched Frame Rectangle
die to cut the red frame (white snippet just the size I needed, colored it with copic markers - mounted on dimensional foam.
 
- Memory Box tree die cut from a gold brown c/stock, then another layer cut from kraft, and a 3rd layer from a snippet of green. Adhered the layers slightly offset, then glued to the frame.
 
- Elizabeth Craft Hello die cut from 2 layers of water color card stock snippet, colored with copics.
 
- created the 'wood plank background' by scoring lines at 1/2" intervals with my Scor-Buddy, then used Memento Desert Sand, Espresso, Bamboo Shoots and London Fog to just drag the ink pad down the scored piece until I got a shade that resembled old barn wood. I rather like this. Water coloring is ok, seems to be a bit better than what I've been accomplishing of late! I'd forgotten doing this one and a couple more that turned up.
 
Here's a picture of Mama's Rose Bush which I took on 4-24, her 105th birthday. This old bush came from where my Mom was born, and I'm sure it was a native plant, not something that her farmer ancestors planted. Mom said it was always there in her memory, so pretty old. It grew by the corner of the separate kitchen building, which was not connected to the main house, due to fire danger. Long ago my SIL took a cutting, transported that to Florida. She was able to get it to grow, but it would never bloom. When they moved to the Georgia mountains, she asked if she could plant it here, as they were thinking of eventually coming to where we live in South Carolina. The 3rd year it was planted here, we went out one morning, and it was full of blooms. They really smell heady, like an old fashioned rose, so Mr. has been bringing some in the house. Don't last long once they have been cut...usually by next day, the edges are brown and dropping petals. I always think it is Mama saying "hello, don't forget my birthday". There would have been lots more blooms, but it was quite 'leggy' in early March, so I snipped off some long branches...I wrote about this bush in a post some years ago.


Ya'll have a great day, the weekend is upon us. So hope there's nice weather in your part of  the world. Been sunny & quite hot where we live. Blessings.


4/28/2016

Green & Gold - Happy

Good afternoon, and welcome. Today's card is a scheduled post, with a card made from some bits that were in the Pile. The piece was done on watercolor weight paper, probably using sprays and micas. Found it, decided to try the Viva Décor Gold modeling paste through a Tim Holtz Flourish stencil. After looking at it for a while, decided to try to finish off something to use it.

- a die from a very old S/B set cut the corners, can't decide if some gold pearls should be placed on each corner, or just leave as it is.

- purchased prefolded chartreuse card from The Paper Cut at a craft show (on a great sale due to the color I'm sure...). Stamped with an Impression Obsession Cover a Card  Thin Stripes CC001 which had versamark applied. Then used WOW Gold Pearl to eat emboss and was quite pleased with the results. Dressed up the plain card but very subtle so as to not compete with the gold flourishes of the embossing paste design. Only used one coat of EP for this effort.

- Memory Box Painted Happy die cut 4 layers of watercolor weight white (snippets) - colored each layer with a Gold WoStella pen. Then used versamark on the top layer, heat embossed with the WOW Gold Pearl, 2 coats. One coat does not give the coverage that I prefer...after applying the first coat, it's dipped back on the versamark pad, more EP applied, and reheated. The 2nd coat gives this effect that looks like gold metal, which I think is quite pretty. Photo does not show this well.

No other sentiment on the front, but I think this will have an anniversary verse on the inside, as our DD has one coming up in May. Came together fast (for me!) once I thought of how to use the snippets. Little by little, some of the stuff in the pile is getting  put on cards.

Thanks for popping in to visit, and hopefully there will be a few more scheduled posts this week. In the meantime, Big Cyber Hugs to all!

4/27/2016

Christmas Birds for Rudolph Day

Good Morning, and it's time again for the April 2016 Rudolph Day Challenge (which starts on the 25th of each month and is open until the last day of each month). Since I missed joining in the fun last month, I wanted to be sure to playl along in April. Actually the card today was meant to be in last month's challenge...had the image colored, but just never got round to making a card with it. So here 'tis:


_ Whipper Snapper image, colored with copics, and it was really fun to color this trio of cuties. Some WoS for a little sparkle. Added some Sparkle n Sprinkle white flocking to the pom-poms on the hats, and some SnS Twinkling Clouds to make snow on the branches.

- S/B Curvy Rectangle die cut the image, and tracing around the outer edges of the same die, created the red faux mat.

- Viva Décor Mother of Pearl modeling crème applied using THoltz Layering Stencil Snowflakes and a Dreamweaver Snowflakes Stencil.

- Sticker sentiment and added some sparkling snowflake stickers as a final touch.

Now I'm off to link up at April's Rudolph Day Challenge, where there are some nifty prizes on offer, as well as some terrific inspiration to get you excited for adding one more card to your Christmas stash. Why don't you just com'on along, and have some fun!

Thanks for joining me this morning, hope your day is off to a fine start. Big hugs.


4/20/2016

Zentangle Flower

Hello & Welcome. This is a scheduled post, as I'm trying to do a few posts ahead, and then keep up with visiting & commenting. I do get behind at times though, so please forgive me if it takes me a couple days to get back to your blog to see what you've shared.

I usually work on my cards at night, while watching old British series on Netflix or Acorn - which I love. Lately been enjoying Series 6 of Vera on Acorn and found the old Masterpiece Theater Duchess of Duke Street on Amazon Prime. Loving this - as I saw it many, many years ago on Masterpiece PBS.

While I'm watching tv, I'll color or doodle. This card is from a doodle session, where I'd stamped a line art flower (don't remember the maker, possibly Hero Arts, but if you're interested, I can find it in the Stash). I'd seen someone do Zentangle in an image like this, so gave it a try. I'll share 2 versions...and explain why I changed something after I saw the first photo.


Final effort


Notice the hummingbird...Now look at the next photo, and I'll bet you can see why I changed the bird's colors.
 
First look


Liked the soft pinky colors on the bird here, thought it would work ok with the pink lattice trim, the pink in the flower. Until I saw the photo. Nope, that's not gonna go. Die cut another bird, used the colors from the butterfly, liked it much better!! What do YOU think? I've never seen a hummingbird wearing either of these colors, but maybe....somewhere?
 
- Used a Copic multiliner black pen to draw the doodles after stamping the flower. Die cut with a S/B label, traced the inner edge with a red multiliner. Not the smoothest of tracing, but - hey, it's not Hallmark! Call it whimsical! I think I try too hard - I'm not good with being 'loose'.
 
- background was a sprayed piece, that perhaps was gone over with some Distress ink and then embossed. It's been in the You-Know-Where pile for a while.
 
- MB Box tile (put away, so not recalling the name..but again, I can find it if you want to know)...cut from pink snippet. The flower had pink in it, the snippet was handy, so there you go. Looked 'beachy' with the greens & golds of the background I thought.
 
- MB butterfly and overlay. under layer was colored with Zig brushes in a red and bright yellow, blended. Rubbed some Liquid Pearl Opal over this layer with my finger, and IRL has a bit of shine that can be seen through the filigree overlay. Die cut a natural color snippet with the matching MB butterfly overlay, versamark, and WOW Pearl Gold, 2 coats. Quite pretty.
 
Tessla die hummingbird cut from the same natural snippet, colored with Zigs, Liquid Pearl opal, as I was thinking to bring in the pink of the borders. The more I looked at this, and when I saw the photo "Huh - uh, this is not good". So recut another hummer, colored to try to match the butterfly, more Pearls spread on it, just adhered over the pink fella. Liked it much better.
 
Added some dewdrops and a bead that was a RAK from my sweet Brenda at Crafting with Friends.
Brenda had sent me some of these she had made with Pony Beads. They're so pretty, and the bag is on my desk, but I usually don't think to add this kind of embellie or sequins. I'm trying to do better with that. I just never really know how to place them so they don't look peculiar!!
 
No sentiment, but this may become a birthday card to a family member, who is not too critical. I really didn't like the Zentangle in the flower at first, but the more I'm looking at it, the better I'm liking the effect {-:
 
Also, thanks to everyone for all your kind & sweet comments on the water color Christmas berries.  You all made me feel so much better about my efforts, 'cause truly, sometimes I get _real_ discouraged with trying to get better with this technique. I guess we all go there at times!
 
Thanks for popping in to visit. Great porch swing weather, if you should be able to join me for a cup of something (or a glass of something, ....whichever!!!) Big Hugs


4/19/2016

Watercolor Flowers & Stenciling

Good afternoon. In case you didn't already know this, there is a fun challenge going on over at CAS Mix Up. This month's theme is Stamping + Stenciling and your choice of some other options.


Additional options are listed on the right side bar over at CAS Mix Up.

Here's my entry:

 
Yet another effort with the water coloring. 
 
Rubbernecker Layered Poppy Set 860 (bought in Florida on our last visit). Gansai Watercolors to create a background, then  stamped the outline using Memento Nautical Teal. Used Zig brush markers over the solid stamp included with the set, spritzed with water, inked the image.
 
- Used TH Flourish Stencil to add some dimension using Gold Viva Décor paste.
 
- the sentiment (which came from 2 different clear sets, and I don't remember which!) was placed on a stamp, inked with Nautical Teal. The focal piece is mounted on white fun foam, and adhered to a white card base which had been embossed with an old Darice EF.
 
Our family has a lot of summer birthdays, so this will take care of a June one!
 
I do hope you'll have time to join in with the CAS Mix Up Card Challenge for April. There's some AWESOME inspiration posted.

A lovely sunny warm day here in my area. Hope it's nice where you may be this afternoon too. Thanks for coming by to visit. Hugs & Blessings.

4/17/2016

Christmas Card Club - Berries

Good afternoon on a sunny & warm Sunday. Today's post is for our Christmas Card Club where our Mrs. A had chosen a theme of Berries. Before I get to that, however, I'd like to announce that the blog candy winner, Jenny L. of Cardsarus has contacted me, and her new Schtuff will soon be on the way over the pond to her! Thanks everyone for all your sweet comments & joining in. Wish I could have selected Everyone!

One other caveat and I need to go edit the Woodie post to add this, but I'll say it here as well:
The soda can metal can have sharp edges. It's fun to work with, easy to cut off the top & bottom of the can. (Mr. makes a poke hole into the metal with a utility knife, then cuts off the top & bottom. I cut the metal to size using the Tim Holtz scissors, but any scissors should cut the metal. It's very thin. However would not use the good sewing scissors to do this). You can use dies with this metal too. I'll be happy to answer any questions you might have, but there's videos available showing how to do this with the alcohol inks.

As I've stated here before, I'm pretty rubbish with water coloring. I keep trying to get better though, and have tried with different weights & grades of water color paper (hot & cold press). Different mediums. When I saw the theme Berries, I knew there was a great Penny Black image in my stash that would work to try water coloring. (HA!) The image is berry merry Christmas.

I tried different mediums with this image, and will explain for each effort.


1st effort

- (1) inked up with DI pumice  and used Zig Brush markers & would have been ok with this effort, but for the bleeding. Tried wetting the area, blotting, still not great. Sooo....

2nd effort
 
-(2) hunted up the gelatos and inked the stamp, spritzed water, and stamped. This is the 2nd generation stamping, which I started on first, in case I messed up. Which I did! I wanted to outline around the berries with the Zig brush, and try to move that color in towards the center. You can see where I stopped cause it was going nowhere!
 
3rd effort
-(3) this was the first generation effort with the gelatos, and I liked it ok, but again, just not able to move that line of Zig brush color in smoothly as I was trying to do. I kept with it, hoping it would get better, and perhaps this might eventually be usable - for something!
 
TA-DA!
 
4th effort
(4)This time inked with the Tsukineko brush markers, spritzed and stamped. I really liked this look better than any of the others, but still wanted to try for a faint outline at the berry edge, and smooth the darker color into the berry to get some definition of the image. To my eye, this just looked like blobs if you didn't add in some separation. Colored the berries, branch & stems. Trying very hard to not have bleeding. Red is _such_ a hard color to work with  - for me anyway - was my challenge when I was learning to color with copics too. Anyway, I was feeling a bit better about my efforts on _this_ one. Let it dry very well, then came back with the Zigs to add some background color. Instead of trying to lay the color directly from the pen brush onto the image, splashed some of the 2 shades of blue intended for the background, onto an acrylic stamp block. Used the water brush to dilute & combine the colors. Starting from the edges of the berries, laid down the color, and tried to smooth out towards the edges, hoping not to cause bleeding. Slightly wet this area with the brush before beginning, but tried to keep it not so wet up close to the image to avoid bleeds.
 
 
Used S/B Label 4 to die cut the image before starting to color, and left in the die so there would be a white edge when the background was laid in. Faux mat from gold paper.
 
S/B Arched Elegance die cut twice from a snippet of red gold dots dp.  Adhered the 2 pieces together onto a red snippet in a deeper color which topped the card base.
 
- Outline sticker sentiment and some red berry stickers finished off the card. Folks, I worked hard on this one, and like I said before, the watercolor magic just is not happening for me! I keep on trying periodically though!!!
 
I do hope you'll check out what my fellow Card Club Members have shared. I'm late with this card, so apologies. The links to their blogs are on the right side bar.
 
Additionally, I'm behind with commenting, so I'll do my best to get round to everyone who has left such sweet & generous comments on the past several cards. Hugs & Blessings to all of you. Hope the coming week will be a wonderful one.


4/16/2016

Hello & Winner

Good afternoon. This card has been received, so will share it with you. A friend has been having a rather rough patch lately, and just wanted her to know she was in our thoughts. A fairly simple card.


Background was created with Gansai Kuretaki watercolors...just wet the watercolor c/stock, and splodged around some turquoise, pale green around on the wet paper, spread it with the brush. Liked the look of the gold pan, so wet that one, added a little gold around. I look at videos where one just touches the tip of the brush into the wet, and magically, the watercolor spreads around & creates beautiful magic. Well, mine doesn't seem to do that! Guess I just don't have the knack yet. Used an outline stamp with Memento Nautical Teal ink, and die cut this piece with the MBox rectangle postage die.

Had some circle cutouts from another MB rings die (yeah, the old Crapalanche again)...so placed them around the piece. Hmmm..still seemed to need 'something'. Got some sequins, applied some....looked at it for a while. Adhered this to a previously created background, which had been from a spray or mica play session. I don't always remember what I used for some of these. But liked the background color with the die cut piece.

Decided to add to a gold-tan color textured card base, added a fiber bow, stamped Hello, did an insert, and that's it! Into the mail it did go. It got better looking each time I went back to look at it.

NOW....Drum roll....Random Generator was run a couple of times. When I'd check the name by the number, for either being a current blog follower or having the candy picture on the blog, I had to keep going for a number. After a couple iterations, the number #143 yielded a valid winner. The name Jenny L corresponds to that number and Jenny's Blog is Cardsarus.  Soooo...Jenny has until April 19 (Tuesday) to contact me with her mailing info. Congratulations Jenny! I hope you will enjoy the items I'll be sending.

Thanks for looking in today. Thanks to all my new followers, my wonderful followers who frequently stop to chat...I appreciate ALL of you so very much. As I've said before, the best part of this hobby of cardmaking & blogging, has been the generous & kind folks I've met in the journey. Hugs & Blessings to ALL of you.

4/15/2016

Old Woody Birthday

Good evening, and to all my USA friends: $$HAPPY TAX DAY$$! I hope you got your tax filed on time, as there are just a few hours left to get the envelope postmarked (unless you got an extension). In our house, the day is also known as Mr's Birthday. But before we go there, please help me welcome some wonderful new friends:

 *******************
Leeanne of LEEARTS
Denise B ---- no blog
Greta G of GG Creations
Valerija of My Joy
Glennis F --- no blog
Tina Z of Treebug.org
 
**********************


 Thanks so much to all of you lovely bloggers who have joined here. I hope many of MY friends will surf over to enjoy your work, and become YOUR new friends too! Some great inspiration on these blogs (and don't forget to look for the translate button if the language is different from your own). So happy to have you joining me here, and I hope you'll like what you see when you have time to pop in for a visit.

Now for the birthday card (so he won't get the Penny Black Flower Garden card). Thought he would prefer this one:


- Sparkle n Sprinkle Woody Set 730  (linking to the digi set, this one is a cling rubber set). Stamped in Memento Peanut Brittle, colored with copics. Glossy Accents on the windows, headlights and some WoS clear and silver in places.  Die cut with a stitched oval, some DI shading around the edges while still in the die.
 
- Cuttlebug embossing folder for the center panel, which was created from the reverse side of a soda can.** Used Alcohol inks in Butterscotch, Honeycomb, Hazelnut & some gold. After this dried overnight, embossed. This EF has always reminded me of the pattern used on pickup truck tool boxes, and although I thought about using a woodgrain folder, this patterning showed up better. The metal is a bit fussy to adhere....this has tape, glue, more glue, and used tiny clothespins to clamp it down the last time more glue was added to the edges. Of course the soda metal wants to curl.
 
- Cheery Lynn Alison's Ribbons (B335) die set. This is a 2 set die, cuts some very small borders (one of which looks like a blanket stitch - which is why I bought it). Used a green c/s, then colored over that with a copic green, to get closer to the car color.
 
- Yupo paper experiment with alcohol inks was die cut with an Elizabeth Craft sentiment, and couldn't decide where to place it. So it got put on the top, where it doesn't show all that great. Mr. liked it though (at least he said he _did_!)
 
For some reason I had a lot of difficulty getting the wood paneling on this old Woody to get to quite the shade I was aiming for, but hey, we got close enough!!
 
Ya'll have a good evening. Thanks for the visit and will be doing the Random Generator here in a bit. Will have a post tomorrow with a winning name, and that winner will have until the 19th to contact me. I moderate comments, so if you leave your info, I'm the only one who will see it.
 
Big Hugs, ya'll come back when you can set a spell. (That's Southern for come again when you have time!)

**Edit:The soda can metal can have sharp edges. It's fun to work with, easy to cut off the top & bottom of the can. (Mr. makes a poke hole into the metal with a utility knife, then cuts off the top & bottom. I cut the metal to size using the Tim Holtz scissors, but any scissors should cut the metal. It's very thin. However would not use the good sewing scissors to do this). You can use dies with this metal too.  Used a thick emory board to smooth edges, but you could also use a sanding block. I'll be happy to answer any questions you might have, but there's videos available showing how to do this with the alcohol inks.

Blog Candy- Sticky Post


Blog Candy Sticky Post

 
Good evening. As promised a few weeks back, I have gathered some goodies to offer as blog candy to celebrate 4 years of this blog. Actually the Blogaversary was March 12, but I'm a bit slow in getting this post ready so here goes. This will be a sticky post that will stay at the top of the blog until April 15, when Random Generator will pick a winner from my followers. That's a rather special day at our house, so thought that would be a good time to do the give-away.

Rules are simple:(1) Be a follower,(2) post the candy picture on your own blog. (3)check after April 15 to see if you're the winner. Contact me within 3 days to provide your mailing info. You can do this in a comment (I moderate comments so only I will see your personal data). Or if you have my personal email address, you can email me.


I hope that these are some supplies that you might find useful in your Schtuff Stash. As past winners know, I may tuck in a few little surprises in addition to the items pictured. These are all NEW supplies, but may have to be removed from the original packaging, in order to ease postal shipping rates. Depends on the shipping box used & where the package is going. ((I'm thinking of the Spellbinders MBossabililty, which is a bit tall). We'll see when the time comes.

If I do this correctly, this post will remain at the top of the blog until the end of April 15, when Random Generator will find a winner from my followers. Will do my best to announce a winner on April 16, and you'll have 3 days from the 16 to contact me. If you are following me by Bloglovin only, please use the Google Friend Connect so that I see your face in the followers' list at the top of the post. All those folks and (when I can find it) the links to their blogs are entered into an Excel Spread sheet and numbered. Those are the numbers I'll use for the Random Generator to identify the winner! I don't find Bloglovin an easy way to do this.

Once again: Thanks to Miss Pixie at the Snippets Playground for the long ago sticky post instructions. Any errors are the sole responsibility of Myself! LOL - otherwise known as Operator Error.


Scroll down for a regular blog post


4/12/2016

Penny Black The Garden - Birthday

Good afternoon and this is another scheduled post. Trying to get a couple posts ahead, and keep up with the comments that I'm so blessed to receive, and get back over to _your_ blogs and gather up some wonderful inspiration.

NOTE: To answer some questions received regarding Blog candy: The  winner will be any follower that is in the Google Friend Connect at the top of the blog, in the USA or  otherwise. So to be eligible, be sure you are in that list, so that I can find you, have your name listed in my followers spreadsheet - not just following via Bloglovin. It is not necessary that the winner have a blog.  I would ask that if you should become a follower, I hope it will be that you will like to visit when you can and not just to win the goodies. Thanks!

There's a special birthday coming up at our house, and I'm trying to work on another card. BUT...if I don't get it finished, or if it's a real wart, I think this one will work. I did this effort after seeing a Julie Ebersole Hello Monday video and liking the results.


- Penny Black The Garden die cut from watercolor paper, using the Sizzix Precision Plate (couple of passes and the bits came out fairly well. This one is _very_ intricate). With the Precision Plate, I did not have to say any unkind or unpleasant words when removing the bits...oh Happy Day.

- DI paints (a NBUS..I've collected the colors of the months and never used the first paint or stain!). Used blues & Citrus Green - trying to leave some white space. This does NOT show up nicely in the photo, but looks quite pretty IRL.

- Wood grain embossed white background under the overlay (doesn't show in the photo either, and not all that great IRL, could just as easily have skipped this step).

- MBox - painted happy die - 4 layers - cut from a snippet of same cardstock which made the base of the side fold card. Added glossy accents to the piece after adhering to the card.
(Fun Birthday Sentiments - separated the clear stamps to use part of the sentiment) Birthday stamped in black on a snippet of green dp that complimented the Citrus Green, angled one edge, and called 'er done.

What do you think? Is this too frou-frou for a guy card? It may have to serve as one, if I don't get the 'fer real' one done in time! Our family has lots of birthdays coming up soon, so it will go to SOMEbody in the family :-).

Thanks for visiting today, and ya'll come back. Hugs.

4/10/2016

Flowers, Butterflies and Snippets

Good afternoon. This is a scheduled post to share a card made of more snippets from the Crapalanche. Here goes:

Everything on this card is from the Crapalanche (that's snippets, right? ) or else the Snippet box.

- Flower stamped on w/color c/s, colored with Zig Brush markers...fussy cut. Added some irResistible Pico Embellisher - Dandelion to the center of the flower.

- HLS Butterfly Birthday - stamped on W/color paper, colored with markers, added some Glossy Accents after fussy cutting, and then a bit of the Dandelion pico. The body of the butterfly didn't show up all that well after all my embellishing, so used a MBox butterfly body to die cut one from a black glitter snippet.

- Rose and green Celtic circle behind - snippets from other projects, as was the lower rectangle behind the butterfly and flower (half of the center cut left from cutting angles for this card.) This was from a Christmas pack, but on this card, it doesn't look at all like Christmas paper.

- stitched background was from another project, using some green dp and smooshing it through some leftover ink from spraying, inking & debris left on the craft mat. Unfortunately, the layout covered up a good bit of this...just a bit peeks out.

- Black snippet cut the mat, and the white card base front was covered with a mop-up piece created when a sprayed piece was getting too wet & runny. I try to remember to have extra pieces of cut-to-size card stock handy. If I get too much ink on a sprayed piece, it's a good way to use up the extra ink, also blot the original piece. A Two-Fer I guess it's called, and the 2nd piece is always much more muted than the original.

- Elizabeth Craft die - 2 layers of snippet w/c, colored with copics, think it had a coat of black WoS.

Hope you like it! Thanks for joining me, and I'm trying really hard to keep up with the lovely visitors' comments. I'm not always certain that Blogger publishes my comment, but I do try to visit! Hugs

4/09/2016

Easter Hedgie

Hiya...just posted a Blog Candy Post as a sticky note, and hope I got that done correctly. It should stay at the top of the blog until the draw the winner date.

Now back again to share a belated Easter card, which finally got finished - too late for 2016, but will be ready for 2017! Here goes:


- Penny Black image, colored with copics (long before Easter got here...just slow to make a card with this cutie).
 
- MBox Postage Stamp Square die, edged with DI Picked Raspberry.
 
- Black Glitter snippet cut with the classic S/B square that fit the Postage die for a mat.
 
- Paper Cuts premade bib card was covered with a created background that had been embossed. (hard to see the embossing in the photo, but it's there!). This premade card has a circle cutout on the front, and normally there is an overlay that goes with this card, which has the cutout in it. Since I chose to use my created background, I used a S/B class circle die that 'sort of' fit into the opening, die cut the created background to appropriate shape.
 
- SU Circle Punch to create the sentiment, sponged with DI Victorian Rose, stamped a greeting, and Voila, just need to add a verse to the inside, and it's ready to go next Easter. You probably already know, Hedgie is probably my favorite Penny Black critter, and when I saw this one with his bunny ears, just couldn't resist him. I'm weak minded like that!
 
Thanks for joining this evening, hope you had a grand Saturday. I did House Work (UGH!). Sunday should be a Free Day....{smiling}. Ya'll have a good evenin'. Hugs
 
 
- 

4/07/2016

Watercolored Flowers and Hugs

 
Good evening and welcome. Also a warm welcome to a new follower, Sid of Harpies Crafty Corner.  Thanks so much for joining as a new follower;  it's exciting to have new followers after losing some with the Blogger antics a while back. Please take time to pop over to say Hi to Sid. You might him know I sent you to visit, and enjoy a beautiful blog in the process. It's lovely to have some fellas blogging with us, isn't it?

 
This card is another 'bits & pieces' card. The ?Rubbernecker? image was colored with Zig Brush markers and spritzed with water, stamped. Used the marker to add some highlights, cut out with a S/B circle, and into the Crapalanche it did go - for a while.


- S/B die cut out the mat, from a previously sprayed piece, and it's been so long, I'm not sure what products were used to make the background. Probably some Dylusions and Tattered Angels sprays as it has some glimmer which doesn't show in the photo.

- PTI Sentiment die cut & layered to create some dimension, colored with copics, with WoS clear as a topcoat to add a little shine.

Last minute addition of some sequins that matched the background color, and the card base is a light turquoise that has been in the paper stash for a long time!!!

Little by little, some snippets are turning into cards for the stash. Just need to add an inside verse, and this one would work for many occasions.

Thanks for stopping by to visit this evening. We had some loud whistling wind today, and it was cool as well. Did some house chores, caught up some visiting, and tomorrow will be out running some errands. Hope you will have a wonderful Friday too. Hugs.

4/04/2016

HLS Christmas Challenge - April - Die Cuts

Welcome to the HLS Christmas Challenge. The challenge for the month of April  is to use some die cuts on your card.


Our challenge is sponsored by Happy Little Stampers where the prizes will be:

 $30 gift certificate to the winner
$10 gift certificate to each of our Favorites


Since I'm a die junkie the hardest part of this challenge was deciding which dies to use - LOL. Recently had made this card using frame die cuts, so had snippets left from that project. Rewatched Catherine Poolers' youtube, decided to combine the snippets with poinsettias, and Voila. Lots of die shapes.


- added remaining halves of the double frame die cuts which were from different 6x6 paper packs; overlapped the frames, instead of leaving spaces as on the previous card. This was a much easier effort than the spacing. Arranged in a pattern so that there would be space at the top folding card to add a cluster of poinsettias & leave space for a sentiment.
 
-Memory Box Blooming Poinsettia (861) and Small Blooming Poinsettia (902), die cut several times from white snippets...colored with copics, shaped with the McGill stylus - formed into flowers. Added some tiny beads in the center of one flower.
 
- Used HLS Mixed Christmas Sentiments with a new product: Nuvo Glue Pen and some Heidi Swap Minc Gold Foil.  The Nuvo glue is water soluble, so after cutting the transparent sentiment apart to make it fit the area, covered it with the glue. Used the Mini Misti, stamped twice - 'reinking' on the 2nd time. Used fingers to burnish the foil over the sticky glue, placed the card between some folded printer paper to make a carrier, and ran through the Big Shot. (here's a video showing the process).
Works great with no laminator or Minc.
 
I really like the look, but learned 2 things: (1) Do the foiling prior to applying anything with dimension that you don't want to get crushed - (2)a chunkier, bolder stamp image would show off better. This is a lovely Calligraphy stamp, but since the letters are slender, you don't really get the beautiful effect of the foiling as much. Still very pretty, and is giving me lots of ideas for using some of the other bolder font HLS Sentiment sets I have.
 
Hope you will join in with this fun challenge, get a head start on building a Christmas card stash for 2016 & perhaps win a fab prize too!

PLEASE REMEMBER YOU DO NOT HAVE TO USE HLS STAMPS TO ENTER OUR CHALLENGES

Thanks for joining me today. Big hugs. 


4/03/2016

Christmas Card Club - Stencils

It's that time again when a group of card makers share Christmas Cards with a theme that one of the members has chosen. For Challenge 7 this week, Carol of CM Design selected  stencil or embossing folder. MoJo has been very scarce lately, but I decided to play with some Lindy's Magicals mica powder and Brusho-s and see what I could manage. Got some interesting backgrounds, tried using stencils with glass gel bead paste, that had been colored with a gold acrylic paint and some of the Colorburst Metallic gold. Word of advice: Mix up more colored paste than you think you will need!

Here goes with 3 cards and I'll tell you what's wrong with each of them. These would have worked great in Darnell's April Fool Boo-Boo contest! (Hang in there, as I did finally get a card done that wasn't quite so wonky looking as the first 3! LOL)


The red & green magicals & red & green brusho crystals were dropped into wells on a plastic palette, used a dropper to add water. The magicals were quite thick* (stirred these with a plastic toothpick to mix the colors). This was the 2nd background. The gold is from dropping the Colorburst Metallic gold onto the w/c paper after dabbing the magical & brusho colors around with a brush. Used the toothpick to drag the metallic gold around, as it comes out in a droplet. *this was the 2nd background, added more water droplets to the magicals to get a lighter color on this effort.
 
- Artplorations Tree Stencil used and spread some glass gel bead paste that had been colored with gold acrylic and Colorburst Metallic Yellow. Only used part of the stencil, and probably would have looked better to use the entire stencil, but wanted to leave a space for the greeting. Also should have had the stencil higher towards the top of the piece.
 
- TH Alteration EF (Nordic Reindeer) to emboss, looked straight when inserted into the folder but the finished result does look crooked. Gah!
 
- HLS Mixed Christmas Sentiment was 'inked' with the Nuvo glue pen and foiled. This did not work as nicely as expected, perhaps because of the folder embossing. Debating on scraping this foil off, restamping with versamark and using heat embossing powder. Deciding if the  tree is going to be covered as well!
 
#2 effort:
 
 This was the first background done, & the colors were a bit dark, but after drying, kept on trying to create something.
 
- Used the same Artplorations stencil, but instead of paste, used DI Fossilized Amber to sponge, and used the entire stencil shape. This DI looked much too dark, so went back over it with Brilliance Galaxy Gold, and it does look more 'gold' IRL. Had the stencil positioned ok, top to bottom, but not side-to-side {sigh}.
 
- Same TH embossing folder and then foiled. (the 2 pieces'  folder embossing and foiling were done at the same time) Even though the folder looked perfectly straight when the background was placed inside it...I was very careful doing this after seeing the crooked look in #1 card...it still looks a bit wonky.  This foiling turned out a bit better than the first attempt though.
 
#3--
 
- same supplies as used for the previous backgrounds, but this was a glossy c/stock which just mopped up what color was on the craft mat from the first 2 efforts. Actually it looks pretty good on the background, so will be experimenting with glossy c/s again. Used the other tree on the Artplorations stencil, mixed up some more glass gel bead paste, colored again, and spread this through the stencil. Not a great look. Ditto with the foiling. The foiling can be scraped off I've learned, and could always add a die cut sentiment over this. Not sure about the tree though.
 
These 3 warts need some major rework or else tossed. If time allows, will try again for a better Christmas Club effort. I shared these because quite often I get discouraged with my own efforts. It lifts my spirits when I see expert cardmakers that I admire, make boo-boo-s & share. I know that others go through the same process but when it seems everything you touch, falls to dust, and MoJo is gone walk-about, well.... That's why I share the warts! I hope my mistakes will help someone else when they are trying new techniques. Sometimes it works for you, sometimes it doesn't. But, oh my, when it's THREE in a row, and it's still not working...that's very discouraging!!! Will be interested in hearing your thoughts on fixes (or say: Toss 'Em!) - or how your experiments can turn out, and how you saved.
 
AHA! Finally......

Some time back my friend Hazel (My Card Attic) had done a sponged ornament (sorry I can't find the specific post) as she was practicing her sponging. Monkey see, Monkey try to do, so I had made this ornament. Used a circle die to shape the sponging area.Then a Tim Holtz poinsettia stencil & glass gel bead paste to add a poinsettia (yeah, this was in the Crapalanche). After thinking all day on Saturday, I hunted this ornament up to make a card. (Figured at least the main image done so that it was presentable, yeah?) This was just sponged on a piece of white c/s, with the raised paste area on it, didn't want to run through the Big Shot; hand cut it, added some Christmas Twine for the hanger.

Used a PB Stellar coverplate die to cute some pink 'non-Christmas' paper. Also had a Falling Snow dots embossed card front in the C pile, so inspiration for a card. Die cut adhered onto dotted card front, added to a side fold card. The ornament is popped up and used Wplus9 stamp set (the font is a heavier font than what I used on the other cards)...foiled with the Nuvo glue, and called it done!! Pretty fast compared to the agony of the 3 warts shared above. Apologies for the long post..I just felt blabby.

Before I go, let me give a big welcome shout out to a new follower. How wonderful to gain a new friend, rather than losing one as has happened of late. Hope you can take some time to hop over to say Hello to Bonnie of This Creative DayBonnie, thanks so much for becoming a follower and I hope you'll enjoy visiting.
 
Do please take time to visit my fellow team members (blog links in the right sidebar). I am certain they will be showing some amazing cards....And thanks for sharing in my card making adventures! As DH says "Some you win, some you lose. That's life". Have a great day. Hugs
 

4/02/2016

M is for Margins & Mint

Good Morning from sunny Upstate SC where Spring is bustin' out all over....(That's a song, right?)

Mrs. A's Butterfly Challenge theme this time round is Butterflies, Mint and/or Margins. Haven't been able to join in the Butterfly Challenge for a while, so started this card. Worked hard using pan pastels to create a 'mint' color, hope this looks like mint to other people! While working on the card, learned that a good friend lost her DH yesterday morning. So thought this would work for a sympathy card too.


- taped off the margins, inked up an old wooden butterfly stamp(Hero Arts - 4 small stamps in a pack)  with versamark, a-stamping I did go. On the 2nd try, decided to heat emboss the butterflies with Ranger Silver Pearl before applying the pan pastels. Selected 2 shades of color that combined might yield a mint as I had nothing in the supplies that was specifically labeled 'mint'. Sprayed a mat fixative over the chalk surface when it was finished.

- applied versamark to another butterfly stamp, inked on white snippet, then heat embossed with the Ranger Silver Pearl. Used the same pan pastels, but wanted get a deeper color than the background, so tried adding a blend of Zig watercolor brush markers in light turquoise and pale green & a bit of waterbrush. This didn't look really 'mint-like', but it did give some nice splotches of color in the wings. Let this dry well, applied some more pan pastel over it. There's 2 layers of butterflies on each one, fussy cut, adhered together. Used a silver gel pen to color the edges & the body.

- Silver outline stickers to dress it up a bit; the SU sentiment was stamped with versamark, and heat embossed with Judikins Aegean Silver. Tried to use an old Brilliance Starlight pad, and found it is dry. Reinking this morning, and not sure if it's going to work as it's supposed to when one reinks a pad.

Off to join the Butterfly Challenge, and there's still time to hop in and have some fun.

4/01/2016

April Fool's Day Boo Boo Hop

HiYa! Welcome to the First Annual April Fool's Day Boo Boo Hop, hosted by our very Own Darnell and her famous team of Hamsters.


Anyhoo...here goes with one of my boo-boo's of late. I had seen a Catherine Pooler video on Ink Layering-Shadow Stamping and decided to try it, even though I didn't have the same stamps as Catherine uses (I bet ya'll get tired of hearing about videos, don'cha? Well, I get a lot of my inspiration from videos as well as seeing fab cards on blogs. I'm not an artist but a copier, as I've said many times. I try to provide a link if I can re-find one, and hope that you'll have time to check out the video as well. Always hope the link will work ok for you if you're interested).

So here's my take on the Shadow stamping, using the Mini Misti, which did help a lot, but I need more practice at shadowing images. When I heard about Darnell's Boo Boo Hop, decided I would enter this card. You'll see why:


Wplus9 Happy Wishes clear stamp on purchased kraft card, using Hero Arts Unicorn (white) pigment ink as the first layer. This is where the mini Misti came in handy, as the image was cleaned, then inked with Hero Arts Unicorn Pastel Green, card shifted up just a smidgen, restamped. This green didn't look quite dark enough to show well, so cleaned the stamped leaves, inked with Memento New Sprout to get the look you see.

- re positioned the leaf stamps to do the bottom stamping, followed the above steps. Positioned the sentiment, repeated the steps. Noticed a smudge of ink (operator fingerprint.) so added a small flower image from another clear set, did the same inks.

Was fairly happy with the look until I realized that I have the 'shadow' just a bit off to look like I think it is supposed to look. So I really need to practice with the positioning to get a better looking 'offset shadow'. However, this was my 2nd attempt, and the first one was even worse!!! Another boo-boo was that I should have chosen a bit darker shade of green ink I think. Would love to hear what you think I should try next.

Now I'm off to join Our Darnell in the April Fool's Day  Boo-Boo hop. Why don't you check it out? Hmm?

And have a nice afternoon, and thanks for joining me! Hugs