Followers

2/28/2017

Celtic Cross and Shamrocks


Good evening, and welcome.  Back with another Shamrock theme, and on this one, the background was created with 2 different cling background stamps.


- Hero Arts (CG671) Forest Floor Bold Prints  inked with a bright green Colorbox Fluid Chalk ink and stamped onto a white card base.
 
- Simon Says Stamps Circle Doodle inked with a yellow Fluid Chalk, over stamped the bold prints.
 
- added a few little solid flower stamps using a yellow green ink at random places.
 
- S/B Celtic Cross die from last year, was embossed with an Mbossibility EF.
 
- Sparkle n Sprinkle Stamp Set 254 Irish  colored with copics and WoS, die cut with MFT Xstitch circle die. Used a dewdrop green ink pad to color the edges.
 
- Sentiment stamped in green ink, heat embossed with a WOW silver EP.
 
Scallop stitched die created the bottom border from part of the trimmed off background. Not showing very well in the photo. Wish I had thought to add some ink around the top scallops and it would show better. Oh well.
 
Big hugs & prayers for those who are in need of same. Thanks for stopping in.


2/27/2017

Recycling for February Rudolph Day

Good afternoon. Welcome to February's Rudolph Day Challenge, which opens on the 25th of each month and ends on the last day of that month.

My card today is one that has been made up for a couple of weeks. Sorting through the cards received this past Christmas were some that I thought had 'recycle' possibilities. A Memory Box Oval Master frame that had come in an order, made me think one card would work fine with that die.


- Covered a white card base with Paper Studio plaid pattern.
 
- Die cut the original Christmas card with the MB Oval Master Frame die. This die also cuts a thin oval frame, which was used on this card. If you look closely at the oval in this card, you'll see part of the picture image from the ornament.
 
- Another scallop, stitched oval die had been used to cut a frame using the back of this same original Christmas card, and thought it looked pretty good with the ornament motif. However, that red frame had something showing that I didn't want on the card, so -- Martha Stewart poinsettia punch to the rescue. Used some cream c/stock to punch out several layers, shaped and formed some poinsettias to tuck around, hide part of an image that I didn't want visible. Added some gold seed beads to create the stamens of the poinsettias. Some of the flowers were colored and cut apart to form leaves. Thought these rather complimented those flowers in the printed image.
 
- DieVersions die cut sentiment from a snippet of gold mirror paper. Aside from the plaid background, pretty much this entire card is snippets I guess! We received another card with what I thought was this same ornament, and had thought to fussy cut and add over the top with some tape to create dimension. However, once I had the idea, found the other card, nah, it has a pretty poinsettia image, rather than an ornament. The rest of the card is identical though - to the one I recycled here. Same design except for the switch of the ornament to a poinsettia!
 
Do pop over to Scraps of Life to join in with February's Rudolph Day Challenge. Maureen always has some lovely prizes! Thanks for joining me this afternoon. Big Hugs


2/23/2017

A Leprechaun for St. Patricks Day

Welcome, thanks for popping in to say hello to a cute Art Impressions little leprechaun. Doesn't seem to be available at AI website though, which is a shame. I think this little guy is far more appealing than some of their 'ladies' stamps so popular just now.

- AI Cling UMM1608 - and this fella is such fun to color. He makes me smile as I color with copics, and he's lived at our house for a long time too. Couldn't find a link at the AI webstore, even with the numbers...These companies are missing the market by not designing more Irish theme stamps & dies, IMHO. I know quite a few Irish crafters who are searching for these items. Saw some high prices on eBay.

- Created background, embossed with a Darice Shamrock EF, which doesn't show well in the photo

- Reverse Confetti Cuts All Framed Up. Used several of the frames from cutting VOS St. Pat's themed DP.

- sentiment inked with 2 different green inks, then heat ep with some silver pearl, hand cut fish tail.

Top o' the afternoon to you, and come back when you have time! Big hugs

2/22/2017

Penny Black Hedgie Says Happy Easter

Good evening, and thanks for stopping for a visit. Thought I'd give you a break from St. Pat's cards, and finish up an Easter card. This cute little PB Hedgie lady was colored years ago. It's a clear set called Tiny Wishes.  Found the colored image in the stash, added more contrast to her dress, selected a S/Binder to die cut, and off I did go.


- Miss Hedgie was shopping (I think), but decided to go with the 'Easter Bonnet' and use this as a card for Easter. When I was a child, everyone had an Easter outfit to wear, and the ladies wore hats (sometimes the little girls did too). I think that's a tradition that has disappeared these days. Copic coloring, WoS on the Rose, and although the photo doesn't show it, a little drop of Nuvo Jewel Drop (Grey Mist) - which dries clear and looks like dew on the flower. These Nuvo Crystal and Jewel drops are easier to control the size of the 'drop' (at least for me) than the liquid pearls were. Really like the ones I've used.

- S/Binders Oval Bliss to die cut Miss Hedgie, then used Memento Dewdrop sized inks to add some color at the edge. After making the background, thought there needed to be another color between Ms H and the background, so found an oval S/B that sort of fit the shape, to do an underlayer.

- Artplorations Delicate Leaves stencil - embossed over white c/s, then used brushes to add color: DI Milled Lavendar, Dewdrop size turquoise shade, keeping the corner areas darker. Then used some old small floral stamps to add darker pink & some turquoise flowers over the stenciling. Trimmed down this piece, added tiny strips of the same turquoise mat shade at the edges of the white card base.

- Sentiment stamped and punched with an oval punch. Yay, first Easter card done!!!

Big Hugs, and hope it's nice where you are this afternoon. It's been overcast here with some very early morning rain. Come again when you have time. I'll be back to visit you too. Sometimes when leaving comments, I'm not always certain Blogger publishes - if I have time, when I go back to check, I don't see my comment. I know with comment moderation on, it won't publish immediately - but I do try to get back to all my sweet visitors.

2/20/2017

Sparkle n Sprinkle Vintage Irish

Hello & welcome. Time to start sharing a couple of St. Paddy's Day cards. We're not Irish, but we have friends who are and a lovely niece whose last name was O'Hara. Now that's Irish indeed! So here goes with a Sparkle & Sprinkle stamp. I have the red rubber, bought some years ago, when SnS still had a physical store. Now I think sales are just online...and this set is available as a nice digi (which costs less than the rubber too!)


- Impression Obsession Die 065AA shamrocks (snippets)
 
- Created background using Silk Glaze, brushos, then overstamping with several tiny shamrock cluster stamps.
 
Reverse Confetti Cuts All Frames ** cut from VOS St. Patrick themed dp.
 
**(I didn't find this die cut properly, even using my special metal shim. However, I do think it is largely the fault of an aging Big Shot that did not cut well in some areas. I had to keep moving the position of the die to get complete cut-through in places. I'm noticing that on EF's, some of the areas don't emboss well, so I'm pretty sure my old B/S is about to bite the dust. This die cuts many sizes of frames and I think will be a useful tool in the die cutting arsenal)
 
Hope you like this one, whether you're Irish or not!!! A new card was added to the Cards by Friends Page if you have time to enjoy it.
 
Hope your week has started off well, and many hugs & thanks for visiting.


2/19/2017

Christmas Card Club - Snowy Mountains

Good Morning and welcome to our 4th Christmas Card Club Challenge of 2017. Our teamie Culliesocks (Kate) wanted to see Snowy Mountains, Sleighs, Skies. Well, this is one challenge that had me putting on my thinking cap (somehow I overlooked that Sleighs could be a motif! I was looking through my old wooden Stampscape stamps for some mountains that I thought I remembered! Gosh I have several sleigh dies..totally missed it on that one, Kate!!!) Anyhoo....here's what I came up with & hope it's going to fit the bill:


 Supplies:

Stampendous: Cling Christmas Cottage, Stampscapes 182G Tall Peaks, both stamped with London Fog. Fussy cut out the topmost area of the stamped cottage image, then masked and stamped the Tall Peaks behind the cottage.

Light copic colors to create a snow scene

- Hero Arts Infinity Nested Ovals, Marvy Snow Marker, 6x6 Rockin Christmas paper pack (picked up on sale at one of the local stores), Nuvo Jewel & Crystal drops added to create more snowy effects. Really got a huge clump of snow in one place on the mountains when trying to get the marker to flow. Decided to leave as is, and when this product was heat embossed, it really puffed up nicely. The Nuvo Crystal product was dropped on some of the ground snow, spread with fingers to create the glisten of snow in sunshine. Along the path - built up snow piles.

The cottage scene was stamped twice, and the holly & pinecones motifs colored a bit darker than what was on the original scene, cut out and applied with some dimensional foam over the mountain paper cut out oval to add some dimension. The mountain theme paper was just a lucky find when searching through 6x6 paper packs.

I hope you'll find time to visit my team members to see their inspiration of Kate's challenge theme.
(Blog links are on the right side bar). Do have a lovely Sunday, and Big hugs & prayers to all in need of them. Thanks for popping by this morning.

2/14/2017

Happy Valentine's Day

Welcome and many Happy Valentine wishes coming your way!!! Today's post has the remainder of the Valentine cards that got made and now hopefully, on to some St. Patrick's Day and Easter cards.

Let's get started:


You've seen this cute PB hedgie before. He happens to be a favorite among the old wooden block stamps.

S/B Deckled Rectangle die cut the image, faux mat with black, then placed upon an embossed background, with some leftover white stitched swirl at the bottom.

The UTEE covered heart was from a Gina Marie stitched die (snippet from earlier projects)

- Tutti Love sentiment....this was made from many layers of scrap paper that covered the air brush table where spraying is done. There's a large craft mat (like the Ranger brown one found in stores, but I was able to buy a couple of large pieces at a store, where this is used to cover the work tables). I usually put some scrap paper over that craft mat if I'm spraying...sometimes something interesting happens. Thought the overspray made some pretty colors, so die cut a bunch of layers, glued together, and Voila.

Here's the rest of the Valentine cards:


If you have any questions about products used, please ask. There were a couple different techniques used on card #3, the background of which is a mop-up piece from working with the cameo created heart stencil, using sprays & brusho-s with the stencil. The center heart was created by coating the Corbel Heart die that with versamark, embossing over white c/s, dumping some red EP over the embossing, and heating. Tried this technique with a black c/s and it looked terrible as the red just became shiny over the black, and didn't show up as I thought it might.

Again, thanks for joining me this afternoon, and I certainly hope all of you had a marvelous Valentine's Day. Big hugs.

2/11/2017

CAS Mix up Challenge February 2017

Good evening, and hope you've had a great Saturday. Back again with another card to try to join in with the February 2017 CAS Mix Up Challenge.

 
But first, please help me say a big hello to a new follower, Asha M.  I can't determine if Asha has a blog, but Asha if you do have a blog, please provide me with the link. I like to introduce my new friends to my old friends, and I want to be sure to pop over to enjoy your work too. Thanks for joining as a new follower. Love to make new friends!
 

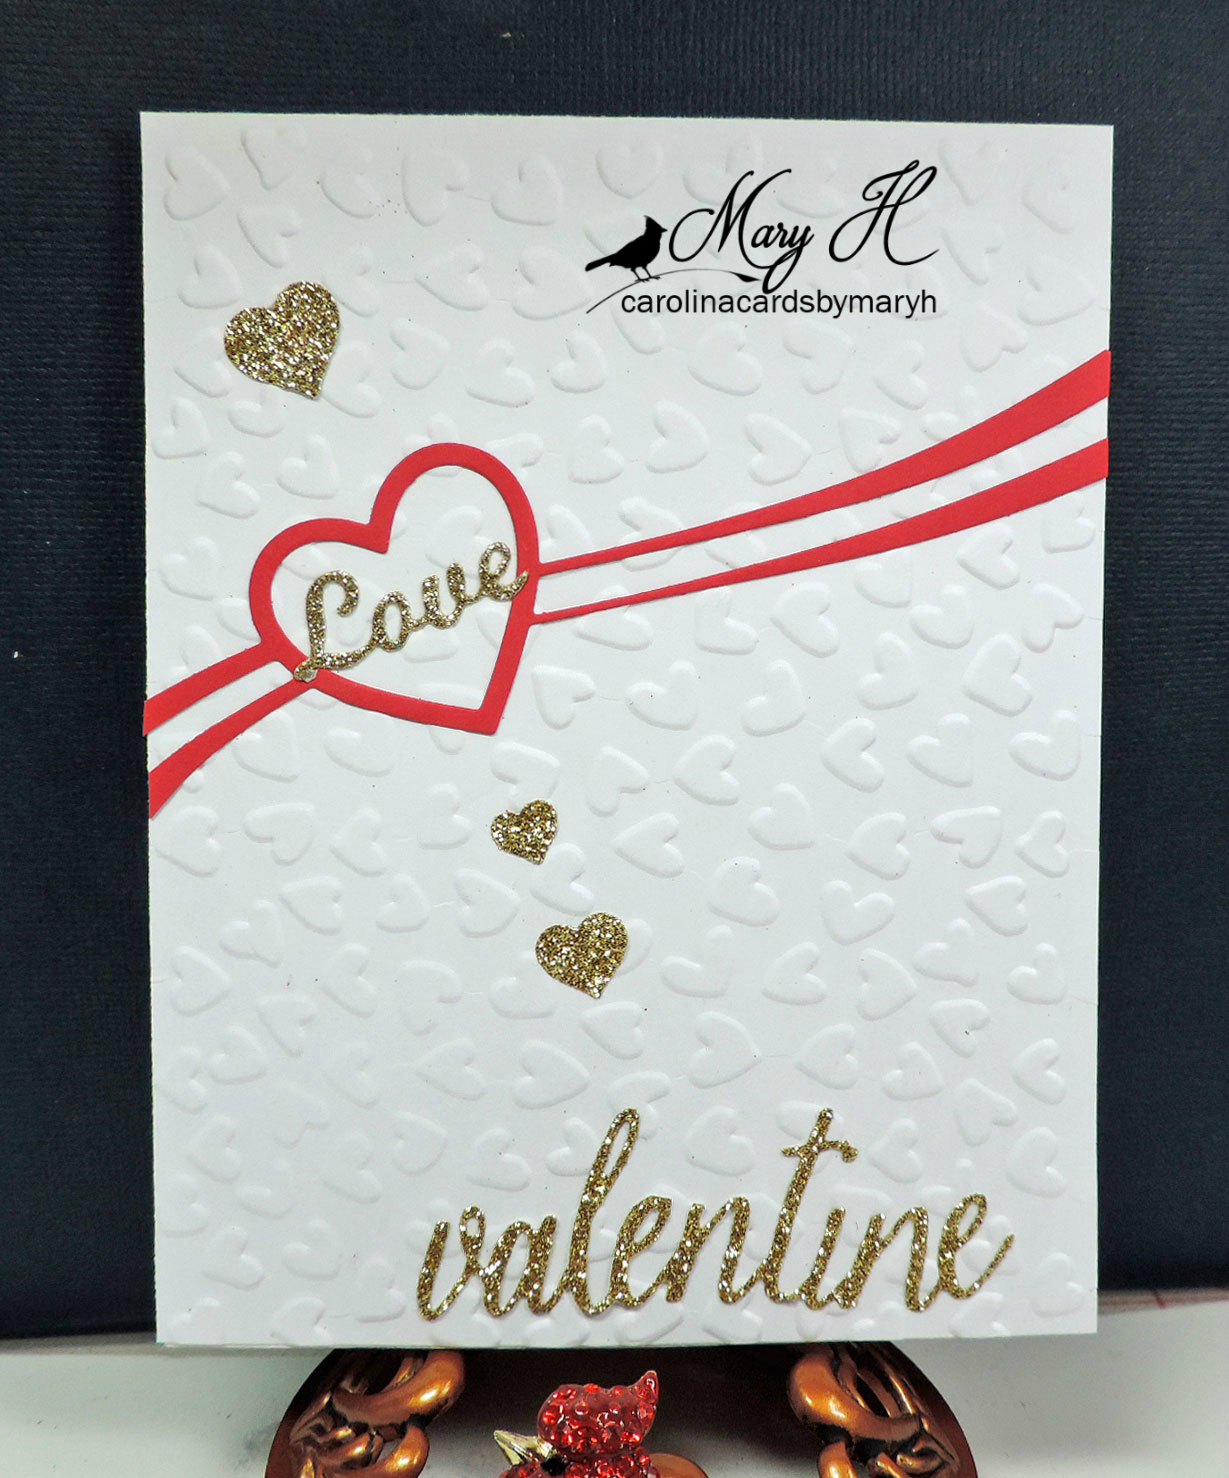
Here's the card and my optional choice item was the Tim Holtz Sizzix 660222 Thinlets Scribbles & Splat die set - the heart.


Many of you have commented about being unfamiliar with the Silks Glaze products, so included a picture of what this product looks like. The sets are available in Hobby Lobby and other box store, and individual pots are available in Stamp/Scrapbook/Art stores and this is a Luminart product. Can be used as watercolor if thinned to that consistency, but also as a thicker acrylic paint. Some of mine have 'hardened' since being in the stash for a while, but just spritzed some water in the pot, and let it soften...much as would happen with the Twinkling H20's.


-Mixed Media weight c/s 98#. Splashed some of the red color over the c/s, let it begin to dry just a bit, then dabbed a piece of bubble wrap into the still wet color. Finished drying with a heat tool, as I wanted to get the card into the challenge. (more about the woes of this card below!) Flattened the card overnight, but in the photo, it looks like it may need even more pressing time.

- black c/s was crinkled in an old Fiskars crinkle tool. Tried this with a lightweight chipboard, nothing was happening. Decided to try with a lighter weight c/s, and it crinkled nicely. (also separated a box that my ATG tape came in, as that weight was too heavy to crinkle. Once I separated into 2 layers, it crinkled great, but after spraying Dylusions Black Marble over the 2 pieces, then a bit of Tattered Angels gold, it wasn't great background for the heart. (Message: stop when it looks good, don't keep adding more!!!) S'ok -- , can be used on another project.

- Red Mirror c/s to cut the Twiggy heart, using the nice heavy metal shim, and it cut smoothly with a couple of fwd/backward passes.

- Old wooden block stamp inked with Versafine Onyx and stamped. Tiny red punched heart from the snippet left from the twiggy heart.

Backstory: You'll remember an earlier card done for the challenge but as I went to link, realized I had forgotten to stamp on it. Decided to remake the card so basically the same background was done. This first try had some great texture from the bubble wrap, and then smooshed the wet bubble wrap over the white areas, got some lovely spatters. Went to stamp the text...big time SMEARS! Said a couple of discouraging words too. That's when the 2nd w/color background was made, and as sentiment was stamped again, I was being _VERRRRY_ careful. There is a  slight smudge under the 'N' - not so visible to the eye, but figured the camera would catch  it....hence the tiny punched heart.
I was beginning to think it was not meant I should enter this challenge. LOL!

Do check the Cards by Friends tab if you have time, as some lovely new Valentine cards are being shared here. Thanks for joining me tonight, and wishing you a wonderful Sunday. Big hugs.


2/09/2017

Watercolor Valentine

Good evening, and welcome. Hope that any of my Northern states friends are ok with the snowstorm that dumped on you last night and today. We had sunshine, but brisk air with winds making it feel colder. Tonight the temps drop...but AH...No Snow!

Tonight's card was meant to go into the February CAS Mix Up Card Challenge. As I pulled up the blog to have available to link after finishing this post, I realized: No stamping! Dang it! So I'll share it anyway, and hopefully get time to do another card that has some corrugated paper, AND remember to stamp on it.


- Used Silk Glaze to watercolor the background, attempting to do an ombre effect on watercolor paper.

- Oval was a snippet from a die cut (using a recycled card). Thought it looked artsy behind the corrugated paper.

- Sprayed the corrugated paper snippet (which has been on the airbrush table who knows how long, and had oversprays of other colors on it too). Used Dylusions Fire Box red and an Adirondack spray red. Some of the earlier overspray colors - which included a gold, peek through the reds, and I quite liked the effect.

- Gina Marie Stitched Hearts die was cut from a snippet of dark red c/s. Then used Ultra Thick Embossing Enamel, 4 layers, heating between each layer, adding more versamark and another coat of UTEE. This creates a very glassy look. It's fun to crackle the product and then use a vintage ink to distress it.

- Hero Arts Valentine word sentiment die from 3 layers of glitter gold paper (snippet).

Hope you like this one. And I hope you'll be able to join in with the February CAS Mix Up Challenge. Remember: have stamping on the card too!!

The other evening, an old card from our Christmas Club Card (the Birds & wings card) showed up on the blog with the current date. Have no idea why or how this happened. I only realized it _had_ happened when some comments came in. Scurried quickly to the blog, and there was the old card. Figured out how to change the cuttrent publish date back in time, but for anyone who remembered the card, that's why a Christmas Club Card showed up. I blame it on Gremlins!!!

Thanks for joining me tonight. Ya'll stay warm. I'm off to finish up some visiting with blog friends, so catch you later. Got a bunch of Valentine cards that will be posted the next few days. Trying to get started on a few St. Patrick's and Easter cards. Big hugs.

2/07/2017

Blue Floral Get Well

Welcome - always happy to have you stop for a visit. Today's card was started with a recycled floral bouquet. The original card was just too pretty to not share again. The card has been received, so remembered I could share it here, and do a little break from all the Valentine cards.


- Oval Double Stitched die for the pretty flowers, which had some additional shading added with colored pencils, then added Nuvo Crystal drops in the centers.
 
- S/B lacy oval die for the mat.
 
- Dots Embossing folder for the banner.
 
- Bazzill textured navy card base, added small strips of the same paper used for the banner.
 
I hope it made the recipient happy to know we were thinking of her and sending hugs & prayers.
 
Thanks for joining me this evening, and Big hugs coming your way. 


2/06/2017

Penny Black Balloon Hedgie Valentine

Good afternoon & happy Monday; thanks for stopping by. Sure hope you had a wonderful weekend. Ours was quiet, had sunshine, but one day it was awfully windy.

Yay - there's 2 new followers showing in my followers list. A big welcome to Birgit of Crafting While I Wait! So happy to have some new followers, as it's been quiet for a long while. Thanks for becoming followers, and I hope my friends will pop over to say Hello to Birgit, and enjoy some gorgeous cards. I've not been able to determine who the other new follower is, so if it should be you, please let me know. I add the names of followers in my spreadsheed database, and then your name is included for when Blog Candy winners are chosen.

Speaking of Blog Candy: For a while now, there's been some goodies collecting in a box. Was hoping to reach the 350 followers milestone, then Blogger played games with the followers. However, all the Blogaversaries I've been seeing around Blogland reminded me, I have a 5 year Blogaversary coming on March 12. So if the milestone goal happens first, some of the candy will go for that. And then there will be another give-away for the Blogaversary!  That 5 years has gone by so fast, and I've met so VERY many lovely people.

I hope you won't get too tired with Valentine cards in the next few days, but that's what I've got to work on. (and get in the mail too!). So here goes with today's, using my favorite Penny Black Hedgie. Just love this little guy, and he's so easy to color. This is an old wooden PB, bought when I first started learning how to stamp.


Copic coloring, some Winks added on some of the hearts. The background around Hedgie & his balloons is BG0000 and BG000 (pale blues).
 
- Cheery Lynn die sentiment
 
- MB Oval Master Frame 99357 - cut from a 6x6 Recollections Christmas Noel pack. The design is a wood grain motif. Happened to notice the opposite side is white, with some raised embossing, so used that side. The frame is popped up on foam strips placed along the inside edges.
 
- Rhinestone hearts to trim, and the white card base was edged with DI Weathered Wood and Memento Summer Sky sponging. This enhances the light blue background around Hedgie, that the photo is not showing, but looks nice IRL. The camera IS showing the adhesive dots that were on the rhinestone hearts, though, which IRL the eye does NOT see! Go figure!!!
 
Ya'll have a great evening, and come again when you have time! I try to visit all who leave comments, but sometimes I'm not absolutely certain that my comment was published. So if I should miss coming to enjoy your work, I'd appreciate hearing from you. Sometimes Blogger likes to tease me! Hugs
 

2/04/2017

Christmas Card Club - Festive Foliage

Hello and welcome to 2017's Challenge 3 at our Christmas Card Club, where a group of card makers share the season's cards every 2 weeks. This Festive Foliage theme was selected by our team member, Rachel.

I decided my festive greenery would be in the manner of a layered wreath.


- Base composed of a tan layer and a darker brown layer of Gina Marie Wreath Die set.

- Next layer from a snippet of green DP - Gina Marie Leaf Die

- top layer also from a snippet of c/stock:  Poppy Home for the Holidays Wreath die

- ribbon cut from Impression Obsession DIE026-0 (Fancy Ornament Die) [snippet]

- Sentiment: Frantic Stamper (FRA-DIE-09650) [snippet]

White Stitched square (don't remember what company), then traced the die to create the green faux mat.

- holly background paper, more festive greenery.

- used some VOS of sticker circles to add some holly to the wreath...and called it done!!!

Please check out what my team members have shared on this fun theme. Their blogs are listed on the right side bar!

Thanks for joining me today, and come again when you have time!!! Big hugs, and prayers to those in need of them. Have a wonderful afternoon.

Valentine Bear

Good afternoon and Happy Saturday. Today's card has a DeeDee's Digi that came from my time as a Design Team Member at DeeDee's. She has closed her shop and is now doing other things, so I've linked to her new blog. DeeDee designed such cool images, cute, easy to use; this image is one I found printed out in my stash box, and it went along to Florida at Christmas time. Got colored when I was enjoying the sunshine & dolphins playing.


- Digi Bear colored with Copics, die cut with a S/B pinking circle; black mat cut with a larger pinking circle from the same set. DI Worn Lipstick sponged around the outside edges.

- Cheery Lynn Italian doily cut from red c/s, and Elizabeth Craft Heart Background cut from red c/s that had more pink tones in it. (Recollection card pack of Valentine colors).

- Behind the heart background, old dictionary page was torn, sponged with DI Picked Raspberry with Festive Berries at the corners and edges to deepen the color. Crinkled up the old page, then sponged a
layer of Festive Berries over all of it, with the deeper color hitting on the wrinkled parts. The boo-boo here is that the torn piece had to be applied in a landscape fashion, because I don't tear very well! The cut out hearts need to be vertical; so the script is sideways!!! Oh well. I had already done all the sponging, wrinkling, etc, when I realized this would be the result.

- Hero Arts Valentine word die cut from black cardstock.

Thanks for joining me this afternoon, and ya'll have a great weekend! Be back later to share a card for our Christmas Card Club.Tha's all folks! Hugs

2/02/2017

NBUS Challenge 10 - Bubble Wrap

Welcome! I think I've managed to not miss the deadline for Darnell's 10th NBUS Challenge! And the optional theme, aside from using NBUS (which means Never Before Used Schtuff - in case you are one of the few bloggers who doesn't know what NBUS means!) Additionally, if acronyms are used in my post that are unfamiliar to you, be sure to check the tab Blog-a-nitions at the top of this blog. I try to put in definitions coined by some of the clever cardmakers - if I didn't know it, guessed other folks might not either!

Challenge 10 optional choice was to use Bubble Wrap as a part of the card design, with alcohol inks, reinkers, whatever ink would work on Bubble Wrap. Now, I had played some months ago with yupo paper & copic various ink (which is alcohol base).  Blotted the wet yupo with some bubble wrap. Took a while to dry, and then I didn't know what the heck to do with it - & other things got in the way. THEN: the night prior to learning about this challenge, tried one of the old C/B folders -the  green kind if you remember - which would cut out a portion of the embossing.

OK, still got that piece bubble wrap, so got busy with some alcohol inks, just selecting random colors. Had cut a few pieces of 144# Yupo Paper**. Dropped the inks in sort of a circle pattern onto the bubble wrap, and plopped the Yupo over it. First was very wet; still had ink on the bubble wrap, so plopped on the 2nd Yupo. STILL had some ink, so here comes the 3rd piece, still getting faint inking designs. I think I finally got all the ink pretty much off the bubble wrap. Took overnight for the 1st piece to dry. Since I need to get crackin' on Valentine cards, that's what my efforts became.


Covered a top fold white card base with another piece of white c/s which had been embossed rather than cut. (Jennifer McGuire has some good youtube videos showing the sandwich for doing this technique).

Fishtail banner was cut from the 3rd inking, very faint, but thought it would make a nice look behind the Valentine - which was cut from the 1st, more intense piece.  Ranger & Pinata alcohol inks were used in colors of silver, red, blue, green and yellow.

**YUPO Paper Weight: A good friend had shared that she's had trouble cutting 144# weight. I didn't even know that Yupo came in various weights! Checked what mine was, but I'm happy to say with 2 fwd & backward passes - just to be sure it cut well - this die cut 144#  Yupo nicely. And it's a very thin weight die too, not thick like some of the MFT ones. (Yupo is a specialty paper that looks like glossy card stock, but has different properties. Think it has a lot of plastic in the makeup - so best not to use a heat gun to dry...at least not close to the Yupo).

- Black faux suede paper was backed with Stickit to cut the sentiment. Came out of the die very smoothly. However, removal of the backing paper didn't go nearly as easily as it does in the videos. Was good to not have to bother with tiny dots of glue however.

- red snippet to cut the tiny hearts. This paper is a shiny silk like paper, has slubs in the paper that looks like raw silk fabric.

NBUS Supplies: Elizabeth Craft Heart Background die 1261;Hero Arts Infinity HeartsHero Arts Valentine Words; black faux suede paper which has been around for a while, as has the Stickit and it's first time used. Normally I reach for Sookwang, which is a thicker double sided tape.

Thanks for joining me, and if you think you'd like to play with Bubble Wrap, Darnell's Challenge 10 is open until Feb 5. Be sure to check the rules. The bubble wrap is optional, so you can pull some of your old, never used stash, and join in the fun right here:

Edit: Whoo Hoo! The Snippets Playground Week 265 & 266 is still open! I've been MIA for so long Parsnip might not even recognize me, but this card has got SNIPPETS! So I'm going OVER!
 
PS: many of you have commented on the pretty jeweled cardinal that I've had on some recent posts. It was a lovely pin sent to me by my sweet Brenda.  Since I rarely dress up where a pin is appropriate, I thought it would look pretty decorating my card photos. And, I can always pin it on, if I _should_ dress up! She is such a sweetie.