Followers

1/31/2018

Pineapple and Feathers

Welcome and thanks for stopping in. Today is a scheduled post, as I'm trying to get some things done ahead. This is a card created from a UFO image colored long ago. Did a faint script stamping over the previously colored pineapple when it was rediscovered, then some sponging for the background. A little vintage color was added to the edge of the rectangle.
 
Some feather dies cut with white snippets,  sponged using a finger dauber & pale green ink, then some very dried out Novu gold mousse rubbed over the raised areas. These feathers made me think of the pineapple's green leaves.  Lastly added some clear drops.  The background was done with gold mica spray over a stencil (used the wet color left on the stencil to create this background). Don't you love it when you can make 2 backgrounds with one effort? I sure do.  This is a very simple card, but I rather liked it!


Ya'll have a good afternoon, stay flu & bug free. Hugs & Blessings. Come again when you have time.


1/29/2018

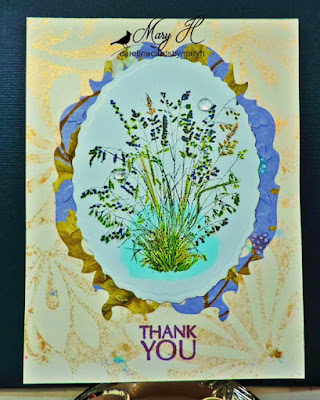
Lavendar Thank You

Welcome! After a rainy & dreary weekend, we have lovely golden warm sunshine today. Great way to start a week. This weekend we took a 3 hour drive up to our hometown to visit a 91 yr old cousin. She's in a nursing home, and my oldest brother expressed a wish to see her. My sweet DH said "I'll take him". So that's what we did Saturday, and even though it was very sad to see the situation she's in, I'm thankful we were able to have them meet again. They were kids together, and were close as adults too. Additionally we met up with some other cousins at our favorite family BBQ place in the town. Had a safe drive back home, for which I always say a big "Thank you", as there are so many irresponsible and crazy drivers on the interstate we travel.

Today's card has been received, so I'm sharing it this afternoon. Just finished up a marathon commenting session for the sweet folks who came to see the Rudolph Day post. I was about 2 day s behind on my visiting.

This UFO image had been colored, who knows how long ago. My recipient likes purple, so I used DP that has a large floral pattern for a die mat. I just never know how to use these  pretty large patterns effectively. I admire seeing how other crafters can make such lovely cards with these papers.

 
The image was from a PBlack transparent set, very easy to color; S/B deckled oval die, and a Darice oval die for the mat.  The background was made using a stencil, gold mica spray. This particular piece was created by pressing the saturated stencil against Canson Mixed Media c/s. The stencil had been used to spray through for another project. I was not going to waste all that lovely gold spray!
 
Found a simple sentiment stamp, used a Memento purple pad, and a quick thank you was finished.
 
Need to get crackin' on making some Valentine cards. We are planning to be away that week, so I doubt I mail out very many. Hoping to get to Florida. The DD was here for a few days last week, and oh, did we enjoy that time. Hard to see her leave, but I did goodby better than I usually do (primarily 'cause we hope to see her again soon). 
 
Come again when you can. So much flu & stomach bugs around, so please try to stay well. Hugs & Blessings. Thanks for your visit.


1/27/2018

Penny Black for Rudolph Day

Hi and welcome to the first Rudolph Day Challenge of 2018. I missed a lot of Rudy Days last year, so I'm going to make a concerted effort to join in if at all possible in 2018 (that wasn't a New Year's Resolution or anything, but hey, it would make a pretty good one, yes?) You DO know about Rudolph Day? It's a challenge hosted by Scrappymoi, opens on the 25th each month, closes at the last day. The only rule is 'anything Christmas'.

Was inspired by this card by my so talented friend, Bonnie K. Of course then I had to buy the Penny Black stamp. Decided I'd use it for Rudy Day, as I needed to make something that didn't take a long time to color. First thought about using gold to emboss it, but had gotten some NBUS Altenew Platinum that needed a try, -- was pleased with the effect. Did some DOX sponging..(trying for a glow right around the tree, not sure I've achieved that. Still pleased with the outcome. My first try at coloring the swirls inside the tree wasn't great, neither was my second. Tried with an alcohol marker - got it messy outside the embossed edges. Then tried another effort with gel pens, still not great. Went to Polychromos pencils, not dark enough in the tiny spaces to show well, so went over the pencils with the Kaiser glitter pens. Liked that better).


Embossed Penny Black Starry Tree withWOW watermark pad, then heat embossed with Altenew Platinum Crisp EP. Colored elements within the tree with pencils and Kaiser glitter pens. Using a snippet of my other failed efforts, sort of masked the edge of the tree while sponging DOX Twisted Citron, Bundled Sage & Iced Spruce at the bottom. Spritzed a pearlized mica spray, while shielding the tree image. That same snippet mask was used to ink WOW versamark over the edges, then heat embossed with Platinum. Two slivers of that same snippet were trimmed, inked with copic blue greens, then used WOS for a little glitter. Started coloring the strips with the Kaiser glitter pens, but the ink didn't flow well. I'm not particularly thrilled with these pens, as they don't seem to hold much ink. A couple of times use, then they appear to dry up, even though you can still see ink in the barrel. Pulled out the trusty copics, inked, WOS, done. The blue doesn't match the swirls color but I liked the contrast between the platinum and this color, so....

Penny Black Rejoice die, cut 4 layers from the last of the failure snippet, then embossed with the same platinum used elsewhere on the card. After seeing the picture, the sentiment didn't get centered as well as might be.

Is anyone else having a problem with Blogger slowness when leaving comments? At some blogs, I hit publish and then it 'goes'. Other times I publish, wait, hit the publish button again, and finally it appears to take the comment. I'm not always sure.

Please do check out this fun challenge, as Maureen (Scrappymoi) always has some lovely prizes. So see you at Rudolph Day January 2018. Be there, or be square!

Thanks for joining me today, come again when you can, and hugs & Blessings. Stay well, as there is so much sickness about.

1/21/2018

Christmas Card Club - Christmas Baking

Hello and welcome to Christmas Card Club Challenge #2 for 2018. Our theme this week is selected by Maureen, whose choice was something with Christmas Baking. Would you believe I don't have _any_ stamps or dies that I could imagine would remotely fit this theme, so I started hunting for some digi images. Couldn't find anything that really floated my boat as the saying goes, but remembered a clipart I'd seen at Christmas time....so I hunted clipart. Found a gingerbread house....that should do it! (Mind you, I've never even thought about baking a gingerbread house! But I love gingerbread and sometimes I do bake it too!)

 
So here goes:


The main focal image was a clipart image that I sized and printed. Added a few more touches of color with copics and then added some die cut holly over a smaller holly that was pictured on the chimney. There's 2 layers of this image and on the top one, I used a stylus around the trees and heart, some of the candies, to add a little dimension to the picture. Also added some more white dots on the trees using a white gel pen.

Die cut a Sue Wilson die for the outer edges (the green dots dp).  The bronze frame around the gingerbread house was just a white card stock that was sponged with DOX colors of Gathered Twigs, Spiced Marmalade, Peacock Feathers and Fired Brick. Used a S/Binder square die to cut this out for the frame. The photo doesn't show it well, but the outer rim of the green dots paper was embossed to show the design of the die. There's 2 pieces of the SW die behind the house.

The card base was sponged with the same DOX colors as the frame, but looks a bit different since more of it shows.

Used a NBUS MB die set to create the peppermint candy corners. The gingerbread men were stamped, colored with copics and Kaiser glitter pens, fussy cut because I couldn't find the matching die.

Sentiment was 3 layers of die cuts done with white snippets, colored with copics and WOS.

Please take time to visit my team members (whose links are on the right sidebar) and see how they interpreted this Christmas Baking challenge! And thanks for joining me today, and come again when you can! Hugs & Blessings.

1/17/2018

Feathers for the Twofer Card Challenge

Hi there. Guess what? We're having a snow day! (pictures at the end of the post, and you can skip 'em if you don't wanna see 'em!)

There's a new challenge that launched this month, in case you've not heard about it yet. So here goes my attempt!


OK, folks I worked hard on this challenge! I have some feather dies, but golly, couldn't think of a way to use them in a design. I looked at Pinterest, I looked at the DT's entries, and I'd get an idea. Then I'd go back to look at what some of the other entries were, and dadgum it, someone else had the same idea. Now I admit I am a copier, but I didn't want to be real blatant about this! Remembered I had a Tim Holtz embossing folder that was a feather texture fade, so looked and looked through my dies & folders. Finally checked my spreadsheet listing my dies to be sure I wasn't dreaming about having this embossing folder and feather die. It was a Bigz Die so stored separately from the others! Found it, and away we go.
 
Had done a cling film piece in earlier play. Heat embossed a white dragonfly over  a blue glossy cardstock, which was not an astounding success. Hmmm....well, let's try diecutting with my NBUS TH set. Didn't look too bad & you can see one of the dragonfly images on the blue feather. The neat thing is the embossing folder will put in the feather details...if you hold your mouth just right, and get the feathers put in the proper position. This die cuts 2 feathers, by the way. Used some fun foam, cut 2 feathers I could use as stamps. Didn't end up using these foam stamps after all, as another idea came to mind, while creating the navy blue card.
 
Remembered seeing this card at Our Little Inspirations and (1) since my feather was blue, (2) will need a Valentine for DH, and (3)blue is his favorite color...the Valentine card was born.Thanks for the inspiration Carol!

 Valentine Feather: SU wood plank stamp, Memento Nautical Blue ink. ODBD layered heart dies, embossed with Liquid Platinum and a sparkle red for the heart. (discovered I don't really have a good red embossing powder!) Down goes the feather and ok, one for the Twofer!

For the blue card: The remaining feather was smooshed very well into a WOW embossing ink (I'm finding that WOW works better for some things than my old Versamark inkpad, even well inked). Used Ranger Detail powders in Gold and silver. Careful use of the heat gun as this started as a glossy cardstock, and wanted to avoid any meltdown. Then took the negative piece from cutting the feathers to use as a stencil. An old dirty versamark pad and a finger dauber to ink up very heavily through my stencil. Used the same silver and gold, just reversed the placement of the powders. In the photo the stenciled leaf's silver looks mottled. IRL it looks just the same as the feather on the left (which was only glued at the top stem, so it's nicely dimensioned). Guess this effect is caused by the lighting.

Tied a gold bow, embossed the sentiment. Blue card was a snippet, already had the trim on it, from an old project that was a UFO.  Linking up with January Twofer Card Challenge.

And now for the morning's snow pictures. Good thing the feeders got filled late yesterday evening. Our birds are going nuts! We did have some pretty cardinals, but I didn't manage to get a decent photo. The birds are all puffed up in their feathers with the cold air.

Same bird as before, just different pose

Shows how much snow piled on the porch rails


I know our little snow is nothing compared to what a lot of you are experiencing, but it's Big Deal in our neighborhood. I'm seeing some little people out with their parents, playing in this white stuff. It doesn't feel that cold outside, but other than DH's dental appointment, we will be staying inside. Actually his appointment was tomorrow, but the office called, asked if he could make it today. It's just across the street from where our community is, so he told the girl he thought he could. There's a steep hill going out of the subdivision, so if it's icy, that hill is the barrier to leaving home.

Ya'll have a good day, look in on the new Twofer Challenge, come again when you can, and have a great day! Hugs


1/13/2018

CAS Mixup Brusho and Clingwrap

HiYa...We have welcome sunshine after several dreary days. Think the cold front moving across the USA is on its way towards us, as the air is much cooler today. I hope all of you dealing with health issues are beginning to feel improvement. So many folks are down with respiratory infections, colds, the winter blues. Sending hugs to those folks.

After some playing with the brusho/starch/cling wrap techniques, I'm back with another card made from that play. Will add it to the CAS Mixup Challenge for January.


Blue background created with Dylusions After Midnight spray over a glossy krome kote cardstock; sprinkled some blue shades of brusho crystals, may have added a dash of the black pot, then spray starch. Let it bloom just a bit, then crumple a piece of cling wrap and just scrunch it all around. (remember that old song, You Do the Hokey Pokey and you shake it all about? Well, maybe nobody ever sings that anymore, but that's what I think about as I'm scrunching that cling wrap LOL).

MB die cut white glitter paper (American Crafts 6x6 pack - it does not have the heavy plastic backing some glitter papers do, so it's very easy to cut). Cut a plain c/s of the same die to give the glitter paper a little heft. Used a Hero Arts Infinity circle die to get a shape to fit the blue background - round part of the snow globe. I have quite a few different circle dies, and would you believe not a single one fits exactly? I made one of the Infinity dies fit with a little trim here and there, and carefully glueing it to the globe. Could have cut another die from the blue and done an inlay, though some of the bits would have been tedious. I'm not in the mood for tedious just now.

Fun Foam behind the finished snow globe for dimension. Then popped it onto a rectangle embossed with our favorite CB dots EF. Cut thin strips from the remaining brusho piece to create a frame after seeing how it looked just plopped over the snowflake mat. Stamped sentiment in Memento Paris Dusk, then restamped with versamark and clear EP to get some shine. Hand cut the sentiment piece and this is the card that was delivered to our neighbor with the new knee this morning. Since it was a little bulky - thought this would be a good use of a dimensional card, and will save the earlier card to mail.

Added a pretty card to the Cards by Friends page. Now off to link up with the CAS Mix Up Challenge. Hope you'll come along and see some gorgeous cards done with this technique.

Blessings and Hugs. Thanks for the visit.

1/11/2018

CAS Mixup Challenge with Brusho and Cling Wrap Technique

Good afternoon, welcome and all that stuff! We're getting rain at our house, but the temperature is a bit warmer. (gosh, the older I get, the more I talk about the weather! Or how I feel...I used to laugh to myself at old people who did that. Now I ARE one!) LOL


First off, big shout out to a lovely new follower:


Do go over to see Christine's wonderful work and say Hello. You won't be sorry! She's also a guest Designer this month at CAS Mixup with a gorgeous card.

Next:


There is a fun challenge going on over at CAS Mixup for January. Since I enjoy some of the techniques that are 'it' for this challenge, I wanted to try to join in. Here's the card:


Some blog pals are using a 'new to me' glossy cardstock, which I think is called pancetta or Carolina Cardstock for some clingwrap/brusho techniques. I don't have that, but thought I'd try Kromekote glossy cardstock (Marcos Paper) and Yupo, with the technique to see what would result. Both seemed to work ok, but the Yupo took much longer drying time. Even after 24 hrs, it was still wet in spots, which I daubed with a towel; still looked sort of wet, so then I used a Tim Holtz heat gun - very cautiously keeping it a good distance from the yupo which is a plastic type of paper and will melt I'm told. Tried that a couple of times over a few hours, and it did get dry.

What created this background was: glossy cardstock, sprinkled blue shades of Brusho over it, then spritzed with spray starch (cheap stuff from the Dollar Store). I'd not tried spray starch before, only water or other sprays. The starch makes it smell very nice I must say. Then use a piece of cling wrap, bigger than the piece, and as you lay the cling over the wet piece, scrunch it up a lot. Leave it to dry. I left this one overnight. When you remove the cling film, what a beautiful design you see.

Also tried spraying Dylusions After Midnight to wet the surface first, then sprinkled brusho blues, then starch, and this resulted in a much deeper blue (pretty too!). However, the cling wrap does dilute the depth of the color though, at least it did for me.

Then die cut with a stitched square. Tried to stamp with a Penny Black clear stamp.First tried a navy blue Staz-on (one of the newer pads with the square design, not the old-style rectangle shape pad). Used Misti so could repeat stamp but that didn't help. Not certain if it's the stamp, stamping with that ink on the slick surface, or Just Plain Ole Operator Error! Cleaned the stamp well (and now of course it's stained). Repeated the process with the Staz-on black - no better results.  Cleaned again - then tried Versafine Onyx Black. Stamped 2 times, (thank you Misti) and got this result. My friend Nancy S. (no blog) suggested I try Ranger Archival Black with this stamp - so I did (but this effort is not that try!) I'm pleased to say the test stamping with Ranger did work better. Just sayin'. Still not sure this stamp is not part of the problem though.

Anyway, mounted the focal point with fun foam for dimension over an embossed floral pattern, then onto a white card base. The sentiment was stamped with the same versafine black, and heat embossed with clear EP, corners rounded. That's that. A neighbor has just had her 2nd knee replacement, so this is for her. Hope ya'll like it and will pop over to CAS Mix Up Card Challenge to join in with the fun - I'm off to link up this card.

Please take a moment to see the Cards by Friends page, as a new Christmas card was added with this post. 

I hope that the explanation of my experiments is not too confusing for any of you who might wish to try this technique for the first time. It is a lot of fun. (a good tip: wear gloves, I didn't).


Blessings and Hugs.

1/06/2018

Christmas Card Club 2018 - Challenge 1 - Gnomes, Pixies or Elves

Welcome to our Christmas Card Club Challenge #1 for 2018. Our sweet Margaret, who does all the work to host this bi-monthly challenge, selected the challenge theme. Margaret chose our challenge to be gnomes, pixies or elves - OR if we don't have appropriate supplies for the specific subject, then we can select an "anything goes" theme. As long as it's Christmas. This leeway helps all of us to be sure to join in with the challenge. Great idea!

Well, I had to do a little scrambling, as I don't have anything for pixies and the only gnome image I have is a Leprechaun. Thought about how I could turn him into something for Christmas, then did some digi hunting for elves. Found (and bought!) some digi elves. Then...as I was putting away some Christmas stamps, I saw an Inky Antics clear set and there they were: these 2 little elves used on today's card. Had a think about how to showcase them, hunted through the stash some more...and here goes:


Attempted to do some cloud sponging for the skyline. Discovered I'm not great at sponged clouds. So recovered that effort with just some pouncing strokes with a finger dauber over the silly looking clouds and the sky looked ok.

Some trees from a NBUS Stampin Up set  were aligned on the small Misti, inked with various shades of green ink. Yay for the Misti, as these had to be inked & stamped a few times.

Die cut Santa sleigh and reindeer from a white snippet, colored with copics. Before adhering the die cut, tore another small snippet to form a snowbank. Used some Star Dust stickles for snowy glimmer on the snow, decided to add some sparkle to the tree branches.

Elves colored with copics - silver pen for the ice skates, gold pen for the bells on collars, hat bobble, belt buckle and shoe toes. Popped up with dimensional foam, and there it is! These elves are just waiting for Santa to land that sleigh. First card for the Christmas 2018 stash.

Please take a look at what my fellow CCC members have shared today; their links are on the right sidebar.

Thanks for joining me and have a wonderful day. Blessings and Hugs.


Sending Hugs Flowers

Good afternoon and welcome. Surely hope that if it's brutally cold and unpleasant weather where you might be, that you can stay inside where it's cozy & warm. We have lovely sunshine, but it's a brisk 35F outside. It was 13F at 3:30am this morning. We're thankful we are not getting the same bitter cold & snow that our northern states are having, and I expect a lot of my European buddies are also having to contend with some very wintery weather. Brrrrr!

Remember this card  and my first attempt which was not good at all? I had tried for no-lines with a light brown to stamp the image; then colored with pastel shades, based on google-ing Christmas Rose, and it was really a washout. Meant to take photos to share, but that didn't happen. While looking around Youtube I found some other looks that I liked, so re-did the peach-y pastel tones I'd used, and today's card is the result. Changed to a darker blue background (alas the photo doesn't really show how really dark this background is. It shows off the dark peachy tones of this card's flowers).

 
Wplus9 Christmas Rose: original failed effort was used for the background layer. Sponged Oxide Blues, adding more darkness at each corner. Photo is not capturing this, but it looks quite nice. Colored over the smaller flowers with Yellow and YR copics, and darkened the leaves quite a lot as well. Stamped a 2nd image to get the largest flower to cut out, pop up. Fussy cut the large flower from the bottom layer as it's covered with the popup one, and used portions of it to place under the popped up flower (make sense?).  It did create quite a lot of depth, and I was finally pleased with how this looked. All the time I kept telling myself "It's just paper, you _can_ throw it away!" Don't you just hate to let something of this sort defeat you? I do! Finally used a copper Kaisercraft metallic marker to add the dots on the petals.
The blue background had water droplets sprinkled over it- which I forget to do most of the time - and then once all was put together, used a spritz of gold mica spray very lightly. The only thing I thought about changing at the last, was to add some seed beads for the centers. I've not been very successful at getting good results with those...plus they scatter everywhere as I try. Additionally this has to go through the mail, so for once I left well enough alone!! A Martha Stewart tag (VOS) was stamped with the sentiment.
 
Back later this evening with the Christmas Card Club post. Trying to start the new year off right.
 
Stay warm, thanks for visiting, and God Bless. Hugs too.


1/01/2018

Happy New Year

Happy New Year
 
 
And many wishes for all my blog pals that 2018 will be healthy, happy and wonderfully creative for each of you. Hugs & Prayers