

10/31/2012
Miscellaneous
Halloween
Good Morning, Happy Halloween and Welcome to my newest follower. Truly, I promise THIS card is the last Halloween card - I HOPE - for 2012! This one belongs to DH, and the witches reminded me (and probably him as well) of the 2 of us when we take a trip. Had to laugh when I decided on the image for his card. Here's the specs:

Penny Black Backseat Witch Stamp
My Mind's Eye 12x12 Halloween pack
Sizzix Framelits Die
Memory Box Small Spider die on black glitter paper
Copics on focal image, Copic airbrushing background using B range colors.
Star background stamp used after airbrushing done. Inked with Versamark, Ranger embossing glitter applied, heat set* (Note to self: Gold emboss would have looked better I think)
Flowersoft Citrus on broom bristles after all above was done.
Sentiment: Inkadinkadoo, black ink, handcut.
10/28/2012
Christmas

Penny Black Hedgie Shuffle
Copic markers on Copic Xpress Paper
airbrush background, enhanced with Distress Ink Tumbled Glass, Stormy Sky
Glossy Accents on skating area
Spellbinder Matting Basics A
Blue Recollection Matting, then Heidi Grace Frost Boulevard
Blue foil embossed with Darice Holly EF
Merry Christmas & tree outline stickers colored with copics
Elizabeth Craft silver sticker for framing.
Let me tell you how I found the blue foil. (Now maybe you've already had this idea! I thought it was a brainstorm when I had it!). I had gone into our local Dollar Store, looking for some wedge makeup sponges and the little foam applicators used for applying eye shadow. Didn't have 'em. But, as I walked in the door, there was a big display of Christmas bags, small ones 3 for $1. Larger ones 2 for $1. I looked at the bright colors and thought "Hmmm, the S/Binder foil packs are pretty expensive. Wonder how this would work". Well, only a dollar, so I grabbed up a couple of the sets. The only difficulty I had, was - the bags had creases, and it didn't emboss out. So in taping it down on the card, the crease was still visible on the right side. Hence the silver strip to disguise this crease...and it wasn't really 'that bad', but I could see it. The strip did a good job, but it did not go down well at the corners. After picking it up, replacing it, multiple times, still not getting a 'neat join', I said, "That's it. I'm going with it as it is!" On the whole, I like this little card...as I'm a PB Hedgie fan. Think I'll do this image again, try to do a more professional looking job with the strips. Also I wondered if ironing the bag on a cool setting might help with the creases. Or better yet, cut around them. It was an economy foil substitution, and I think with the bigger bags, I won't have the problem. This was one of the tiny bags, as my thought was: If I totally hose this up, I won't be wasting much!!!
Think I'll pop back over to Rudolph Day and Penny Black and More, as I think both challenges allow up to 3 entries. What fun. Check both these challenges out when you have time. Might be fun to enter if you've something that fits. Hugs.
10/27/2012
Christmas
 Good afternoon Blog Friends, and welcome to my world. I pray that any of you who might be in the path of Storm Sandy will be kept safe and will not be dealing with any storm damage. It's sunny here in SC right now, but not our usual sparkling blue sky & sun that we've enjoyed this past week. It's a sort of hazy sunshine, and it looks like we're getting a bit of breeze. No strong winds, just moving the treetops around. Don't think we'll see much effect here in the Upstate. On to the card, which I'm going to enter in Sarn's next to last Rudolph Day Challenge. I like this card, but it didn't photograph well. (My usual excuse!!!)
Here's the specs:
Penny Black Forest Friends Stamp
Copic coloring on Copic Xpress Paper (Airbrushed background, sponged with Distress Ink Tea Dye). Used the E markers for the deer, and YGs and R for the holly, which is also part of this stamp.
Background papers: Impression Obsession CAC Music CC029, Memento Peanut Brittle ink
Red Textured Bazzil card base, green Recollection matting
Spellbinders Grand Decorative Ovals One for image, S/B large oval for mat, S/B large square under Music background.
Will be using SU Hand Penned Holiday (Merry Christmas) stamped in SU Cherry Cobbler on the inside. Too large for the card front.
Hope you enjoy my card, and I have another image ready to put on a card, perhaps later this evening. See you soon, and please check out the Rudolph Day creativity. I promise you'll see lots to ooh & aah over.
Just popped over to Penny Black and More where the challenge theme is Animal Magic, think this might fit in. Another fun place to visit.
10/25/2012
Miscellaneous
Good evening, and once again, welcome to 2 new followers. I don't have a card ready to share yet. Wanted to do a post regarding the Halloween card that DH made, with the intricate die cut. The die is a Cheery Lynn die, called Enchanted Flight, available here. Other online sites sell these dies as well.
A source for the Alene's Easy Flow Tacky Glue can be found here. There's other places that carry it I'm sure. I got a large bottle at the stamp place where I buy supplies, along with some smaller $1.00 size empty bottles. I put about 2-4 oz. from the larger bottle into the small bottle. My large bottle is stored on it's side, as is the small bottle which I have been using. It has lasted a long time, because as you're gluing along a line, you don't have to run a steady bead of glue. You can put a little bit - skip over a spot, then lay down another bead of glue. I've never had a problem with anything coming undone, it dries clear,comes out in an 'easy flow' and has never warped whatever I've glued down. (I have trouble with some bottle glues. I don't have arthritis in my hands, yet still can't get the liquid to flow easily). If I'm gluing on a tiny piece, and get some blobs where I don't want, I blot with paper towel. I learned about this glue in a class & the instructor gave us the tip about not using so much. Now, for what it's worth I have been told this Easy Flow glue is the same as Alene's Tacky glue, just more watered down. Dunno if this is fact. I will say this glue is the best one I've used to date; as long as I remember to lay the bottle on its side, I've never had to unclog it. I have to do that with my glossy accents - which is also a very good glue. I store the glossy accents in an 'upside down' position - still clogs. I've tried leaving it sideways...still clogs - then I have to stick a pin in the nozzle to unclog the tip. This is definitely not a paid endorsement, but I know that when another stamper tells me they've had good luck with a product, I'm more apt to try it. Same with online buying sites. I always appreciate good tips on products/websites, so will pass along things that work for me. May not work as well for someone else...So have a lovely evening. See you later, and thanks for stopping in for a visit.
A source for the Alene's Easy Flow Tacky Glue can be found here. There's other places that carry it I'm sure. I got a large bottle at the stamp place where I buy supplies, along with some smaller $1.00 size empty bottles. I put about 2-4 oz. from the larger bottle into the small bottle. My large bottle is stored on it's side, as is the small bottle which I have been using. It has lasted a long time, because as you're gluing along a line, you don't have to run a steady bead of glue. You can put a little bit - skip over a spot, then lay down another bead of glue. I've never had a problem with anything coming undone, it dries clear,comes out in an 'easy flow' and has never warped whatever I've glued down. (I have trouble with some bottle glues. I don't have arthritis in my hands, yet still can't get the liquid to flow easily). If I'm gluing on a tiny piece, and get some blobs where I don't want, I blot with paper towel. I learned about this glue in a class & the instructor gave us the tip about not using so much. Now, for what it's worth I have been told this Easy Flow glue is the same as Alene's Tacky glue, just more watered down. Dunno if this is fact. I will say this glue is the best one I've used to date; as long as I remember to lay the bottle on its side, I've never had to unclog it. I have to do that with my glossy accents - which is also a very good glue. I store the glossy accents in an 'upside down' position - still clogs. I've tried leaving it sideways...still clogs - then I have to stick a pin in the nozzle to unclog the tip. This is definitely not a paid endorsement, but I know that when another stamper tells me they've had good luck with a product, I'm more apt to try it. Same with online buying sites. I always appreciate good tips on products/websites, so will pass along things that work for me. May not work as well for someone else...So have a lovely evening. See you later, and thanks for stopping in for a visit.
10/24/2012
Christmas
 Welcome and happy to see you dropping in for a little visit. Today's shaped card was made with S/binders Labels 28. When I cut the c/stock, I forgot to leave the topmost edge outside the die, so had to hinge it together with adhesive. Works pretty well to adhere together with tape. Simply scored each piece, put on some tape, Voila, a hinged card. I used the insert to hide the join. I diecut the snowflake design paper with the same size die, adhered to cardfront. This paper is by Heidi Grace Designs-Frost Blvd. Diecut a smaller size mat with red glitter paper, cutting out the interior piece. The image is KK0023, Cardinals & Birch Trees (2 of my favorite things), by Prickly Pear. Got this at the recent stamp show where I did myself in, by walking more than I should have! (oh but it was such fun). I used the Snow Writer at the bottom, with some blobs on the tree branches, then added MS coarse glitter while the snow was wet. I like this little card. It's going to visit over at the Rudolph Day on the 25th. If you have any new Christmas cards, this is a fun challenge to join...lots of creative & talented, not to mention very friendly folks - to interact with. Come join us at Sarn's. She also writes about her adventurous chicks, Margot & Harriet, every Sunday. Sure to provide a chuckle or two. See you there.
Halloween
 |
| JHH's Card (WMSC120) |
The die is Enchanted Flight, by Cheery Lynn. Ran it through the Big Shot 4 passes - (front,back,front,back again). This is lightweight paper, and we had 2 sheets in the sandwich. It cut very well. Sometimes I have to do battle with the CL dies. Didn't realize the 2 sheets had stuck together until DH went to get the pokeys out (that was his assignment and he had no choice but to accept it). He said "Did you mean to cut 2 pieces of paper?" Well, no I didn't, but we were able to make 4 cards for him to send out to his specific addresses, when we had meant to just make 2. Of course he can come up with 2 more folks to send the extras. The orange paper was embossed with the dots C/Bug EF, and the yellow moon, punched with an SU circle punch - was out of some pearlized paper. He used a white gel pin for the Keep out sign. Inside, he punched a big black bat, glued to the insert, and stamped some appropriate Halloween sentiments. I thought it was a neat card, I'm proud of him for making it, and thought we'd share it with you. The liquid glue used for the fussy diecut was by Alene's and is called Tacky Easy Flow. I get this at Scrapbook Creations, and learned about it in a class held there. I would think your local stamping supplier would have or be able to get this, or possibly some of the online sites might sell it. This glue is stored laying down, not upright. You don't need a solid bead of it - just bits & dabs along where you need it. Dries clear and if stored as directed, I've never had to unclog it. I highly recommend it for this type of adhesion. Can you imagine trying to put tape on all these little bits? Not me!!! Have a Blessed day.
Edit: Just saw where Waltzing Mouse is having a challenge and has opened it so that the entry doesn't HAVE to have Waltzing Mouse stamps used. So I think I'll enter this card...This is a great site, with lovely stamps. Check it out when you have time.
10/23/2012
Fall

On another note, let me give a big Shout Out to Susana's Custom Art and Card Design. I placed an order late Friday night, and this order arrived on my porch in yesterday's afternoon mail. Now, folks, that is FAST service. I've ordered from this site previously, had extremely fast shipping then as well. I hesitate to do online ordering unless someone has recommended a site to me. This order was totally correct, reasonable shipping charges, fast service, AND had a sweet little baggie of some complimentary goodies. Just thought you'd want to know! Not sure how the international shipping would be.
I believe I'll try to enter this in Outlawz Friday Copics Challenge, which is Fall Foliage and Colors. I may come back and edit in a couple of more challenges where I've seen something about Fall colors. Thanks for stopping by to visit this evening. See you soon. Hugs
*Edit: I had some questions as to what Eclipse tape is. Here's a link to see a picture if you're interested. If you do much masking in your art, this is a fine tool to have on hand.
http://www.stampstampstamp.com/Merchant2/merchant.mvc?Screen=CTGY&Store_Code=S&Category_Code=et
Miscellaneous
Good afternoon and thanks for joining me for a little chat. I've just spent some time blog surfing and especially trying to visit those of you who visit me. While I'm thinking of it, I wanted to suggest that those of you who have word verification turned on at your blogs, might think about setting the default of that verification off. I tried to leave comments at several blogs, but after trying numerous times to type in the correct word that I saw, not having verifier accept it, I finally had to leave without commenting on some very pretty cards. If I could find an email to contact, I copied & pasted my comment in an email. I like to pay the courtesy of returning a visit to anyone who is kind enough to come spend time with me. However, like most of you -- I have a limited time to spend surfing, commenting, etc. (and being basically a lazy person anyway!). When I have to try several times to leave a comment, can't, then I hop on to the next blog. Anyway, just sayin', if you don't see me leaving a comment at your blog, that may be why! I have been trying to spend a little more - much needed time - cleaning up my stamping clutter. Have not made much of a dint in it sad to say. I've also been coloring some images that need to get put on cards. This morning Mr. DH asked if I had made up some Halloween cards to send to some of his buddies. Told him, Nope, I have images ready, but you must help decide what to do with them. This is because he saw my cards that are ready to be put in addressed & stamped envelopes spread out on the kitchen table. He was getting ready to lay claim to a couple of those, and I said "Oh No you don't! Those are all spoken for". So perhaps this afternoon....hmm? He's been a little on the puny side since Sunday..thinking maybe it's a cold coming on. No sniffles, just a headache, snuffy head feeling. I've kept my distance except for TLC with regard to eating, hot tea & such. Hope to post something later on today. Just thought I'd pop in with this fast pst, as I have spent most of the early afternoon trying to play catchup on visiting blogs. Wanted to leave my thoughts on the word verification. I didn't know about this being the default setting when I first started this blog, and a visitor kindly told me it can discourage comments. You can leave the moderate comments set to on, if you wish, and use that to filter out anything you don't want to post. I've found that all my visitors have been so supportive, encouraging and leave such kind comments, it's not been a problem at this site. Anyway...enjoy your afternoon. Hugs.
10/22/2012
Halloween
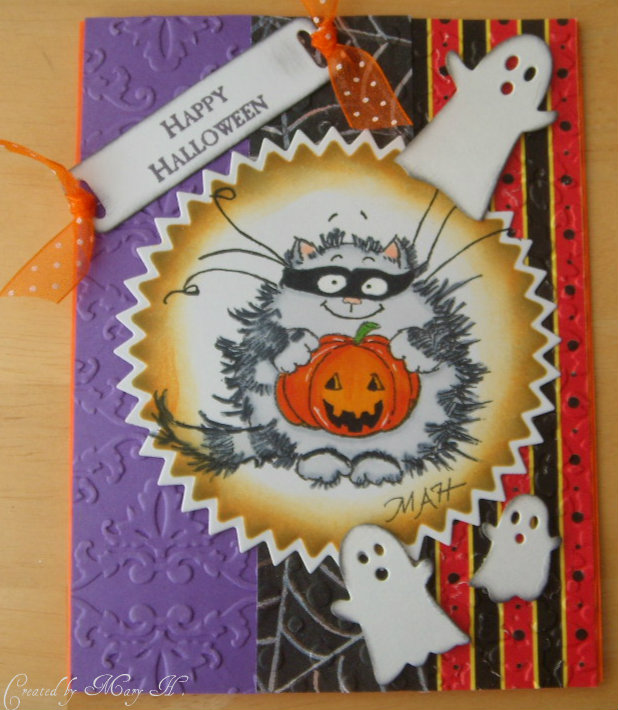
Edit: Once again, a big thanks to Linda for reminding me this can be entered at the Penny Black & More challenge for October.
10/21/2012
Class Cards
 |
| Class Project-Ritz Glitter |
Sookwang tape - punched with a large circle punch, backing removed so as to place sticky side down on ornament. Then burnished on the other side - which has a backing also - to adhere this circle to the ornament, carefully removing any air bubbles. This is a convex surface, so the circle shape has a tendency to crease. Remove the other backing once circle is down to your liking.
Place a used dryer sheet over the sticky surface, dipsticky part of ornament in Ritz Glitter of your color choice. Brush off excess, burnish well. Then dip again in a white Ritz as the dryer sheet has 'holes' which will collect more Ritz - to give a sort of halo effect. (You can see where the white shows on the red at the bottom of the decoration). Burnish again. The burnishing causes the glitter to adhere so well, that it won't come off later as other glitters will.
After removing the dryer sheet, place an Elizabeth Craft sticker on the glittered surface, smoothing to remove creases. Remove center part of the sticker, dip in gold glitter. Now you could remove the inner petals - first to glitter the leaves. Then remove to glitter the poinsettia petals. I chose to only glitter the center. I removed the inner petals, then colored with copics. There was another technique, sans the dryer sheet, which gave a more translucent look. I plan to get some of the glass ornaments, try that technique. Hope you enjoyed this share, and I HOPE I got all the technique steps described accurately & didn't cause confusion with how I described the process. There's lots of Youtubes available on this Ritz Glitter stuff, and it is much fun to do. No matter how much you think you 'mess up', it still turns out lovely. Each student had some sort of wailing about something that didn't look like our example, and truly, everyone's turned out beautiful! Thanks for dropping by to visit. Catch you later!
Class Cards
 |
| Ritz Glitter Class card |
Today's card share is a class sample made in the Ritz Glitter class I took with a stamp friend on Friday evening. Oh what fun did we have at
Scrapbook Creations in Spartanburg, SC, with the very talented & very patient Anita as our teacher. As you may -or may not- remember, I've have this class before, but I always learn something new - or refresh something I've forgotten. Happens a lot. LOL. Anyway, this sample is the reason I took the first class some time ago. DH saw the sample in the store and said "This is beautiful...you need to take this class", so I did. In the other Ritz Glitter classes I've taken, we've made many different cards using different aspects of the Ritz techniques. Anita had us do this sample again as one of our several Friday night class projects. She said it is the most requested of the projects, and I understand why. It's my favorite of all the things I've done in these classes. Ok, here's the specs:
Sookwang tape on lightweight c/stock
Ritz Glitter - remove backing from Sookwang on the c/stock, dip piece in Ritz cool white highlight. Brush off excess glitter. Then burnish well, becomes like velvet, won't fall off.
Elizabeth Craft Outline Stickers - holly. Place carefully on the white glitter, tap down well.
Copics of your choice to color holly leaves. Touch copic nib lightly to the glittered surface to shade; use blender pen to pull color towards holly leaf tip.
Elizabeth Craft Jewels for the holly (although I colored underneath my jewels with a red copic as well)
Brown copic for leaf branch.
Holly piece adhered to dark brown c/stock
Dark Green Bazzill textured card base
Gold Shimmerz sheet for bottom trim, after having been embossed with a Provo folder. We had several from which to choose, & I don't know the name of this one.
Gold trim adhered to c/base, holly piece adhered to card front.
There are lots of Youtubes available on this technique, so if it is of interest to you, search on Ritz Glitter. A very fun technique that gets awesome results. Hope you enjoyed this share, and as always, thanks so much for stopping to visit. Have a Blessed afternoon.
10/19/2012
Thanksgiving
 |
| Oldies Card-HouseMouse |
Thanksgiving
 WELCOME to some new followers. I'm so happy to have you visiting here. Hope that you'll find something you enjoy viewing. And it's finally Friday. Love my Fridays. This evening a stamp buddy & I are driving up to Spartanburg to take another Ritz glitter class at Scrapbook Creations. What fun. Today's card is an oldie Stampability House Mouse image(Pumpkin Pie, HMIR1016), colored with copics. I don't list the colors I use, but if you should ever wish to know this info, please leave a comment & I'll get the marker number info to you. My method of coloring is to start with a general idea of which marker family I want, then experiment with different marker combos,and I don't usually write down which ones I use. I work on a scratch piece laying down colors, until I decide on one that fits my image.(This is NOT the way the Copic classes teach, BTW!!! I do know the correct way to color, but my cards are not for a teaching classroom; I do them for those I care about...so I do the cards to suit what I want! LOL) Basically with copic coloring, as with any medium, you want a blended look, so if my color choices achieve that on my scratch paper, I go with those colors.
Specs: Diecut with S/Binders Resplendent Rectangle - S5-147, and I used 2 of the dies in the set for the image & mat, the smallest for the sentiment.
Mat paper is from a 12x12 sheet of My Mind's Eye - Fall's Swirl; houndstooth is DCWV 12x12 pack called Natural Stack.
Darice EF Fleur de Lis design on houndstooth, but it does not show up very well. Cardbase is orange Recollections - lightweight paper.
This will be entered in the Outlawz Friday Copic/Promarker Challenge
As always, thanks so much for spending some time with me, and have a wonderful weekend. Hugs
EDIT: Miss Linda of Snail's Space was kind enough to let me know this image would fit into the Penny Black & More Challenge so I am going to also enter my little meeces into this challenge. Thanks so much for the heads up Linda! Appreciate it. You might want to check out this challenge...some awesome talent to be enjoyed.
10/18/2012
Christmas

Card specs:
White c/s for base, embossed with the C/B dots folder, then scored top & bottom with the Scor-Buddy.
Fiskars Bow punch, red c/s, rhinestone trim
Martha Stewart leafy twig punch
Memory Box Stocking Die
Various 6x6 packs of Christmas paper (We Are Memory Keepers, Nordic)
When I saw Kittie's card, I decided to get the die, purchased from Oozak.
So that's my card share today, and I have scheduled 2 posts, because I really MUST get in my stamp area, and do some cleaning. So ya'll come back real soon.
10/17/2012
Thanksgiving
 Welcome blog hoppers to the 5th stop of the Oldies but Goodies blog hop. I want to share an Oldies But Goodies Stamp I purchased some years ago, when I first started into this hobby. I saw this stamp by The Artful Stamper, done in watercolor in one of our local stamp shops. When hunting for a stamp for the OBG blog hop, I thought of this stamp. OK, as usual, my image is colored with copics on Copic Xpress paper.The image was stamped with Versamark, then embossed with Ranger's Queen's Gold, prior to coloring.(use copics carefully on embossed images to avoid nib damage). I chose to use some blue-violet at the stalk of the punkin, because I thought it enhanced the oranges in the pumpkin. Used Spellbinders Circle & scalloped circle to diecut the image and the mat. I chose the purple color for the scalloped mat, then sponged some Distress Ink Concord around the edges as I wanted to emphasize the violet shade in the image. The papers are snippets that I had used for other projects and were handy on the desk. I used an MS border punch on the center panel, again selecting one that might emphasize the curlicues on the pumpkin stem. Hope you enjoy this card, and as always, thanks for visiting.
Here's the lineup for the Oldies But Goodies Blog Hop....
1. Mary Anne at http://
2. Cindy at http://
3. Maria at http://
4. Mary G at http://
5. Mary H You are Here (http://carolinacardsbymaryh.blogspot.com/)
Enjoy the hop and kindly leave a word of love and encouragement for all the
bloggers!
10/16/2012
Miscellaneous
 |
| Maple Tree |
Good afternoon, and welcome to Carolina Cards. We are having a gloriously beautiful Fall afternoon here in Upstate SC. Thought I'd share our little maple tree with you once again. As you hopefully can see by the pictures, and if you remember my previous posts of this little tree, it is turning redder each day. We had some rain yesterday morning, and I was afraid the rain might dislodge some of the leaves. The other 2 pictures are of trees I can see turning lovely colors if I step out on our front porch. For once my camera did justice to the marvelous blue sky we sometimes have in this area. There is not a single cloud about. This is called a Carolina Blue Sky by the folks who live in the area. I hope you will enjoy seeing just a little bit about the sometimes very scenic area where I live! How's the weather in your part of the world???Happy afternoon. Thanks for stopping for a visit. Hugs
 |
| Neighbor's tree |
 |
| Trees across the street beginning to change color |
Fall
 Good morning and so happy to have you visit here. This is probably the fastest card I've made to date (and I had already colored the image some time ago or it would not have been fast!). I had posted another card with this image, but couldn't locate the stamp to give the maker...found it while rummaging for another stamp, and this one is a Lockhart stamp that I've had for a while. The image was colored with copics, using Copic Xpress paper, diecut with S/B oval, embossed & sponged while still in the die. Think I used DI Scattered Straw or Antique Linen for the sponging. When I mat images, many times I remove the center part which is hidden, using a S/B die that fits as I need it. This is a tip I learned at Candee's (http://cardcornerbycandee.blogspot.com/) and it saves weight on postage. Additionally, you have a snippet for later use. Worked great here with the green piece of paper, and I used a Cuttlebug dots folder, rounded the 2 bottom edges with a Fiskars Corner punch. The red paper at the top is also a snippet, as is the bottom paper, which was from a 6x6 BoBunny pack. All I did was cut these 2 papers to size, adhere to the white cardbase. (The blue that you see was a paper I laid under the card to make it photograph a bit better). I would go over to the Playground since I've used so many snippets, but I'm scheduling this one to post, and not sure how that would work! So ya'll have a lovely day. Once again, thanks for coming.
Edit: This posted as scheduled this morning, so I'll nip over to Pixie's real fast and see what those playground ladies are up to. This is a really fun & friendly place to visit and I guarantee they will make all you snippet users (and you KNOW WHO YOU ARE!) welcome. Always something interesting going on in the new playhouse! See you there, maybe! Hugs & Blessings for today.
10/15/2012
Winter

Thanks for visiting this Monday afternoon, and a BIG Southern welcome to 3 new followers. Glad to have you coming in to see Carolina Cards, and hope you'll enjoy what you see here. As promised here is another effort at sponging ala Heather Telford of bits & pieces. I did the sky sponging first, using Memento Summer Sky, Bahama Blue, and Angel Pink. The snow landscape was Summer Sky only. Using post-it notes at the bottom, I covered some of the snow, in order to stamp the new SU Evergreen pine tree which I just received. I used Memento Northern Pine to stamp the trees. I stamped the center tree, reinked the stamp and stamped off before stamping each of the other 2 trees. I cleaned the stamp, then stamped versamark, to try to get a 'snowy' effect on the 2 distant trees. I used some Zing white EP, and I'm not happy with this EP. It gives much too thick a coverage for my taste. I'm too accustomed to the Ranger, I guess. But keeping to my personal challenge, to show my progress at this technique, I posted the card. Used the silvery holograph paper to diecut the I.O. smallest snowflake. The image was matted on some green paper (snippet!) that was handy. Made the cardbase with some dark blue- a snippet also from where I'd cut an 12x12 c/s for something else. I decided to use an I.O. Cover A Card snowflake stamp on the cardbase, then added some Ranger Silver Pearl EP. I like the look IRL but doesn't show up too well here. So I think I'll check to see if anybody is at Pixie's Playground this afternoon...those girls are ALWAYS so much fun. See you later..and have a Blessed afternoon.
10/13/2012
Winter

I've tried this technique before, and results were terrible! This one is my best effort to date, and I'm not real happy with it. This one is going to be my benchmark!. I used a die template from My Favorite Things to sponge Summer Blue Memento ink along the template(recently realized I've been mispelling that ink brand..sorry) . Heather has some excellent tutorials plus Youtube videos. She's a good teacher, I'm just not as good at following her directions! But I'll improve. Moved the die along at different places to get the snowdrift look. This was a snippet of white paper, by the way. LOL. Just sayin'. I sponged the sky with Summer Blue & Teal Memento using daubers. Diecut the Memory Box birch tree - used copic gray along the trees, to get a look of the white birch trees I see up in New England. Once the trees were placed along the snowdrifts, that didn't look just right, so I used another snippet of white, a little more sponging. Then tore this paper, used the glue pen along the torn edge, and put some Hero Arts Sparkly glitter on the glue. Adhered this to cover the base of the trees so that it looks as though they were deep in the snowdrift. Used a S/B die for the sentiment, which is an older stamp, that came 3 to a set. Stamped with versamark, heatset with Judikens Aegean Silver EP. Decided it needed a bit more glitter at the top of the sentiment...not sure I liked that after I did it. The snowflake at the top is a MS snowflake punch in the holograph paper. This punch didn't like this thicker paper, so next time will use the I.O. snowflake die with this paper. I adhered the card to a light blue moire paper, then onto a white cardbase.You will be seeing more (maybe!) of my sponging attempts because I think this is a really neat look & I want to improve with the technique.
So thanks to Heather for her great tutorials, and I hope one of these days, I'll be able to do them justice. Truly, if you have time, take a look at some of her cards on Bits & Pieces. They are simply wonderful. As always, thanks for visiting. Have a Blessed weekend.
10/12/2012
Miscellaneous


Bon Voyage

Impression Obsession Cover a Card (CC015) - Gradation - stamped in Fluid Colorbox Chalk Creamy Beige
I.O. CAC (CC088) - Passport - stamped in Fluid C/box Chalk Deep Lagoon
Paper House Cardstock Stickers - STCX-0061 - Rome
Bon Voyage stamp - Michael's $1 bin - Deep Lagoon ink
I used the Acrylic Mega Mount block by Impression Obsession to mount the CAC stamps. I learned in classes with I.O. that when doing the multiple stamping with these CAC stamps for a background, to start with the lightest color, then darker. There's a good video at the I. O. website. I'm not great with using stickers, but when I saw this set, I knew exactly on what card I could use them. I used a S/Binder rectangle die to cut out the center of the cardstock front after stamping with the CAC's, embossing around the space (which doesn't show well here). I adhered a teal c/s piece (ah, those handy snippets!) underneath, then stuck the Rome sticker to that. The other stickers are places I know will get visited on the trip. Be back later with a few pictures of 'around the yard' photos. Thanks for dropping in this afternoon. Hugs.
10/11/2012
Miscellaneous
Hi again. Second post of the day. Reason: Just followed a link to this nifty blogger who is celebrating her 2nd blogaversary & reaching 200 followers. She's offering 2 different blog candies that will go two lucky followers. Just thought you'd want to know! Here's the link:
http://pickledmemories.blogspot.ca/2012/10/candy-time-200-followers-and-2-years.html
Now to see if I can get some pictures of the candies you might win:


http://pickledmemories.blogspot.ca/2012/10/candy-time-200-followers-and-2-years.html
Now to see if I can get some pictures of the candies you might win:


So when you have time to blog surf, you might would enjoy checking out this blog, becoming a follower and winning some lovely candy. I just love to be an enabler!!!
Enjoyed my time visiting with my Thursday stamp group today. Did I accomplish anything? Well, no, but I saw some really awesome talent at work. It was great to get out with crafty folks once again. Til next time, thanks, as always for dropping in to visit.
Fall

Challenges: Outlawz October Challenge
Pixie's Playground
10/10/2012
Thanksgiving

10/08/2012
Christmas
 |
| Penny Black Gift Stamp |
Since this was a PB gift stamp, I'm going to enter it in the October Challenge at Penny Black & More. I'm trying to figure out how to post it at the Penny Black blog, since my comment at that blog is how I got this sweet stamp.
10/07/2012
Miscellaneous
 |
| Penny Black Stamp win |
THEN...I decided to share what it is beginning to look like around our neighborhood here in the Upstate SC area. The maple tree is about 10 yrs old, planted when we built the house. It's not very large, is it? But as you can see, it is starting to develope a bit of color. In a few weeks it will be totally gorgeous. I think this was called a Sunset Maple when it was put in. We had 2, but the prettier shaped one only made it about 5 yrs, then a strong wind broke it off at the trunk. We replaced that one with an October Glory Maple, which really turns a flaming red color, but that one is still quite green. It is growing upward, but not getting a round shape. The other trees are what we see from our front porch, and as you can see, the tops are beginning to get a bit of red & brown. This area will be glorious to see in just a week or two...IF we don't get a lot of heavy rain. Then the trees shed their leaves, and we don't get the glorious Fall colors. That's one of the things I enjoy in this area, as for so many years in Fla, we never saw this blaze of glory. Thanks for stopping to visit, and a BIG Welcome to my newest follower. See you later, and hope you enjoy the tree pics.
 |
| Maple Tree in our front lawn |
 |
| Neighborhood trees across the street |
Birthday
 Welcome. Let's have a cup of something and chat for a bit, why don't we? Well, since I'm at the keyboard, I'll chat, and you, my lovely visitor, can comment! How's that? Here's a PSX sunflower (at least I think it's a PSX...as it's an image I stamped up from a borrowed stamp during one of our local Thursday stamp gatherings some while ago). A lot of my buddies have PSX stamps, which closed their business long before I ever thought about getting into rubber stamping. These ladies are so generous to share their stamps - which I do appreciate. I decided this cheery sunflower would make an end-of-summer birthday card that I must get ready. Of course it's colored with copics onto Copic Xpress paper. Diecut with a S/Binder rectangle (and if you should want to know the name, leave a comment; I'll be glad to look it up and edit this post to give exact specifics). As you can see I sponged the outer edges. After I sponged on the outer scallops, I wasn't too sure I liked it...believe it might be more effective to keep all sponging inside. Oh well, when it's done, it's done! I have a few more of these stamped, so when I color another one, I will leave the outer part white. I put some Glossy Accents onto the highlite in the brown centers, used some sparkly Spicas around here & there. Also added some white Viva Decor Pearls in the corners, & on the little flower by the sentiment. Sentiment is from the SU Teeny Tiny Sentiments, used 2 SU punches for the sentiment. The mat is a snippet of green Bazzill left from another project (where I had cut out the inside to save on the layering weight...those pieces come in quite handy!) and the cardbase is craft. Thanks for popping in, and I enjoyed visiting with you. See you later, and have a lovely day. Think I'll wander over to the Playground and see if there's anyone playing...I hear it's wet & windy, but maybe they might enjoy a cup of Keurig's Chocolate Raspberry Truffle. Ummm yummy. These are some fun ladies, you might want to check out Pixie's Playground if you have time, look for the latest playground challenge. Some very talented cardmakers...and so generous with their help & support to a new blogger. Thanks for visiting. See ya later.
10/06/2012
Florals

Let me explain my problems with getting these cards to a pc file in order to post! Just installed a new modem, about 2 wks ago, still having internet access issues. Our wireless router apparently is working intermittently, according to our internet provider's tech. He disconnected the router, so therefore my wireless printer that I used to scan, won't work. We have 2 other printers, but I can't access them with the pc I normally use. Bring up the other pc, so as to be able to get to one or the other printers which 'should' work. Well, one is a Lexmark All in One, so that I could scan and get the image to a flash drive. The other is a Canon, which I was using to try to print out my Hobby Lobby coupon. Haven't used either in a while, so the ink is all dried up! Since I haven't used the Lexmark for so long, I had to scurry around, try to get the settings to show this card and my earlier posted card, so that they didn't look 'wonky'. I was thinking some unpleasant thoughts about letting the tech disconnect my router; I didn't think about the fact that the wireless printer is dead, with the router down. I attempted to reconnect it, but according to my pc guru, the IP address has been lost. Hopefully Monday, we'll have a new router in place. Having pc trouble is almost as bad - but not quite - as having car trouble!!! Anyway, hope you will enjoy the card. It does look much better IRL, and I will be trying these THoltz markers again. This is the first time I've felt that I really liked them. I've seen some nice things done using the markers, but my efforts have not been all that great. As with all things, I am sure it is practice, practice, practice. Hugs to you all. Thanks as always for visiting.
Miscellaneous
SPOILER WARNING: Just a tiny bit of enabling for my USA followers. Acting upon a tip from Miss Candee of http://cardcornerbycandee.blogspot.com/ that Hobby Lobby had some neat small Christmas punches by Fiskars, I made a trip to H/L this afternoon. Along with the router going out (IF it really did...and is not just our Provider's usual caveat that it's OUR equipment not THEM!), my glue gun died too. So after checking Walmart last evening, not finding what I thought I wanted, I decided to check out H/L. Well, got the glue gun (a dual temp one...and not the one that uses batteries). Couldn't print out my 40% coupon because of the printer issue, so I asked one of the sales assistants if there might be a spare coupon lying about. (The gun that I wanted was nearly $20...so the 40% off helped). He sees me in there all the time, so being a nice fella, hunted up a coupon for me on the QT. Asked him about the punches as I was not finding them. Got pointed in the right direction, and OH BOY! There was also a 40% off on all Christmas Crafts items...so I found several Fiskar Christmas punches...along with 2 holiday border punches. So if you have a Hobby Lobby close to you, and you can find the time this afternoon, might want to give a check out on this one..if you need some more punches. (Oh YES you probably DO! Just as I did!:-) ). I expect this sale will end tonight when the store closes, so if you think you might want to get some cute punches, don't delay! Just thought you'd want to know!!! Doing my bit to help the economy....LOL. Having a beautiful day weatherwise, and got a box of New England apples sent to us by our best friend who lives near a lovely old orchard in Massachusetts. Yippee. Unfortunately, these are usually tart apples, which DH loves, but I prefer a sweeter taste. No fear, though, these won't go to waste!!! Later.
Fall

10/05/2012
Thanksgiving

Thanksgiving

Here's a fallish card, that I am pretty sure will get a Thanksgiving sentiment. (May add some punkins?...dunno yet). Anyway, the stamp is a Stacey bird stamp, and I googled Blue Jays to get the coloration. I was pleased with how Mr. BJ turned out. I wanted the leaves to be sort of fall themed, hence the colors. The top fold card is lightweight blue smooth Bazzill, texturized with Silver Fern Embossing Folder (the brand says Universal Embossing Folder...probably an online purchase). I inked the folder with Momento Bamboo Leaves, prior to embossing. The paper trim was just a piece from the stash. Oh yes, Mr. Blue was diecut with the Spellbinders Classic Diamond. I traced the die onto green paper, handcut to get a scant mat. Pretty simple card. Hope you will enjoy it. My photography is not great.
I have another card that I'll schedule to post later this evening. I have several images ready that I just need to get onto a card. So have a great evening, and thanks for the visit. Catch you later!
10/02/2012
Thanksgiving

Good afternoon, and Welcome. I am back on track with making some Thanksgiving cards, and here is one that uses kraft as the cardbase. I had colored a small cornucopia image several weeks ago. Can't just lay my hands on the stamp at the moment, so I don't remember the maker. If anybody should want this info, I'll hunt up the stamp for you. Anyhoo, it's colored with Copics, on a scrap of Copic Xpress paper. The highlights were done with a white gel pen. Image was diecut with S/binders Label 12, sponged with a bit of Wild Honey. I was looking for papers to use, and noticed a BoBunny 12x12 that I had picked up this weekend at The Stamping Place in West Columbia, SC. It's BoBunny Forever Fall Die Cuts, and thought this motif would work well with my image, with the added bonus of being fast to select! The sentiment was by Just Rite Happy Everything Tag Making Kit (JB-09820), stamped in Momento Teal, diecut with one of the dies from the Happy Everything Kit. The cardbase has 3 scored lines, top & bottom, although it's hard to see in the picture. I added some narrow orange ribbon at the top, and I may trim off the tails on the bow. Still thinking about that! Have a great afternoon. My recliner is calling my name after a nice hotdog lunch at our favorite Wally Dog. Met some folks, had a pleasant lunch, ran some errands, now ready for an afternoon nap. And YES, I DO have some things that ought to be done, but this is what retirement is about...doing what you want, when you want, If you can, AS LONG as you can!!!! Hugs. (PS...the prize Mboss mailing was one of the errands).
Subscribe to:
Posts (Atom)