Followers

3/12/2017

Easter Eggs and Blog Candy

Hi Ya, and Welcome to a Fifth Blogaversary post. YAY! that time sure passed quickly. And how many wonderful friends I've made during the past 5 yrs, and even got to meet a few of you IRL.

First, though, let me welcome 2 new followers:

Donna S of Donna 4 Papercrafting
Cheryl B.
 
 
Thanks so much for becoming new followers. I couldn't find a blog for Cheryl either, so if Cheryl visits here again, and you have a blog, please do let me know! I'll add the link, so that my friends might be able to visit & enjoy your work too!
 
Now...here's today's card, and we'll talk about the blog candy after the card:


 -Inky Antics Rabbit & Cart - colored with copics and WoS. Check out the cotton tails on these little bunnies. Eggs came from this set and another clear Easter set.

- various Impression Obsession grass dies cut the layers of grass from differing shades of green snippets.

- used an Inky-licious brush to do some clouds (definitely could use some more practice with my clouds!)

My cleaning & sorting is still ongoing. It's amazing how many duplicate items I've run across...but I hope they can find a home where they can be loved & used (and not forgotten!)
 
 *********************************************************************************
BLOGAVERSARY CANDY RULES 
 
1. Winner(s) must be a follower, who visits when you can...please don't follow just to get the goodies, and thanks. I will mail internationally too.

2. Please post the candy picture on your sidebar (forgot to add this!)
 
3. Will add a few more surprises with each post I can do during the time from March 12 to March 19 when the candy is won. So watch the picture in the sidebar for updates.
 
4. All items are new, but depending on mailing costs, may need to take out of original packing to keep down the postage.
 
5. Please leave comments if you'd like to be considered & if you don't have a blog, please say how I may reach you if you're a winner. Comment moderation is on, so your info will stay private.
**********************************************************************************
As anyone who has ever won blog candy here can tell you, I include a few little extras when the package is mailed besides what is shown in the picture. I like to appreciate my followers who visit here. Depending on how many items I add to the picture, I may do more than one Random Generator draw (since I don't know how to use the Linky, I'll use my followers spreadsheet names).

We got our little snow flurry this morning (I was asleep so saw no white stuff. DH said he did). It was quite frosty today too, with a very chill wind. Tonight & the first days of the week are predicted to be colder, rainy & foggy. Don't think we have to go out anywhere, so will be good to stay cozy inside.

Took some pictures of what I can see in our yard today, thinking what crazy weather we've had.


Daffodils coming up by an old plow we have in the front bed
 
Flowering Cherry Tree, with a white Bradford Pear behind it. You can see that our grass is starting to green up.
 
Tulips coming up by our front steps. These bulbs were planted about 15 yrs ago. Guess I should plant some new ones next Fall, as we only have a few that are still sprouting each Spring.
 
 
Thanks for joining me this evening. Ya'll come back, now heah? Big hugs, and stay warm if it's cold & stormy where you are.


3/10/2017

St. Patricks Day Frogs & Organization too

Good evening, and welcome. We've had a lovely sunny day, warmish according to the temps, but such a wind that howled & chilled. Tomorrow the prediction is for a wintery mix, and may get snow flurries. What crazy weather! We've had snow in March before. I can remember seeing the tulips peeking up above the snow. However, flurries don't stay on the ground, and we should not have to go out in any 'weather'. Hope it will be nice where you are.

Back again with another St. Paddy's card. Got most of them in the mail. Still have about 3 more to finish up. This afternoon, Mr. was waiting on me to go out and I was hurrying to finish up, so this  one  just has pattern paper and a design from a 6x6 pack + some die cuts.


Lots of snippets on this one too. The wonky stitched  outer frame is left from another project, as is the green one. The DP also a snippet - from VOS. The center motif is a page in an Irish themed 6x6 pack, so just cut one out. Impression Obsession shamrocks were cut from a snippet from some created background done who knows how long ago. It's left over from die cutting a Christmas tree, probably early in 2016. The photo doesn't show it, but there's some gold mica in the striations of color. I like the shamrocks best of all on this card. It truly is one of the fastest cards I've ever made. (being told "if you want to go get something to eat, you better get a move on" can speed up the process. I just happened to remember having this 6x6 pack and that it had a page with squares on it, that can be used for motifs).

Here's another project I've been working on - off & on. Debated on sharing, since it's so messy (embarrassing really). Last year we got some Ikea Alex cabinets. Mr. put together for me, put castors on the base so these can be rolled to wherever. Been trying to sort through wooden and clear stamps, get them together as to 'themes'. I had stored previously more by companies, and that's definitely not a good organization. Didn't realize how many flowers, birds, dogs, frogs, leaves & trees I have. Also tried to sort the Christmas themes as to Santa, wreaths, Snowmen, Poinsettia, Christmas animals, religious, sentiments & keep those together; ditto for other holidays too. I can already see that some of the drawers I've labeled, will have to be changed as I'm finding more stamps & I wanted to try to keep the drawers consecutive with the theme (say 2 drawers of birds and then not have a 3rd one in another cabinet). I'm open to any organizing ideas you care to suggest. Also I'm stacking stamps on top of bottom layer, so I foresee I'll still have to search. At least hopefully it will just be in one place, not all over the room. (I'm hanging my head in shame at this mess and  how long it's taking me to get things cleaned up. My friend Hazel, has spurred the incentive to get cracking on doing this, as she has been doing some hard work at reorganizing her space.)

the plastic 3-bin drawers look sad, and I'm trying to think of another use for these. They're still in good shape, so don't want to just toss. Behind the door on the right of the picture, there are 2 double wire paper racks. Got these as a 'bargain' when a store closed. It's great storage if you have 100 sheets of the same pattern. Not so efficient if you have a couple sheets of many different color patterns. I want to eliminate these, and perhaps put 2 more tall file cabinets, or some more tall Alex cabinets (or something similar). Behind the 2 chairs are the big plastic bins you pack stuff in & it's adventurous moving in that space. One day I hope to move the chairs to the back wall, where the sofa is, maybe put the sofa in place of the chairs. You can just see the dark recliner (hand-me-down from a neighbor who redecorated) and that's where I sit to watch tv, color & doze at night. The plastic bins in the dark bookcase hold small dies, which I have sorted by theme, and also embossing folders. I don't like the look of the bins in the bookcase, but where to store. These bookcases used to hold books, dvds and things that looked 'nice'...not so messy. I'm lucky that DH doesn't fuss at me for the chaos I've created in his tv room!

 the narrow bins on the floor are from Harbor Freight (a guy's place! and used for storage in garage. They are inexpensive, hold clear stamps in a standing position, you can flip through easily, see what you have. I'm trying to separate these by sentiments, flowers, etc. Hopefully I can get all the stamps & matching dies together in a labeled clear envelope so I'm not hunting for the die to go with a stamped image...like I do presently. You can see the ground level window that lets in little natural light. In the next picture you can see another Ott light - and there's a fluorescent hanging light above the desk. Also lights on the ceiling fans, but these just give room light, not good work light. You can't see the recliner I'm usually in at night, but there is a floor Ott light by that chair, just as there is one by the sofa.
 
Desk is on this side of the room. The table shown is the same height as the desk and has way too much mess. Shelves above the desk and this table are loaded. The tall Alex cabinets in the previous pictures were along this back wall. Decided to move the shorter cabs to this wall, and put the SU stamp bins where they are easier to swivel if I'm looking for a color. Across from this area, is another table that has the cameo & laptop, but you can't see it just now because of all the mess piled on top of everything. It's daunting, but I've been trying to work a few hours each day. Nobody but myself could possibly see that I've made any progress!!! Please tell me I'm not the only card maker who has this kind of mess! You can be sure that IF/WHEN I get this all sorted away, I will share pictures of a clean, straightened up room. Of course I still may never be able to find anything :-)
 
Just added a new card to the Cards by Friends page, hope you'll have time to enjoy it with us. And perhaps go visit the kind person who sent it to us.
 
Thanks for joining me - hope your weekend is going to be just swell. Hugs & Prayers.


3/05/2017

Christmas Card Club Challenge #5 - Something Non-Traditional

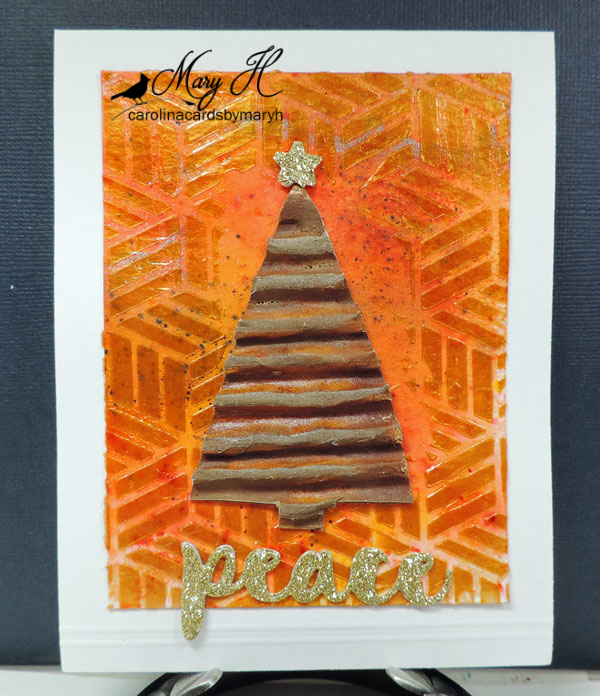
Welcome to Christmas Card Club Challenge #5, the theme of which is "non traditional, a little whacky, unusual colors" and was chosen by Zoe, of Stamping Scene. I decided to go with non-traditional colors.....


 - Orange background was created with Brushos, Colorburst powders, some Paper Artsy Infusion powders. Sprayed the dried piece lightly with a little Tattered Gold spray. Once this dried, Dreamweave Gold Embossing Paste was applied using a Hero Arts Star Grid stencil - just around the outer edges to frame the tree.

- A salvaged piece of cardboard from a shipping box was separated to get the corrugated look. Applied white gesso, then a layer of Ranger Bronze Stain. Dried, then applied more gesso, some Paper Artsy Rusting Powder, spray with white vinegar and let it rust.**

- Impression Obsession Christmas Tree die to shape the tree. At first intended to die cut, but thought that would seriously flatten the corrugated shape. Flipped the tree to the back side, traced around the die in a rough tree shape, and hand cut it. Several punched tiny stars were made from gold glitter paper, glued together to create some dimesion on the star.

- Memory Box sentiment cut the same glitter paper, 2 layers. In between these layers, is a thicker layer using a cardboard snippet that handy. Hope this fits the unusual colors theme that Zoe was looking for. It could also fit in with the whacky part of the challenge too!

**Inspired by this card at Cathy's Card Spot. If you didn't see this unique and lovely card, I encourage you to zip over to enjoy it.

I also hope you will take time to check out what my fellow teamies have shared for this Sunday's Club Challenge.Their links are over on the right side bar.

Hope your weekend has been lovely, and that you're looking forward to a great new week. Thanks for stopping by. I'm a bit behind on commenting, but hope to catch up this afternoon. Big Hugs

3/02/2017

Easter Basket

Hi There and welcome. So happy you could pop in.  I'm trying to finish up with the St. Pat's and get a few Easter cards made to be mailed in a more timely manner than I did with the Valentine cards.
Found this Easter image in the box of UFO's, added more contrast to something I'd colored who knows how long ago. The image is fairly large to put on the size of cards I normally make, so decided to make it just a round card. At first I had thought to use a Cheery Lynn doily behind the image, made from vellum, but then the card would have been large (think extra postage!), so the round shape won out.

- Don't remember the stamp manufacturer (could be Northwoods**). Used some WoS & Spectrum Noir glitter pens over the eggs and on the basket cloth, flowers. Die cut with a Hero Arts Infinity Circle die in the size that fit well with the motif.

- Impression Obsession sentiment Die257-D - cut twice. Colored top layer with a Yellow WoS. Left bottom layer white, and finally managed to do the 'shadow layer' in a way that pleased me.

- Used Dewdrop stamp pads in Desert Sand and Pear Tart to edge the outside of the card front. Still looks a bit plain.

Hugs.
** It's a Penny Black cling stamp