Happy Friday! Thanks for dropping by. I hope I've got my return visiting caught up, so I wanted to post another card. Remember this post where I said I'd done 2 water color Rubbernecker trees, misplaced them? Well here's one, that I finally got made into a card. (Still got one more to use up!) This will be for our neighbor's November birthday; she has a gorgeous maple tree in her front yard, that we probably get to enjoy more than she does, as it's very visible from our windows.
The Rubbernecker stamp was inked with Distress markers in fall shades, then spritzed. I think some Zig markers were also brushed around to add more color after stamping/spritzing - in places that looked like they needed it.
A stitched frame die was adhered over top of the stamped piece (because I had cut it too small...had to fiddle to get it to fit inside this frame). Then an old Tim Holtz 12x12 Fall pack was cut up to create the mat behind. Used VOS Paper Studio card pack of vintage sepia colors, to get the other design papers. Top right stitched rectangle cut from Sue Wilson Noble die, and an MFT angled die cut the spotted paper. The sentiment was embossed with Brutus Monroe Detail Copper. Tha's all folks!
Hoping that you have a wonderful weekend, with great weather. Our humidity has been less, and the morning & evening temps much cooler - but the day still warms up nicely. With less humidity, though, it's quite pleasant!
Big hugs - God Bless.
Showing posts with label Watercolor. Show all posts
10/19/2018
8/25/2018
August Twofer Challenge - Geometrics
Good evening, and welcome. I'm skating into the August Twofer Challenge by the skin of my teeth!
This month I tried very hard to play as the theme is Geometrics. I have circles, ovals, squares, rectangles, you name it. So it ought to have been super easy, right? Here goes, and see what you think.
Here's the 2 cards done using a skinny Double Stitched Rectangle, Set B, Sue Wilson. (hope this link to Walmart works. Mine came from Oozak when there was a 50% off, and it's no longer showing at the site).
- Northwoods Halloween image was colored with copics. Used the same skinny stitched rectangle to die cut the scene into thirds. Wasn't sure how this would look with the separation in the scene, but I think it turned out ok. A background of DOX was created using Dusty Concord, Mermaid blue and Carved Pumpkin. Sprayed this lightly with some Tattered Angels silver-y spray (which of course doesn't show. It made spatters I was proud of though!) Tried to use an unmounted plain rubber spiderweb stamp to black emboss - I've learned that unmounted stamps do NOT stamp well for me, so will be hunting up that mounting stuff I have somewhere. Decided to dry emboss a SU spiderweb, which worked ok, although not much of that shows either. Purple glitter paper was die cut with the Wonky rectangle (which needed a little artistic license. The large die in the set didn't quit fit for the trio of rectangles, so drew around the outer edge to lengthen it enough that the images would fit better. Then fussy cut ). Last bit was to use another snippet of the green brusho piece to heat emboss the Halloween sentiment, add some purple rhinestones. One Halloween card down!
I'm having blogger issues with comments again. I have deleted the email address, saved, waited a bit, then re-added the address, saved. But still not getting the comments. This started yesterday. So bear with me.
Off to link up with the August Twofer Challenge. Thanks for joining me this evening. Hugs.
This month I tried very hard to play as the theme is Geometrics. I have circles, ovals, squares, rectangles, you name it. So it ought to have been super easy, right? Here goes, and see what you think.
Here's the 2 cards done using a skinny Double Stitched Rectangle, Set B, Sue Wilson. (hope this link to Walmart works. Mine came from Oozak when there was a 50% off, and it's no longer showing at the site).
Also used the S/Binders Wonky Rectangle as a mat.
-SnS sunflower image was inked with DI markers onto 140# c/s. Then used a water brush to pull the color out. The skinny stitched rectangle cut the focal image. Then used larger sized rectangles from that set to cut the frame. Adhered a previously made Brusho background onto cream cardstock. Adhered the frame rectangle piece, then inlaid the watercolored piece. Added a stamped sentiment, 3 wooden look sequins, and decided to do a few score lines.
- Northwoods Halloween image was colored with copics. Used the same skinny stitched rectangle to die cut the scene into thirds. Wasn't sure how this would look with the separation in the scene, but I think it turned out ok. A background of DOX was created using Dusty Concord, Mermaid blue and Carved Pumpkin. Sprayed this lightly with some Tattered Angels silver-y spray (which of course doesn't show. It made spatters I was proud of though!) Tried to use an unmounted plain rubber spiderweb stamp to black emboss - I've learned that unmounted stamps do NOT stamp well for me, so will be hunting up that mounting stuff I have somewhere. Decided to dry emboss a SU spiderweb, which worked ok, although not much of that shows either. Purple glitter paper was die cut with the Wonky rectangle (which needed a little artistic license. The large die in the set didn't quit fit for the trio of rectangles, so drew around the outer edge to lengthen it enough that the images would fit better. Then fussy cut ). Last bit was to use another snippet of the green brusho piece to heat emboss the Halloween sentiment, add some purple rhinestones. One Halloween card down!
I'm having blogger issues with comments again. I have deleted the email address, saved, waited a bit, then re-added the address, saved. But still not getting the comments. This started yesterday. So bear with me.
Off to link up with the August Twofer Challenge. Thanks for joining me this evening. Hugs.
8/23/2018
Watercolored Sunflower (CAS August 2018 Challenge)
Good evening. Tomorrow is Friday..YAY. Even though I've been retired quite a few years, I still get happy when Friday is the next day. I guess it was ingrained in my consciousness for too many years :-)
I've been trying hard to get into this month's CAS Watercolor challenge, since it's sunflowers. Have a lot of those images (but when I went hunting in the flower stamp drawers, I wasn't finding as many as I thought I remembered having!!!) I was looking for something that would be easy to watercolor, since that's a bit of a challenge to me. Finally settled on a clear stamp that probably was from the Michael's Dollar bin. I knew I was going to stamp on w/color paper, and with that texture - it needs to be restamped multiple times, so I wanted a clear image I could keep reinking. Now please don't ya'll laugh at this card-----
used Distress markers in shades of yellow to ink up this stamp, and can't even remember how many times I kept reinking, restamping. The outline part shows up as though I'd outlined it, but that was the Rusty Hinge marker that showed up nicely here. I also had some of the Mustard Seed and Lemonade inked on the edges of this outline stamp. Then used a waterbrush to try to pull out the colors...that worked fairly well. Wanted a bit more shading, so scribbled the Mustard Seed on the kraft mat, and used the brush to add some more layers around on the petals. Center was done with adding a little Spiced Marmalade first, then using Tea Dye, Brushed Corduroy, and just going to darker browns until I got something that looked like the brown center of a sunflower to me.
Now here's where I said Don't Laugh! This was just a single flower...so I free handed the stem and leaves with the water brush. That little blossom just looked too lonely all by itself.
Mat was colored with brusho greens and yellows, also on watercolor weight paper. For some reason, it didn't want to spread well so that's why so many of the specks still show in the colors. The c/s was quite wet, but the crystals just didn't want to spread around even though I kept spritzing with water, finally with a gold spray. Decided I liked it anyway behind the sunflower and cut it with a S/B Wonky die. The sunflower looks like it's on white paper, but it was cream colored..the card base is also cream color, and IRL these 'creams' look the same color.
OK, off to link up with the CAS August Watercolor (AW, heck, go ahead and laugh if you want! I'm still trying to get the hang of watercolor). Skating in by the skin of my teeth----
Ya'll have a nice evening. Thanks for joining me & maybe see ya again tomorrow if I can finish a card tonight. Trying to sneak in the 2fer also! Big hugs.
Labels:
Brushos,
CAS Watercolor Challenge,
Flowers,
Watercolor
4/14/2018
Christmas Card Club Challenge #8 - Christmas Greenery
Every 2nd Sunday, our group of ladies in a Christmas Card Club share our cards - designed to a specific theme one of us has chosen. This week it was my pleasure to select the challenge theme of Poinsettias or any other type of Christmas Greenery. I had just used the poinsettia theme for our last Challenge of Christmas Flowers, so decided to go with Christmas Greenery. This stamp had a basket of holly, so decided that would be my card focus for this challenge.
- image colored with copics, WoS. I liked the way it turned out, but since there was a piece of water color paper that had been cut to size, messed up on one side, I decided to use the opposite (clean) side, to stamp the image again, and try to watercolor it using Zig markers. Used Hero Arts Concrete Flannel, the misti, and several stampings to get a good outline on the w/c paper. (140#). Heat set the outline before starting to w/color and it didn't bleed.
Tried to replicate the same colors as card #1 and I have to confess, I _still_ think #1 looks better. I see in the photo, which I had not caught IRL, that I need to do some darker shading on the berries to sort of 'separate' them. I can do that with pencils - I hope. I keep trying to master this w/color stuff...
Used the same supplies on both cards. (the red card front c/s came from a Christmas pack. Took out 2 sheets without realizing I had 2 sheets in hand, cut to make the 4.25x5.5 size card shape I usually use. Voila, there was 2 sheets together so I made one card base with the solid red, and the other with the red & gold dots.)
-MBox sentiment die - 3 layers, used Brutus Gilded Gold to emboss it. The circle mats were also gold embossed but I think I used a different gold power for that.
Hope you can visit our card group to see some gorgeous cards made on this theme...their blog links are in the right side bar. Enjoy. Thanks for visiting and come again when you have time.
Hugs & have a great day.
3/18/2018
Christmas Card Club - Christmas Flower
Welcome, and today is Challenge #6 for our Christmas Card Club. This is a group of ladies who make Christmas Cards and post every 2 weeks. Today's challenge theme was selected by Rachel who picked Christmas Flowers.
I decided to use a Stampendous cling poinsettia stamp, and work with watercolor again. Stamped and embossed with a new Brutus Monroe Ultra Gilded Gold. I'm very pleased that it seems to be very similar to my favorite Ranger Queen's Gold, which has been discontinued. Got out the Arteza water color pens to try. I had used Koh-I-noor mixed media paper which is supposed to be good for watercoloring. Well, folks, my water color skills are not great, and this paper pilled for me. Also I didn't find the Arteza pens to be quite as easy for me to blend as the Zigs. (not that I'm great with Zigs either!) Finally got out some distress inks and just touched the water pen to the surface and then tried to fix the hard edges on my work. Here's the result:
I didn't even bother to put this on a card. Was very tempted to just toss in the trash, but thought I'd share it here - yes, it's a wart. I keep trying with the water color & get so discouraged that it never looks very good.
Next effort - and once again tried the Arteza, thinking maybe my first image was too complex so I'd use a very simple shape. Used the same colors as above.
Do check out the fellow team members whose blog links are on the right hand side bar. Have a wonderful afternoon, and my blog candy winner has contacted me. I've been finding some other goodies to tuck in, and hope to mail it early next week.
Hugs & Blessings.
I decided to use a Stampendous cling poinsettia stamp, and work with watercolor again. Stamped and embossed with a new Brutus Monroe Ultra Gilded Gold. I'm very pleased that it seems to be very similar to my favorite Ranger Queen's Gold, which has been discontinued. Got out the Arteza water color pens to try. I had used Koh-I-noor mixed media paper which is supposed to be good for watercoloring. Well, folks, my water color skills are not great, and this paper pilled for me. Also I didn't find the Arteza pens to be quite as easy for me to blend as the Zigs. (not that I'm great with Zigs either!) Finally got out some distress inks and just touched the water pen to the surface and then tried to fix the hard edges on my work. Here's the result:
I didn't even bother to put this on a card. Was very tempted to just toss in the trash, but thought I'd share it here - yes, it's a wart. I keep trying with the water color & get so discouraged that it never looks very good.
Next effort - and once again tried the Arteza, thinking maybe my first image was too complex so I'd use a very simple shape. Used the same colors as above.
This image did color a bit better than the first attempt, but I still had to use the water pen direct to the Distress Ink pad to get good coverage. I had put layers of water color on the petals, but as it was starting to 'pill', decided I best go to the ink pad. This was done on 140# watercolor, and I didn't have a lot of water on the brush. Guess I was just going over the area too much perhaps. Die cut a red side fold card base to create an aperture. Die cut the image, then made a green frame. Once this part was adhered behind the aperture, cut another frame, used WOW embossing pad, then the Brutus Monroe Gilded Gold EP. This looked pretty good, BUT as I was adhering the frame over the aperture shape with glue that is not supposed to leave anything showing if some of it seeps out....well, you could see a smudge on the paper. What to do? Had a purchasedt Christmas card (some of my relatives who don't save cards but give them to me)...so started to fussy cut some poinsettias to hide the boo-boo. One fussy cut led to another...and there it is. You ever start a card, that no matter what you do, it seems to get worse?!
Almost ready to pull out the copics, as time was getting short. Decided to give the water color one more try. Found another image, used water color paper, Distress Inks. WOW embossing ink, Brutus Monroe EP, then put a light blue wash over the embossing. My first wash effort made some of the gold embossing flake off, so got another piece of W/C card and did the above process again. This time I was very careful to keep the damp brush off the embossing as I was doing the wash. Then used the Distress Inks (2 greens for the leaves, even though you can't see the shading) -- Barn Door and Festive Berries for the flowers. Die cut, and the die made a frame as it cut. Used Brutus Monroe Gold to emboss the frame. Used a PTI cover plate to emboss the white background, but it doesn't show up in the photo.
I don't know if #3 was the charm, but I do know I was getting tired of trying to do watercolor, so that's it! It might be a while before I try to watercolor anything again. I get frustrated, and then after a while, I want to give it another go. I just don't like to admit something has defeated me, when I really want to be able to do it...and do it fairly well. I know it takes practice, practice, practice! Sorry for the long post. I'd be interested in your efforts if you struggle with this technique too. Do check out the fellow team members whose blog links are on the right hand side bar. Have a wonderful afternoon, and my blog candy winner has contacted me. I've been finding some other goodies to tuck in, and hope to mail it early next week.
Hugs & Blessings.
2/06/2018
Watercolor Valentine
Hi, thanks for surfing in. Another UFO Valentine - from an effort at trying some Gansai water colors and spattering. This background was just brushed on a piece of cardstock handy at the time I felt in the mood to play. I had also been using a pink Dylusions spray mixed with water and white Dylusions spray. Haven't played with those sprays for a bit. Tried again with the spatter stuff. This _should not_ be that difficult a technique, but I tend to get blobs rather than spatters.
Edit: a sweet blogger friend just gave me a heads up that this card will fit in with the February Watercolour Challenge ..so off to link up! (thanks Miz B)
- Brushed red Gansai water color trying to get the ombre look that is so popular. This was not watercolor weight c/s..it didn't pill, but warped a little. Started to toss it, but I've learned to wait, look and think a bit before trashing - usually. The pink spatters got put on later when I was playing with Dylusions spray with another effort and just shook the spray tube around over the surface of this piece. Still thinking "this is just trash anyway". At least I didn't get big blobs this time.
Had the white cutout section laying around so started to play with placing that along with the black THoltz twig heart and hmmm....could this become anything? My creative process is not very complicated as you can see! Went through the lace box (which I have tons of lace from when I used to sew)...and just started placing the bits around. We have a large extended family, so I need a few Valentine cards. Figure since I'm their aunt, they will be forgiving if it's not the greatest card in the world. (and people always appreciate your time and your thoughts for them, even if you're not the greatest artist in the world!) That said, I don't deliberately try to do a rubbish card. I've discovered that often when I don't like my results, a kind relative will say they liked it.
Added the gold braid since I meant to use the mirror gold for the sentiment (once this got going) and a black glitter heart, snippet from another card. Again, a "get-er done card". (Thanks Lynn...that is a very useful phrase!) Creating something, even if MoJo has wandered off.
Thanks for your visit, God Bless and hugs. Hope any who are feeling poorly, are on the mend.
Edit: a sweet blogger friend just gave me a heads up that this card will fit in with the February Watercolour Challenge ..so off to link up! (thanks Miz B)
4/22/2017
An Inlaid Rose for CAS Mixup Challenge
Good afternoon on a lovely & quiet warm Saturday. Doing bed linens after running some errands this morning so just took a minute's break to do a little post. I've been wanting to join in with the current CAS Mix Up Challenge and finished up a couple of cards that might work for this month's challenge.
Here's the 2nd card - both used the same Gina Marie flower die, and were made from Brusho backgrounds.
The same design, just having the rose facing opposite direction. The reason I did a second card? When making this one, I had the bright idea to add a cut foam shape behind the rose (fussy cut the shape). The dimension is great, but thought it may look more like it was just adhered to the top of the card front, rather than inlay. But the rose was glued to the foam, then both pieces were inlaid into the opening. Looks quite nice IRL.... This is a really pretty die, and I like the look of the brusho pieces that were extremely easy to put back in the shapes.
A new Easter card was added to the Cards by Friends page, and I'll be back later with another CAS watercolor challenge card.
Ya'll have a great afternoon, and I'm off to the CAS Mix up Card Challenge..rules are in the badge at the beginning of the post. You still have time to play along!
Hugs and Prayers.
Here's the 2nd card - both used the same Gina Marie flower die, and were made from Brusho backgrounds.
These roses have been floating around on the desk for some time, and so has the embossed background. Hunted up the Gina Marie rose die and die cut the background (and reminder to self: best to die cut first, then emboss! I was lucky enough on the first card that the Mbossibility folder (So Trendy) lined up perfectly, so I could re-emboss after the die cutting sort of flattened out. On the 2nd card, I diecut the opening for the inlay, then embossed).
![]() |
| Card #1, with fun foam behind the rose inlay |
The same design, just having the rose facing opposite direction. The reason I did a second card? When making this one, I had the bright idea to add a cut foam shape behind the rose (fussy cut the shape). The dimension is great, but thought it may look more like it was just adhered to the top of the card front, rather than inlay. But the rose was glued to the foam, then both pieces were inlaid into the opening. Looks quite nice IRL.... This is a really pretty die, and I like the look of the brusho pieces that were extremely easy to put back in the shapes.
A new Easter card was added to the Cards by Friends page, and I'll be back later with another CAS watercolor challenge card.
Ya'll have a great afternoon, and I'm off to the CAS Mix up Card Challenge..rules are in the badge at the beginning of the post. You still have time to play along!
Hugs and Prayers.
3/27/2017
Watercolor Pencils from a Postcard Book
Good evening, and welcome. Let's start off by welcoming a new friend:
Marjeta(Margaret) of Marjeta's Workshop
I'm so happy you found my blog Margaret, and after not gaining any new followers for a while, I've been doing the happy dance to see the numbers increasing. I hope that my old friends will pop over to another new friend, and get to meet you and enjoy your work too! Thanks for becoming a new follower.
BLOG CANDY #2 WINNER: #257 ---Congratulations Sherry of Loose Stitches and Unraveled Threads.
Please contact me with your mailing information by Thursday, March 30, so that I can get your goodies in the mail. Moderate comments is on, so no one besides myself will see your personal data.
Now, today's card:
The image for this card came from a postcard book found in our local Hobby Lobby - a sale item. So many of the adult coloring books have such 'busy patterns', are larger & may not be designs that appeal to me. When I find the smaller sized ones, and if it's flowers, usually I'll look through the book to see what is in it. This was done on watercolor weight paper, has flowers.
Decided to try using watercolor pencils, and a tiny brush. I keep trying to improve my w/c skills, and this one -- well, it was ok. After finishing all the coloring, went back with the pencils, used a damp brush touched to the pencil lead, to add some darker shading. After doing that, used a white gel pen to add some 'dots' over the flowers. Lastly added some Nuvo Jewel drops for a little accent.
Edged the image with a dauber and some green ink. After adhering to a purchased aqua card base, thought "why not do a vellum sentiment so that the flowers show through?". Of course then had to try to lift the glued piece without damage, and it was just easier to get up the area where the embossed hello is. The vellum is just folded under the card and used a bit of wet glue to stick it down again. I think it would have been placed best lower down the card, but ...it is what it is...(what a cliché!)
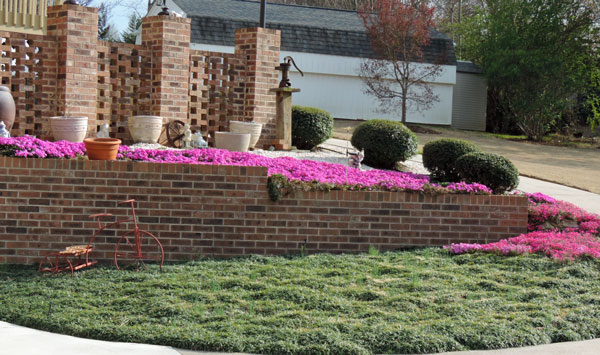
Here's a few pictures taken before the weekend of the thrift blooming on our retaining walls by the driveway. I think the proper term for this plant is Phlox, but around here folks call it thrift. The few little tulips blooming by the steps are all the bulbs left from Fall 2003 planting. I've been too lazy to plant more!! Wanted to snap these before the weekend rain flattened them...we only got a drizzle, but the rain is welcome.
Thanks for visiting, and Big hugs. Come again when you can. I'll try to take some pictures of the clean up progress...it's slow, but it's coming along. DH said he couldn't tell I'd done much cleaning of anything! I moved the furniture around, and I don't think he's too happy with that! Oh well.
Also, don't forget to keep visiting...I'm finding plenty of things as I sort, that I loved enough to order a couple of times! I may just have another candy draw, so watch the sidebar. AND if you are interested, please do show the thumbnail. Or if you are kind enough to post the thumbnail, but don't want the goodies, that's ok, just let me know when you comment..Thanks.
![]() |
| High retaining wall, right below front porch |
![]() |
| Walkway by the retaining wall, coming down from front porch |
![]() |
| Low retaining wall. The thrift is creeping into the mondo grass that covers this area |
![]() |
| Tulips by the front porch steps. Bulbs planted in Fall 2003. Not much left of those! |
3/21/2017
CAS Watercolor - Spring Tulips
Good afternoon, and welcome. Today's card is another watercolor effort, so that I could join in with the Spring Celebration at the CAS Watercolor Challenge. Also Blog Candy #1 winner will be revealed later in the post!
NOW: for the winner of the Blog Candy #1 which ended March 19:
Winner 230: https://rmgcreations.blogspot.com/ (which turned out to be Rita, who is also on my Christmas Card Club team! ). I really had to work to get a winner, as the names that kept coming up, either didn't have the blog candy pic posted on their blogs OR had previously said they didn't want to be considered for the give-away! So Rita, please contact me by Saturday(3-25), with your information, and I'll be sending the first set of blog candy on the way to you!!!
Don't forget there is another blog candy draw - so if you are interested, do place that picture on your sidebar! I don't want to have to work so hard next time!!! LOL
I'll be back later this evening with another post, and I will be sharing some Cards by Friends, AND have some Welcome Shoutouts to a couple of lovely new followers.
Thanks for joining me, and big hugs.
- Stacy Stamp tulips inked Direct To Rubber with Tombow markers, spritzed and stamped the outline image. Then used a brush to pull the color out towards the center. This was the 3rd effort. Looked at it for a day or so, decided to try to use it, but alas, no background, no grounding...just 2 blooms dancing in the air. Cut a mask using effort #1 which was pretty rubbish, covered these stems, and inked up an old wooden script stamp with Memento Desert Sand very lightly. Thought for a second and decided Summer Sky (blue) might be better to suggest a sky background, so just inked the blue over the Desert Sand, and Voila. Because the mask was water color paper, of course there was a big space around the image, what to do? Got a finger dauber, used the blue ink, rubbing off the ink a bit on a scrap and tried to lightly smudge right next to the image, without getting it too heavy. What do you think?
Die cut with a set of Sizzix dies that came with some magnetic plates, don't know the name. Then used a piece of 'failed brusho' experiment to cut the skinny mat, with the next size of the same die set.
The Brusho piece was made at an earlier effort, just testing colors when trying to use the cling wrap. Started with sprinkling different colors of the crystals, nothing was working, and I had the brilliant idea to use a little black. Nah, not a great idea...looked awfully dark. So just stuck a piece of the cling wrap over it, left it (forgot it is more honest!). When making this card, I spotted that piece, pulled off the cling wrap. Yeah, it's still pretty black looking, but the Gotcha - was that you could see some color and sparkle where some gold spray hit the colors. It doesn't show in the photo, but IRL, there is quite a sparkle that just hints around the frame. So don't just toss the mistakes into the garbage...Look at a few days later.
- CTMH clear set inked with blue Versa Fine ink for the sentiment, tied the baker's twine and scored a top edge line. I hope this will be considered CAS enough to fit in with the CAS Watercolor Challenge which is open for a few more days!
*******************************************************
*******************************************************
Winner 230: https://rmgcreations.blogspot.com/ (which turned out to be Rita, who is also on my Christmas Card Club team! ). I really had to work to get a winner, as the names that kept coming up, either didn't have the blog candy pic posted on their blogs OR had previously said they didn't want to be considered for the give-away! So Rita, please contact me by Saturday(3-25), with your information, and I'll be sending the first set of blog candy on the way to you!!!
Don't forget there is another blog candy draw - so if you are interested, do place that picture on your sidebar! I don't want to have to work so hard next time!!! LOL
I'll be back later this evening with another post, and I will be sharing some Cards by Friends, AND have some Welcome Shoutouts to a couple of lovely new followers.
Thanks for joining me, and big hugs.
2/11/2017
CAS Mix up Challenge February 2017
Good evening, and hope you've had a great Saturday. Back again with another card to try to join in with the February 2017 CAS Mix Up Challenge.
Here's the card and my optional choice item was the Tim Holtz Sizzix 660222 Thinlets Scribbles & Splat die set - the heart.
Many of you have commented about being unfamiliar with the Silks Glaze products, so included a picture of what this product looks like. The sets are available in Hobby Lobby and other box store, and individual pots are available in Stamp/Scrapbook/Art stores and this is a Luminart product. Can be used as watercolor if thinned to that consistency, but also as a thicker acrylic paint. Some of mine have 'hardened' since being in the stash for a while, but just spritzed some water in the pot, and let it soften...much as would happen with the Twinkling H20's.
-Mixed Media weight c/s 98#. Splashed some of the red color over the c/s, let it begin to dry just a bit, then dabbed a piece of bubble wrap into the still wet color. Finished drying with a heat tool, as I wanted to get the card into the challenge. (more about the woes of this card below!) Flattened the card overnight, but in the photo, it looks like it may need even more pressing time.
- black c/s was crinkled in an old Fiskars crinkle tool. Tried this with a lightweight chipboard, nothing was happening. Decided to try with a lighter weight c/s, and it crinkled nicely. (also separated a box that my ATG tape came in, as that weight was too heavy to crinkle. Once I separated into 2 layers, it crinkled great, but after spraying Dylusions Black Marble over the 2 pieces, then a bit of Tattered Angels gold, it wasn't great background for the heart. (Message: stop when it looks good, don't keep adding more!!!) S'ok -- , can be used on another project.
- Red Mirror c/s to cut the Twiggy heart, using the nice heavy metal shim, and it cut smoothly with a couple of fwd/backward passes.
- Old wooden block stamp inked with Versafine Onyx and stamped. Tiny red punched heart from the snippet left from the twiggy heart.
Backstory: You'll remember an earlier card done for the challenge but as I went to link, realized I had forgotten to stamp on it. Decided to remake the card so basically the same background was done. This first try had some great texture from the bubble wrap, and then smooshed the wet bubble wrap over the white areas, got some lovely spatters. Went to stamp the text...big time SMEARS! Said a couple of discouraging words too. That's when the 2nd w/color background was made, and as sentiment was stamped again, I was being _VERRRRY_ careful. There is a slight smudge under the 'N' - not so visible to the eye, but figured the camera would catch it....hence the tiny punched heart.
I was beginning to think it was not meant I should enter this challenge. LOL!
Do check the Cards by Friends tab if you have time, as some lovely new Valentine cards are being shared here. Thanks for joining me tonight, and wishing you a wonderful Sunday. Big hugs.
But first, please help me say a big hello to a new follower, Asha M. I can't determine if Asha has a blog, but Asha if you do have a blog, please provide me with the link. I like to introduce my new friends to my old friends, and I want to be sure to pop over to enjoy your work too. Thanks for joining as a new follower. Love to make new friends!
Here's the card and my optional choice item was the Tim Holtz Sizzix 660222 Thinlets Scribbles & Splat die set - the heart.
Many of you have commented about being unfamiliar with the Silks Glaze products, so included a picture of what this product looks like. The sets are available in Hobby Lobby and other box store, and individual pots are available in Stamp/Scrapbook/Art stores and this is a Luminart product. Can be used as watercolor if thinned to that consistency, but also as a thicker acrylic paint. Some of mine have 'hardened' since being in the stash for a while, but just spritzed some water in the pot, and let it soften...much as would happen with the Twinkling H20's.
-Mixed Media weight c/s 98#. Splashed some of the red color over the c/s, let it begin to dry just a bit, then dabbed a piece of bubble wrap into the still wet color. Finished drying with a heat tool, as I wanted to get the card into the challenge. (more about the woes of this card below!) Flattened the card overnight, but in the photo, it looks like it may need even more pressing time.
- black c/s was crinkled in an old Fiskars crinkle tool. Tried this with a lightweight chipboard, nothing was happening. Decided to try with a lighter weight c/s, and it crinkled nicely. (also separated a box that my ATG tape came in, as that weight was too heavy to crinkle. Once I separated into 2 layers, it crinkled great, but after spraying Dylusions Black Marble over the 2 pieces, then a bit of Tattered Angels gold, it wasn't great background for the heart. (Message: stop when it looks good, don't keep adding more!!!) S'ok -- , can be used on another project.
- Red Mirror c/s to cut the Twiggy heart, using the nice heavy metal shim, and it cut smoothly with a couple of fwd/backward passes.
- Old wooden block stamp inked with Versafine Onyx and stamped. Tiny red punched heart from the snippet left from the twiggy heart.
Backstory: You'll remember an earlier card done for the challenge but as I went to link, realized I had forgotten to stamp on it. Decided to remake the card so basically the same background was done. This first try had some great texture from the bubble wrap, and then smooshed the wet bubble wrap over the white areas, got some lovely spatters. Went to stamp the text...big time SMEARS! Said a couple of discouraging words too. That's when the 2nd w/color background was made, and as sentiment was stamped again, I was being _VERRRRY_ careful. There is a slight smudge under the 'N' - not so visible to the eye, but figured the camera would catch it....hence the tiny punched heart.
I was beginning to think it was not meant I should enter this challenge. LOL!
Do check the Cards by Friends tab if you have time, as some lovely new Valentine cards are being shared here. Thanks for joining me tonight, and wishing you a wonderful Sunday. Big hugs.
2/09/2017
Watercolor Valentine
Good evening, and welcome. Hope that any of my Northern states friends are ok with the snowstorm that dumped on you last night and today. We had sunshine, but brisk air with winds making it feel colder. Tonight the temps drop...but AH...No Snow!
Tonight's card was meant to go into the February CAS Mix Up Card Challenge. As I pulled up the blog to have available to link after finishing this post, I realized: No stamping! Dang it! So I'll share it anyway, and hopefully get time to do another card that has some corrugated paper, AND remember to stamp on it.
- Used Silk Glaze to watercolor the background, attempting to do an ombre effect on watercolor paper.
- Oval was a snippet from a die cut (using a recycled card). Thought it looked artsy behind the corrugated paper.
- Sprayed the corrugated paper snippet (which has been on the airbrush table who knows how long, and had oversprays of other colors on it too). Used Dylusions Fire Box red and an Adirondack spray red. Some of the earlier overspray colors - which included a gold, peek through the reds, and I quite liked the effect.
- Gina Marie Stitched Hearts die was cut from a snippet of dark red c/s. Then used Ultra Thick Embossing Enamel, 4 layers, heating between each layer, adding more versamark and another coat of UTEE. This creates a very glassy look. It's fun to crackle the product and then use a vintage ink to distress it.
- Hero Arts Valentine word sentiment die from 3 layers of glitter gold paper (snippet).
Hope you like this one. And I hope you'll be able to join in with the February CAS Mix Up Challenge. Remember: have stamping on the card too!!
The other evening, an old card from our Christmas Club Card (the Birds & wings card) showed up on the blog with the current date. Have no idea why or how this happened. I only realized it _had_ happened when some comments came in. Scurried quickly to the blog, and there was the old card. Figured out how to change the cuttrent publish date back in time, but for anyone who remembered the card, that's why a Christmas Club Card showed up. I blame it on Gremlins!!!
Thanks for joining me tonight. Ya'll stay warm. I'm off to finish up some visiting with blog friends, so catch you later. Got a bunch of Valentine cards that will be posted the next few days. Trying to get started on a few St. Patrick's and Easter cards. Big hugs.
6/26/2016
Water color and Spotlight Technique
Hi again, and hope Monday** has started your week off in a happy way. I'm still dabbling with the Spotlight Technique, trying to achieve a look that makes me feel I've got it right. This one used Zig watercolor brushes, and I'm still trying to find a flower that everyone else is not showcasing! I've come to the conclusion that the image used certainly makes the difference (at least in _my_ hands!). \
Used Strathmore 140# Cold Press w/color paper.
**Oops...got the scheduled date wrong on this one! Sorry. Hope you enjoyed it anyway. Hope to get my Rudy Day entry posted tomorrow since this one showed up this afternoon. And thanks to the replies about if you like the product links.
- Winnie & Walter In Bloom - Addie's Garden. Used Mini Misti to stamp in Tuxedo Black, heat embossed with clear EP (helps to avoid line bleeding).
- HLS Bold Birthday Sentiments
- Stitched Rectangle Dies (don't remember which company)
- WOW Gold Pearl EP (love these pearl powders)
- Zig water color brushes, blues, with a light violet for shading, bright yellow for the centers.
- navy mat, rubbed over the edges with Nuvo Indian Gold Mousse
You'll be seeing more of this technique. I'm determined to master it!!!
Ya'll enjoy the day. I'll try to catch up on visiting...having one of my respiratory bouts just at the moment, so a bit slow. Big Cyber Hugs..and thanks for your visit!
6/11/2016
Hydrangea Watercoloring
Hi & welcome. Recently did this card with Distress Inks and water lifting the color. In the process of doing the card, used the old wooden Rubber Stampede Hydrangea stamp a few different ways. Today's card image was just heat embossed and watercolored with Zig Markers.
- heat embossed with Ranger's Liquid Platinum (my current fav EP color). Used blue & lilac Zig brush markers to color the petals, with an aqua pen. Actually IRL it doesn't look this washed out.
Of course the leaves were done with shades of the green brush pens. The platinum outline looks pretty, as it's a warmish shade - not quite silver.
- die cut with a Sizzix rectangle, made a faux mat with the same die.
- white background stamped with just the blossom portion of the stamp image and DI Evergreen Bough (2nd generation stamping). Then did same with the leaf portion, but that's covered up.
- Mama Elephant Basic Borders inked with Versamark, heat embossed with Ranger Liquid Platinum, added as a border strip. Covered the join with a dark gray snippet.
- Black snippet sentiment stamped with SnS Detail White, trimmed by hand, and it's done! The photo looks way too pale, and while IRL it's not bold coloring, it looks much better than the photograph!
Happy Saturday, and wishes that your weekend will be just as you want it to be. Hugs.
5/06/2016
Pink Shoes and Butterfly
Welcome and this will be another scheduled post. Pink Shoes -- another Art Impressions effort done some years ago, using Tombow markers to water color. While hunting for one thing, I run across something else I had forgotten about (doesn't mean that I found what I was originally searching for, mind you.)
The green piece was a Brusho effort, in the background pile, so used a PTI Scroll Frame Die Coverplate. Even though this background was on thicker watercolor paper, this die cut into the c/stock a bit. By careful handling I was able to 'keep it together' so that the pink shoes could be adhered behind the oval aperture, and then placed on the corrugated paper for the card front.
The butterfly is one that has been floating around, colored with Zigs, hand cut. There is just a slight place right under the oval where the Scroll die did not fit back together perfectly, and the white bottom of the pink shoe c/s can be seen (if you look hard - I did!). Wasn't sure that the butterfly colors would be that great with the pastels of the rest of the card, but Hey Ho...went with it anyway. Added some white spots to the butterfly wings with a gel pen. Not sure who makes the butterfly...
The sentiment for this card will be added inside. Probably this will be a birthday card, as we have lots coming up for the extended family in the next few months.
That's it...Ya'll come back when you can. It's good porch swing weather, and the grass is nice & green now. Big hugs.
4/29/2016
Old Water Colored Barn
Hello, thanks for buzzing in for another scheduled post. We have some house repairs that are being examined, people coming to look at the problem, give advice as to best way to fix, so I'm trying to get a few posts ahead. Basically what we are looking at is a major bathroom redo in our master shower, which originated with what we thought was just a pipe leak. Turns out the shower pan has cracked, has to come out, a new one made to fit the space. To complicate matters, the walls of the shower surround rest on the lip of the pan, and in addition one wall of that shower is glass block...so major tear out & repair. AND there's 2 shower pans...one where you step into the shower proper, then you step out from the shower area, back into that space to dry off. Both pans have to come out. Also will tear up the flooring when the shower walls come out. We know that the glass blocks will be replaced with a solid glass wall, but we are undecided as to whether to go back to the cultured marble walls (easy to clean, not lots of grout lines to clean such as ceramic tile). Some of the experts are suggesting we should go with tile, as it's the 'in thing' just now. I happen to like the marble, and from what the contractor is telling us, there won't be a substantial savings incentive for us to go with the tile. Additionally our vanity surface matches the marble shower walls, so changing the material would involve changing the vanity top as well. We are not very happy campers about this problem!
This is a very old effort using an Art Impressions set from many years ago, when I was first trying to learn how to water color. Found this piece buried in a storage box of 'schtuff', trimmed it with a die...decided to try to use it. Used a Lawn Fawn Stitched Frame Rectangle
die to cut the red frame (white snippet just the size I needed, colored it with copic markers - mounted on dimensional foam.
- Memory Box tree die cut from a gold brown c/stock, then another layer cut from kraft, and a 3rd layer from a snippet of green. Adhered the layers slightly offset, then glued to the frame.
- Elizabeth Craft Hello die cut from 2 layers of water color card stock snippet, colored with copics.
- created the 'wood plank background' by scoring lines at 1/2" intervals with my Scor-Buddy, then used Memento Desert Sand, Espresso, Bamboo Shoots and London Fog to just drag the ink pad down the scored piece until I got a shade that resembled old barn wood. I rather like this. Water coloring is ok, seems to be a bit better than what I've been accomplishing of late! I'd forgotten doing this one and a couple more that turned up.
Here's a picture of Mama's Rose Bush which I took on 4-24, her 105th birthday. This old bush came from where my Mom was born, and I'm sure it was a native plant, not something that her farmer ancestors planted. Mom said it was always there in her memory, so pretty old. It grew by the corner of the separate kitchen building, which was not connected to the main house, due to fire danger. Long ago my SIL took a cutting, transported that to Florida. She was able to get it to grow, but it would never bloom. When they moved to the Georgia mountains, she asked if she could plant it here, as they were thinking of eventually coming to where we live in South Carolina. The 3rd year it was planted here, we went out one morning, and it was full of blooms. They really smell heady, like an old fashioned rose, so Mr. has been bringing some in the house. Don't last long once they have been cut...usually by next day, the edges are brown and dropping petals. I always think it is Mama saying "hello, don't forget my birthday". There would have been lots more blooms, but it was quite 'leggy' in early March, so I snipped off some long branches...I wrote about this bush in a post some years ago.
Ya'll have a great day, the weekend is upon us. So hope there's nice weather in your part of the world. Been sunny & quite hot where we live. Blessings.
Subscribe to:
Posts (Atom)


