Followers

Showing posts with label Trees. Show all posts

10/19/2018

Birthday Water colored Tree

Happy Friday! Thanks for dropping by. I hope I've got my return visiting caught up, so I wanted to post another card. Remember this post where I said I'd done 2 water color Rubbernecker trees, misplaced them? Well here's one, that I finally got made into a card. (Still got one more to use up!) This will be for our neighbor's November birthday; she has a gorgeous maple tree in her front yard, that we probably get to enjoy more than she does, as it's very visible from our windows.


The Rubbernecker stamp was inked with Distress markers in fall shades, then spritzed. I think some Zig markers were also brushed around to add more color after stamping/spritzing - in places that looked like they needed it.

A stitched frame die was adhered over top of the stamped piece (because I had cut it too small...had to fiddle to get it to fit inside this frame). Then an old Tim Holtz 12x12 Fall pack was cut up to create the mat behind. Used VOS Paper Studio card pack of vintage sepia colors, to get the other design papers. Top right stitched rectangle cut from Sue Wilson Noble die, and an MFT angled die cut the spotted paper. The sentiment was embossed with Brutus Monroe Detail Copper. Tha's all folks!

Hoping that you have a wonderful weekend, with great weather. Our humidity has been less, and the morning & evening temps much cooler - but the day still warms up nicely. With less humidity, though, it's quite pleasant!

Big hugs - God Bless.


9/21/2018

CAS Watercolor Card Challenge - September

Good evening, and hope you've had a great week. Ours has been fairly busy. Going to exercise classes (or therapy) 3 times a week, keeps us on the go a lot. By the time we spend about 90 minutes doing the routine, perhaps get lunch or run a couple errands, get back home, I'm tired! I feel the exercise/therapy is helping...but it's a slow process. I'm able to do more than I expected to do, and while I'm walking, I'm wearing one of the gadgets on my finger that is measuring my oxygen levels as well as my heart rate. The oxygen level stays up pretty well, but when I walk outside into the humidity, still get quite short of breath. I expect it will improve, in time, and with cooler weather. Gosh, we're into Fall. And the folks at the CAS Watercolor Challenge selected the theme of Trees.


I knew the perfect stamp to try to watercolor, so hunted it up. Did it first with DI markers, then used some zigs to do the same image - just to see the results. Stamped, die cut, and then couldn't find either piece. Soooo....got the stamp back out, and redid again for this card, using DI markers, huffing, stamping with the misti.


Rubbernecker Cling Stamp
PB Snowflake die
- stitched die for the mat (it was handy, and I don't know what set it came from. Thought it would frame the fall tree nicely if I heat embossed it with Brutus Monroe Gilded Gold)

Here's the card and the stamp shown together, and I tried to color the image with the stamp photo as a guide. Couldn't quite get the reds in the foliage just as I wanted, but maybe next time. Put a little more green in there than Rubbernecker did too. 

Got this Rubbernecker stamp at a stamp show some time ago, along with some florals. After I finished this card, picked up something on my desk, and Voila, there were the 2 other images that I had done. I swear, I had looked under all the stuff, and they were either hiding from me, or Pixies live here!!!

There's still a few days to enter the CAS Watercolor Challenge for September. Ya'll have a great weekend, and thanks for visiting. Hugs. 


8/07/2018

Christmas Trees

Good morning, and welcome - I nearly missed Rudolph Day for August, and then there is a CAS Christmas Challenge going on...with trees as the theme. Now I have a lot of tree stamps and dies, so thought "Surely this time I can join in with the CAS Challenge". But as frequently happens to me, time just got away. So I hope this CAS card will do double duty here!!!


Way back in June I shared some Brusho Play on this post (scroll down past the card to see the backgrounds created by using brusho-s with an embossing folder). Decided to cut the MBox tree die from one of those backgrounds. The marbled colors show up in the photo, but the embossing texture doesn't show all that well. It does IRL however, and I was pleased. Also had some thin metal where DH & I had used Loll's Heated Copper technique (who knows when we did that!) - after placing the trees on the embossed card front, thought it needed a 'little something' - yet still keep it CAS. Took a cheapie tiny star die (probably a $1 find at Michaels) and to my surprise - the tiny die* cut that metal. I wasn't certain it would. It bent the star shape just a bit, and I had planned to straighten the 'legs' once I had the star down. Decided I liked it with the little curls. The center star looked lonely, and since the first cut had gone well, I added 2 companions! Die cut the tree shape from white, embossed that piece. Used 2 colored tree die cuts, with the white cut from the embossed piece to inlay into the front, and it has nice dimension.
 *meant to write punch!
Since today is the ending of Rudy Day I'm also going to jump over the pond to join in that challenge.
 
Linking to: August CAS Christmas Card, and July 2018 Rudolph Day Challenges. Looking forward to seeing your cards there too!
 
Thanks for joining me this morning, and ya'll have a nice day (that's what we say here in the South!)
Hugs.
 
Supplies: CuttleBug Snowflakes EF, Memory Box Pine Trio Background, Hero Arts CL343 clear sentiment set

5/27/2018

Christmas Card Club - Challenge 11

Hello and welcome to another Christmas Card Club post - Challenge 11 for 2018. Today our Shaz selected the theme of "Trees - Indoor or Outdoor". I'm a bit late with my post, but we've had guests this past week (one exciting visit, more about that later!) So let's get started: 


- Memory Box die - 6x6 paper from stash. The tree design was cut from the DP, then cut the tree shape again from white snippet, and gold snippet. Adhered the stripe cutout with the white snippet, then had the gold on top. Inlaid, although the photo does not show the dimension all that well. There's lots of gleam and shine on this card, so hard to photo well (even if I were a good photographer!)
 
A black snippet was heat embossed with Gina K white detail powder. The black snippet was a piece of textured paper, but still the embossing showed up quite well. This is the first time I've used this particular white EP. 


- More snippets (from this card) using the Memory Box Oval Master frame. The silvery oval rim was white, just like the oval inlay shape. Used a Pentel silver slicci pen to color it. Adhered this to a white backing, which the edges were colored black with a Copic marker.

- Tree is cut from 2 different Dee's Distinctively dies, one does the green tree silhouette, one did the silver overlay.  Adhered the tree over the oval, added a vellum sentiment, embossed with WOW platinum ep.  This topper was placed on a purchased pale gray card base.

Apologies to Shaz for being late with my post. I hope you'll take a few moments to check out my teammates' inspiration for this challenge. Their blogs are listed on the right side bar.

Now for my exciting guest: My sweet blog pal Brenda was visiting some relatives on the east coast of South Carolina, and was able to get over to my part of the state for an overnight visit. Her son, Bret, who just graduated very recently, was kind enough to spend his time driving her about 5 hours  off their route home, so we could finally meet face to face! We'd tried once before when we were traveling through her state of Pennsylvania, but things didn't work out for a meeting. I was so looking forward to it. As you might guess, we had a delightful time, yakking away. (I felt bad for poor Bret, having to listen to us gabbing away. Thank goodness young folks have their phones and Ipads to keep them amused). Got a call yesterday evening, that they had arrived safely back home. It was a big blessing to finally meet somebody with whom I've grown to known via blogging and emailing for many years, gotten very attached to. She was just as I thought she would be.  Makes one thankful for taking up blogging, I can tell you! You meet such wonderful people.

Anyway, I'll be back later with a post for May's Rudy Day...  so ya'll have a good day, and thanks for visiting. God Bless and Hugs.


1/27/2018

Penny Black for Rudolph Day

Hi and welcome to the first Rudolph Day Challenge of 2018. I missed a lot of Rudy Days last year, so I'm going to make a concerted effort to join in if at all possible in 2018 (that wasn't a New Year's Resolution or anything, but hey, it would make a pretty good one, yes?) You DO know about Rudolph Day? It's a challenge hosted by Scrappymoi, opens on the 25th each month, closes at the last day. The only rule is 'anything Christmas'.

Was inspired by this card by my so talented friend, Bonnie K. Of course then I had to buy the Penny Black stamp. Decided I'd use it for Rudy Day, as I needed to make something that didn't take a long time to color. First thought about using gold to emboss it, but had gotten some NBUS Altenew Platinum that needed a try, -- was pleased with the effect. Did some DOX sponging..(trying for a glow right around the tree, not sure I've achieved that. Still pleased with the outcome. My first try at coloring the swirls inside the tree wasn't great, neither was my second. Tried with an alcohol marker - got it messy outside the embossed edges. Then tried another effort with gel pens, still not great. Went to Polychromos pencils, not dark enough in the tiny spaces to show well, so went over the pencils with the Kaiser glitter pens. Liked that better).


Embossed Penny Black Starry Tree withWOW watermark pad, then heat embossed with Altenew Platinum Crisp EP. Colored elements within the tree with pencils and Kaiser glitter pens. Using a snippet of my other failed efforts, sort of masked the edge of the tree while sponging DOX Twisted Citron, Bundled Sage & Iced Spruce at the bottom. Spritzed a pearlized mica spray, while shielding the tree image. That same snippet mask was used to ink WOW versamark over the edges, then heat embossed with Platinum. Two slivers of that same snippet were trimmed, inked with copic blue greens, then used WOS for a little glitter. Started coloring the strips with the Kaiser glitter pens, but the ink didn't flow well. I'm not particularly thrilled with these pens, as they don't seem to hold much ink. A couple of times use, then they appear to dry up, even though you can still see ink in the barrel. Pulled out the trusty copics, inked, WOS, done. The blue doesn't match the swirls color but I liked the contrast between the platinum and this color, so....

Penny Black Rejoice die, cut 4 layers from the last of the failure snippet, then embossed with the same platinum used elsewhere on the card. After seeing the picture, the sentiment didn't get centered as well as might be.

Is anyone else having a problem with Blogger slowness when leaving comments? At some blogs, I hit publish and then it 'goes'. Other times I publish, wait, hit the publish button again, and finally it appears to take the comment. I'm not always sure.

Please do check out this fun challenge, as Maureen (Scrappymoi) always has some lovely prizes. So see you at Rudolph Day January 2018. Be there, or be square!

Thanks for joining me today, come again when you can, and hugs & Blessings. Stay well, as there is so much sickness about.

12/03/2017

Backgrounds, Tree, Snippets

Happy Sunday afternoon. We're having a gorgeously sunny & most pleasant afternoon after an overcast & rather gloomy day on Saturday. Today I'll share a couple so-so cards, finished from salvaged bits (snippets) and  boo-boo.

Here's the first - the boo-boo

 
- Background created from mica products(Mineral burst, color burst, pearlized sprays) using #140 watercolor paper. This was the first try with the liquid mineral burst, and I was quite happy with the results here.

Used several sizes of snowflake dies and glitter paper to layer the medallion. Cut the Penny Black die from the same paper, but letters of this die were very tricky to handle. There's 3 layers, and each layer was difficult to get adhered together straight. After it was placed on the background, it didn't look at all as I wanted. After looking at it, took a gold gel pen and outlined around the words, and decided 'that's it'. I hated to toss the pretty background.

Tried this as a square card, and it didn't look right. Used the 5.5x4.25, added a border of gold glitter paper top & bottom, and some SU sequins to cover the join. This is one that may stay in the stash box and get cannabilized for something else. Not real happy with this die either...too fussy to have to work with (for me anyway!) It's a very pretty font on the die though.

- this one is the Snippets one! The tree was cut from a ?Hero Arts? die that cuts the tree shape and the little branches, which are then lifted out from the surface. Used a mica created background for this, then rubbed some Nuvo Mother of Pearl mousse around before lifting the branches. The Nuvo MoP. had been closed properly, still has the inner seal, but it had dried out quite badly. I'm wondering if spritzing a little water into the container might rehydrate...anyone have any thoughts on this? I'd only used it once before, but it's been a while. I had a problem with the small pots of Inca Gold old formula some years back.Wondering if the mousse is going to give me similar problems. It does give a nice sheen though.

A snippet that had a circle die cut from it, was handy and another piece that had some embossing paste....used the cut out as a stencil atop the paste piece, and sponged various shades of dark blue to create a night sky. I was trying to create a way to use the tree, as that was the jump off point for this card. Added some white gel stars. Torn paper with Sparkle n Sprinkle Twinkling Clouds spread over liquid glue to create some snow drifts. Decided to add 2 little Art Impression birdies, and the sentiment. Done!

Now for just a couple of the Thanksgiving cards that got made, but not mailed in time.


The next 2 were sponged DOX & embossed background. The image is an old Art Impression cling that I have always enjoyed coloring.

Still have a couple more Thanksgiving cards I may share, where I was experimenting with the Whitewash technique.

Thanks for joining me this afternoon. Hope that you had a good weekend, and ready to tackle the  seasonal rush that is beginning! Hugs & Prayers.


3/05/2017

Christmas Card Club Challenge #5 - Something Non-Traditional

Welcome to Christmas Card Club Challenge #5, the theme of which is "non traditional, a little whacky, unusual colors" and was chosen by Zoe, of Stamping Scene. I decided to go with non-traditional colors.....


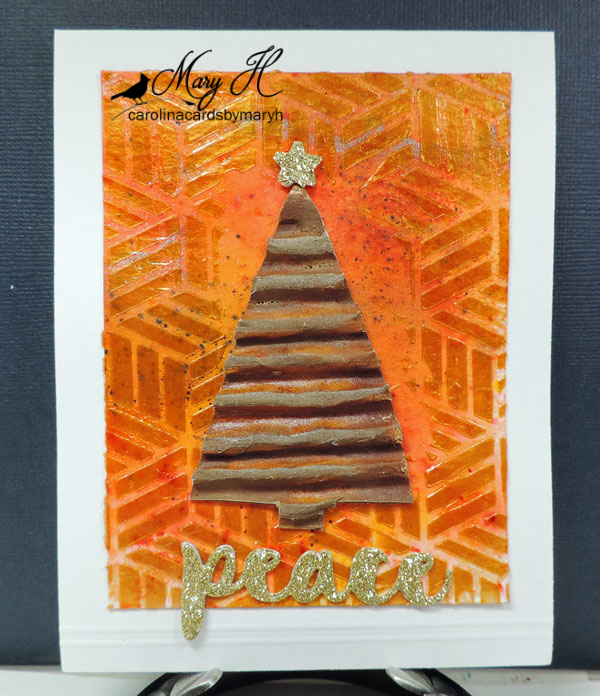
 - Orange background was created with Brushos, Colorburst powders, some Paper Artsy Infusion powders. Sprayed the dried piece lightly with a little Tattered Gold spray. Once this dried, Dreamweave Gold Embossing Paste was applied using a Hero Arts Star Grid stencil - just around the outer edges to frame the tree.

- A salvaged piece of cardboard from a shipping box was separated to get the corrugated look. Applied white gesso, then a layer of Ranger Bronze Stain. Dried, then applied more gesso, some Paper Artsy Rusting Powder, spray with white vinegar and let it rust.**

- Impression Obsession Christmas Tree die to shape the tree. At first intended to die cut, but thought that would seriously flatten the corrugated shape. Flipped the tree to the back side, traced around the die in a rough tree shape, and hand cut it. Several punched tiny stars were made from gold glitter paper, glued together to create some dimesion on the star.

- Memory Box sentiment cut the same glitter paper, 2 layers. In between these layers, is a thicker layer using a cardboard snippet that handy. Hope this fits the unusual colors theme that Zoe was looking for. It could also fit in with the whacky part of the challenge too!

**Inspired by this card at Cathy's Card Spot. If you didn't see this unique and lovely card, I encourage you to zip over to enjoy it.

I also hope you will take time to check out what my fellow teamies have shared for this Sunday's Club Challenge.Their links are over on the right side bar.

Hope your weekend has been lovely, and that you're looking forward to a great new week. Thanks for stopping by. I'm a bit behind on commenting, but hope to catch up this afternoon. Big Hugs

12/23/2016

Retro Reindeer in the Snow

Hello and welcome to a scheduled post. Hopefully as you read this, we will have safely arrived in Florida. And MANY, MANY Thanks to all of you lovely friends who have sent us such beautiful Christmas cards. How that does brighten our day, and these are on the mantel for us to enjoy for a while.

Here's the card that DD will get this year (and a Crazy Bird card if I can get it finished in time!)


Background was first airbrushed using copics BG0000, BG000. This looked too pale, so before adding the reindeer, birds and snow hill, sponged around the edges/corners with DI Stormy Sky.

- Retro Reindeer - cut from brown glitter paper, using the nice thick metal shim that I have. Couple of passes, and it cut through that thick glitter paper very nicely. Added a Nuvo Glitter red nose.

- used a Memory Box tree die to cut fun foam, to ink up with Versamark, use as a stamp. Sprinkled this with some WOW silver glitter. We have some dinner plates that are white, have a light silver bare branches tree, with a single cardinal perched on a limb. That's where I got the idea. (but this card looked a little bare with just one red cardinal, so I added 2 more!).

Background was first airbrushed using copics BG0000, BG000. This looked too pale, so before adding the reindeer, birds and snow hill, sponged around the edges/corners with DI Stormy Sky.

Impression Obsession DIE333-H cut the cardinals from white snippets; colored the ones used with copics, added some glossy accents.

- used a Marvy snow writer to dot some falling snowflakes. Once the pen dots the flakes, using the heat gun creates a raised puffy effect. This looks rather like the liquid applique to me.

- American Crafts white glitter paper (this is much thinner with no plastic backing like some glitters have, comes in 6x6 paper packs) and a stitched hills die cut the snow hills.

- A stitched rectangle cut out the image, adhered over a white snowflake embossed card front, using some fun foam for dimension.

Hope you like this one....Thanks for joining me, and big cyber hugs. Remember, He knows when you've been sleeping...He knows when you're awake...la, la, la!


11/15/2016

Twelve Tags of Christmas - Day 9

Good evening. The early dermatology appointment went fine (thanks to all who mentioned it), and so did the 2pm dental checkup. Now my teeth feel all minty & fresh! Love that after feeling when the choppers get all cleaned up. The air quality was terrible when we left in the dark cold morning, but thankfully when coming out from the dentist's office, it had cleared up quite a lot. Not all gone, still a ghost of a sooty smell, but much, much nicer to breathe this afternoon than this morning.

Another tag to share for Loll's Twelve Days of Christmas.

 
Here goes:


IO Patchwork tree Die was die cut from several different snippets of specialty papers that were in the Crapalanche - added some Nuvo Crystal drops for ornaments. You can barely see it, but the little tree stump IS peeking out at the bottom.
 
- background created with Brushos; used some Dreamweaver translucent paste through a stencil  (translucent paste does not show up all that well on the lighter surface).
 
- Heat embossed the vellum using an old wooden sentiment stamp...It says "Peace" with some scrolly-curliques at each side. It is NOT showing up well at all in the photo, only marginally better IRL. The green looked darker in the pot than it actually heated up to be. Was disappointed in that. I might pull off the vellum and redo that. Added the snowflake buttons, some ribbon at the top, and Bob's Ya Uncle.  I do like this tree die...I'm a sucker for those stitched dies!!
 
Ya'll have a great evening, and please do check out Loll's Twelve Tags challenge. There are some gorgeous tags entered AND by Guest Designers,  that will just knock your socks off!!! Big hugs. Thanks for stopping in.
 

1/23/2016

Christmas Card Club - Sleigh

Hi & welcome to another Christmas Card Club post; today our Maureen (Scrappymoi) wanted to see Sleighs. (Maureen is also the hostess for Rudolph Day, which will be opening on the 25th, and it's not too early to start on your Christmas card stash for 2016).

So let's get on to the Sleigh fun:


- Inkadinkadoo wooden stamp was inked up with Memento Cottage Ivy and then colored with Copics, Pentel Slicci gold pen, and some WoS.. S/B Decorative Labels 22 (S4-387) was used to die cut the image, then while still in the die, sponged some DI Shabby Shutters around the edge.

- Cheery Lyn DL103 - Italian Flourish cut from a textured & patterned red Christmas paper, adhered over CL Celtic Fire doily (DL109) cut in white. The white doily alone didn't give enough contrast with the image, so added the red layer between.

- Lawn Fawn sentiment die cut from the same red Christmas paper (2 layers) and Impression Obsession (DIE035-E) green tree (2 layers) from a snippet.

I love these Cheery Lyn doilies. However the Celtic Fire was a PITA to cut, even using the Sizzix Precision Plate, with many passes through the Big Shot. It did finally cut, but required a lot of painstaking poking out of the bits. It IS a very pretty die though. Usually the Precision Plate works great, so I shudder to think of how this die would have been had I not used the Plate. Italian Flourish cut just great.

My fellow club members' blogs are listed on the right sidebar, so I do hope you'll have time to go see what they have shared for today's Club Challenge!

Thanks for joining me today, and have a blessed Sunday. Big hugs.

11/20/2013

3 Twenty Crafts - Borders Set

Hello my crafty friends and welcome to Day 3 of Jo’s Scrap Shack’s Surprise Blog Hop!  
Today’s hop is day 3 of a 4 day hop for the new launch and release of a brand new company called  “3 Twenty Crafts”!

For those of you who missed the news, Jo has decided to launch her very own company and stamp line!!! Very exciting time indeed! Every day we will show you a brand new stamp set from 3 Twenty Crafts and trust me, you don’t want to miss this!

The stamp set that we feature each day will be given away to one lucky winner, but in order to win the set you must hop along and visit each design team member’s blog, leave a comment and then comment on Jo’s blog to let her know that you have completed the hop! The winner will be randomly selected and we have no idea which blog the winner will be chosen from. So make sure to visit each blog and leave some bloggy love!

 Today we are showing you the new and awesome stamp set “Background Builders”.


This is what I created using this featured stamp set. 


I've not used very many border stamps, as I can never get them aligned properly (these are clear so that shouldn't be a problem with these border stamps ). Had seen a folk art Christmas tree recently and when I saw these borders, realized they were perfect to create that look. Selected several red & green SU inks, inked & stamped away on white C/S. Didn't get a very good impression on some of the stampings. Hmmm...the stamps were clearly inked well. So decided to try the Colorbox Fluid Chalk inks...worked _much_ better with the next stamping. Now ya'll may already have known that SU doesn't seem to work well for clear stamps (and maybe it was the Operator in this case!) but I didn't. I can report though, that for me the Colorbox ink worked well for a clean impression, the SU didn't.
 
Next I created the background using this card for my inspiration. Shirley does the most fantastic backgrounds with the DI's and Acrylic Block technique. I keep trying that, but have not achieved anything I was pleased with, as yet. I debated on using this one, created with Mowed Lawn, Shabby Shutters and Festive Berries; misted the block with water, then dragged over the c/s. This was my 3rd try, time was growing short, so I went with the last effort. Decided to stamp the twig from yesterday's Winter Wonderland set in Colorbox Creamy Brown to create a pattern on the background. MS corner punch for the holly trim, and Viva Décor Pearls for the berries on the sentiment, stamped in Creamy Brown, punched with an SU Curly Label punch. As I looked at the tree when photographing, I thought I should have distressed the outer edge of the border 'branches'. I will try this one again, use DI Tea Dye & won't that look very country & folksy???
 
Here's the 2nd card. I really did want to try a stamp as a border - but I wasn't brave enough yet to try aligning - even the with stamp positioner I can manage to boo-boo. This border was long enough to cover the card without repositioning. A Dylusions background was handy, so off I go to ink with the Colorbox inks, which worked well over the sprayed background. Doubt that the SU inks would have been as intense (and perhaps I need to re-ink the pads?). Liked that look, so inked Happy Harvest Turkey with Rich Cocoa onto a white snippet; Black Tuxedo for the the pilgrim's hat from the same set. Colored these with copics, fussy cut, mounted on dimensional tape. I thought Mr. Turkey looked very chic & well dressed with his hat, ready for the holiday table. Stamped the sentiment from Happy Harvest in Versamark, embossed with Queen's Gold. Added corners punched from a Dylusions snippet, adhered tiny black pearls, and we are dressed for dinner! 

That's it for my project for today. Hope you will enjoy the cards.

Now just a reminder....to win Background Builders, visit each blog along the hop and leave a comment! Also, all four sets that are released this week will be available for purchasing on Thursday, November 21st at 3pm and will ship out on Monday, November 25th!

Soooo are you ready for some Blog Hoppin Fun???

I'm the last stop on the hop,  but if you get lost along the way, just start at
Jo's Scrap Shack at the beginning!

Thanks so much for stopping by and hopping with us today and make sure to join us tomorrow for another sneak peak at another great stamp set by 3 Twenty Crafts! And thanks for joining me this afternoon, and welcome to some new followers. I will provide links to their blogs after the blog hop posts. Hugs from me to you, and  have a wonderful afternoon.


11/19/2013

Winter Wonderland - 3 Twenty Crafts Tuesday Blog Hop


Hello & Happy Tuesday.  Welcome to day 2 of Jo’s Scrap Shack’s Surprise Blog Hop!

Today’s hop is day 2 of a 4 day hop and the launch and release of a brand new company called “3 Twenty Crafts”!

For those of you who missed the news yesterday, Jo has decided to launch her very own company & stamp line!!! It's very exciting, yes?? Each day we will show you a brand new stamp set from 3 Twenty Crafts and truly, you don’t want to miss this! 


The stamp set that we feature each day will be given away to one lucky winner, but in order to win the set you must hop along and visit each design team member’s blog, leave a comment and then comment on Jo’s blog and let her know that you have completed the hop. The winner will be randomly chosen and we have no idea which blog the winner will be chosen from. So make sure to visit each blog and leave some bloggy love!
Today we are showing you the new and awesome stamp set “Winter Wonderland


This is what I created on my first card using Winter Wonderland.


I wanted to try out as many of these differently designed trees as I could so went for a winter forest scene, using different colors of green ink for each tree. It's hard to see in the photo, but then I used pan pastels in light blues to create snow drifts and a sky. I used a mylar stencil with some Popcorn Color Box Chalk & a sponge to do the clouds (as with all my photos, it looks better IRL!). Added some twiggy Impression Obsession die twigs(glitter snippets) along the side for the grazing deer(snippets from a small piece of Dylusions spray background), and I hope their footprints show up in the photo. Also added some coloring with Inktense pencils on the trees, some stickles for some sparkle. Shaded the deer just a bit with a dark brown copic marker.
 
Since there were more trees in the set that I had not stamped, I did another fast card (and I'm not fast making cards either!). Stamped this little darling with Versamark, embossed with Queen's Gold, on green patterned paper. Colored in the baubles with a Viva Décor pen after I had everything finished, added a punched glitter paper star. (Did you know punches do NOT like the regular weight glitter paper? No they do not!) Mounted the tree on a S/B circle die cut from a Kringle & Co. 6x6 (American Crafts); glued that to a larger circle from 6x6 DCWV Metallic pack. Used a green from Paper Company's Farm House 6x6 pack to emboss the card front with a Crafts Too Pine Tree Scene EF after I had die cut the circle in the position I needed. Apiece of the red pattern paper behind the tree circles covered the gap between the gold circle & green front. The sentiment is gold embossed on the same red paper & punched with SU oval; Delicata Gold sponged lightly over the embossed trees. Credit for the tree design goes to this card. Thanks Lynn, because when I saw your card, I knew one of the trees from Winter Wonderland would be perfect in this raised design.

Friends, that is my project for today.
 
In order to win Winter Wonderland, visit each blog along the hop and leave a comment! Also, all four sets that will be released this week will be available for purchasing on Thursday, November 21st at 3pm and will ship out on Monday, November 25th!

Soooo are you ready for some Blog Hoppin Fun???

I'm the last stop on the hop  so remember if you get lost along the way, just start at
Jo's Scrap Shack at the beginning! Don't forget to stop by Jo's blog to leave a comment that you have visited all the Team blogs in order to be eligible to win this so very versatile Winter Wonderland stamp set.

Thanks so much for stopping by and hopping with us today and make sure to join us tomorrow for another sneak peak at another great stamp set by 3 Twenty Crafts!


9/26/2013

Sunset Trees

Good afternoon, and it's a beautiful one in our area...very sunny after our rainy Wednesday, but a nice cool breeze blowing about. We are just back from running errands, some medical, some not. Had a nice lunch while we were out. Wanted to share another Dylusions background card and I have another one for later, in another colorway. Used the same stamp on both of them..but they look quite different with another set of sprays.
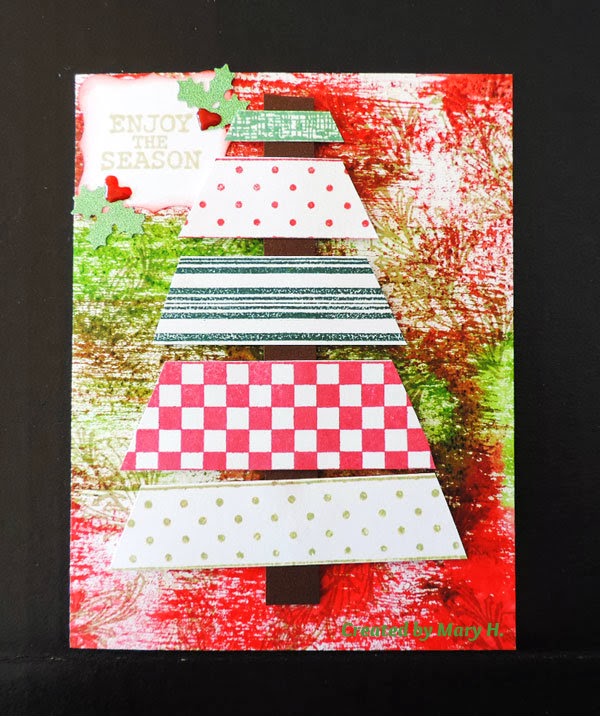

- Background done with diluted Dylusions sprays as I have described in earlier posts. I let this one dry naturally after a slight dab with a paper towel sheet. I just sort of 'blotted' quickly, not really drying it. I had selected colors thinking of a possible Halloween card, but when I saw the dried piece, it reminded me of a beautiful sunset.

- Memory Box tree stamp using Memento Rich Cocoa.