Followers

3/31/2018

Christmas Card Club Challenge #7 - Animals

Hello. It's time again for our bi-monthly Christmas Card Club Challenge...#7 for 2018. This time our Kate selected the Challenge theme of Animals.  This challenge is a group of cardmakers who share cards every 2nd Sunday during the year, and each member takes a turn to pick a theme...something related to Christmas. If you'd like to join in our group, let me know, as we'd love to have you join us. It's a good way to build a stash that come December, you'll be happy to have ready.


This trio of dancing penguins was one I found in the UFO box. I thought these little guys could fit the bill of 'animals' for the challenge (guess they could rightly be called birds too- but I decided for this card, they are definitely animals! I hope this is ok, Kate ).
 
The image had been colored with copics, so just added some colored gel markers on their hats & scarves, added some Sakura Silver Star to the snowflakes. Mixed some Stickles Star Dust & Liquid Pearls opal and brushed on under their feet. IRL it's quite irridescent. Added some glossy accents over that, to look like ice (looks a bit yellow in the photo, but looks 'slick' IRL).  Added some Hero Arts Silver stars and sequins.
 
Background was DOX blues applied with a large sponge dauber.
 
- Poppy Mod Snowflake Background coverplate die over the blue background. Applied WOW embossing ink, then WOW Clear Glitter EP. This is very sparkly, as the EP is translucent, and you can see the color behind the EP. Had meant to do this over the sponged blue background, then had a change of plan to use the coverplate. Some of the Hero Arts sequins were added to the die cut snowflake centers. I'm not sure why the snowflake die & 'ice' have a yellow look in the photo. It looks white IRL.
 
- The sentiment was stamped with  Memento Teal Zeal  ink, then applied a WOW blue pearl EP over the ink to get a nice gleam.
 
I hope you'll take time to enjoy the cards my fellow team members have shared today. Their blog links are shown in the right hand sidebar.
 
Thanks for joining me - I'm a bit behind in returning comments. Been a little busy and will try real hard to catch up in the next few days. Don't give up on me!  Blessings & Hugs. Come again when you have time.


3/29/2018

March 2018 Rudolph Day

Good afternoon, and welcome to March 2018 Rudolph Day (which I nearly forgot about!) While returning some visits on Tuesday night (the 27th), I saw some Rudy Day entries, and suddenly realized the significance of the date. If you don't know about the Rudolph Day Challenge, look here.
This is an easy challenge to play in, as all one must do, is have a card with something Christmas as the theme, and the challenge opens the 25th of each month, and ends on the last day of that month. It's a terrific way to build up your Christmas card stash all during the year.  Here's my entry for March's Rudy Day. Hope you like it.

 
- Dee's Distinctively Birch Tree Frame (IME-266) - Enhanced with Warm Gray copics to look like birch trees we see in New England. Covered with WOW Embossing, then sprinkled WOW clear EP glitter over it. This EP is translucent, allowing what is underneath to show, and this created an icy, brrr feel to the oval cutout.
 
- IO Die 333-H (birds, cut from white snippet, colored with copics, WoS)


- background sky created with DOX Broken China, Wilted Violet, Peacock Feathers, and Memento Sky Blue. Used a white gel pen for snow.

- Gina Marie Designs Double Pierced Oval was dry embossed around the Birch Tree frame.

- Memory Box Be Merry Flourish, 2 layers of snippets. Used Brutus Monroe Ultra Fine Sterling EP to emboss the sentiment. I had first colored this with a red copic and it didn't look right, so decided to use the Sterling instead. Liked this better.

Entering in March 2018 Rudolph Day
Snippets Playground Challenge 322 (must use snippets or scraps!)

Both challenges still are open! C'mon and join in.

Thanks for visiting, and come again when you have time! (hopefully my comment notification problem has corrected itself...!) Hugs & Blessings.


3/26/2018

Bunny Hat

Hi Ya...here's the 2nd YNS bunny image that I thought was so cute, and it was uber easy to color. Don't you just love the expression on this little bunny's face?

 
 - YNS clear stamp
- Cheery Lynn egg die
- SW stitched hill die
- MS border punch
- Memory Box sentiment die

The same Paper Studio DP that was used on the previous YNS bunny card. Again,one that made me happy while coloring as it was so very easy to color.

Thanks for popping in to visit, and ya'll come back when you have time. Still having a little problem with the email notification of comments, but I think it _might_ be getting better. I wish I knew why some comments come in as they have always done, and some are still sitting awaiting comment moderation. Which is what the email notification should be doing! I'm also getting comments from Anonymous which look like spam type of comments, so I'm just deleting those.

Hugs


3/25/2018

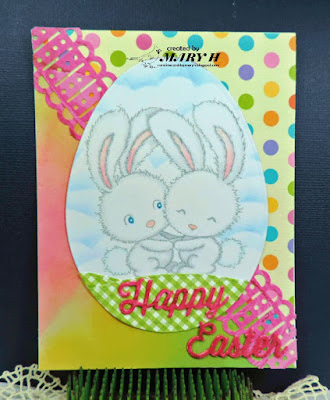
Bunny Hug

Good evening, and welcome. I hope you had a great weekend. Ours was pretty quiet & relaxed, but Friday was busy with domestic goddess chores. Didn't quite finish all that was on the list, but they can wait til another day. It got a bit brisk weather wise here, but at least no snow. Today was spent with the extended family, ending with a shared supper with Brother #2.

Have been trying to finish up the Easter cards. Here's one I hope you'll like. The image is from Your Next Stamp and when I saw this one and another one that I'll share later, I couldn't resist.


- YNS image, colored with copics.
- Cheery Lynn egg die
- SW stitched hill die for the gingham grass (The Paper Studio)
- MS border punch to cover the join
- Paper Studio DP
- Memory Box sentiment, 2 layers cut with white snippets. top layer with the same DP as the punch trim. Ended up coloring with a pink copic as the white under layers showed too much.
 
Ya'll come back when you have time, and thanks for joining me this evening. Big hugs and blessings to all who may be in need of such.


3/20/2018

Dirty Pour Acrylic Experiment

Good evening, welcome. Please help me welcome some new followers, and then we'll get to the dirty pour acrylic results that I told you about earlier.

Nancy of artful notions
 
 
Thank ya'll for joining this blog as new followers. I'm so pleased to have you visit, and I'm hoping my visitors will follow these links, pop over, say hello and enjoy some fabulous creativity. It's nice to have some new followers, as things have been rather slow in that department for a while.
 
Additionally, the comment notification is still not working as it used to do. So if I miss visiting you, please let me know. I'm looking in several places to try to make sure I reciprocate any visits here, so I hope I'm not neglecting anyone!
 
OK..a couple posts ago I mentioned a technique I had seen on Cathy's Card Spot with a technique that I'd never heard of. Now Cathy does fab cards, so I always love her work. Then while visiting my friend Loll I saw another example of this technique. Well, why hadn't anybody told ME about this? Cause their cards  sure looked amazing. Of course I go to youtube and type Dirty Pour Acrylics and spent the afternoon watching videos  (it was a rainy Sunday afternoon anyway!) Finally called the Mr in, had him look at one, and said "you think we could try this?". He used to be a pretty good painter, and on occasion can get pretty creative - more so than I. Only linked the one we watched, but there's lots of videos available. Some are better than others.
 
Gathered some supplies, (like canvas, pouring medium and silicone liquid). One afternoon when we didn't have other obligations, and again it was a dreary afternoon, we headed for the basement airbrush table, and started to work. I have bottles of craft paint from long ago hobbies, but you can use just about any paint I believe. Don't think you need the pouring medium, water would probably work, and the silicone isn't mandatory either.  We had some little condiment cups that had been washed out very thoroughly; I poured  bubblegum pink, a pale blue, a bright yellow, some gold and finally a pearl white in each of 5 small cups. I didn't want large amounts of mixed paint left if this didn't turn out to be something we liked. Added the Liquitex pouring liquid, stirred with a craft stick. Didn't seem thin enough to pour easily, so took a pipette and added some water slowly, stirring all the while, until it felt like it would do the pour on the canvas. Mixed all these paints into a large Dixie drinking cup. The video instructions said it didn't matter the color order, but we added the white last, and it did sink right to the bottom. Then Mr. slowly added some of the silicone in drops. The silicone makes the 'cells' or the little blobs you can see on the canvas. Then slowly poured some of the Dixie cup contents and watched it spread over the canvas, drip down the edges.
 

What resulted was pretty much as the video shows....BUT as the lady in this video used an offset spatula to move the color around, Mr. decided to try that. Only he used the flat craft stick. Basically this scraped rather than moved paint.  Should have used one of the embossing paste knife spatulas....the stick sort of just muddied the colors...as we didn't have a speck of green that shows. Also I may have gotten the paint mixture too thin, as there are white spots in the canvas, and the canvas was not covered very well either. I've been advised that we can apply gesso over this, cover up, and try again.  I wanted to share the results here first. It's messy - so wear gloves. I think this could be lots of fun, but I have no idea what to do with the finished canvas! Another idea that Loll gave me, was to smoosh a thick cardstock in the drips left in the pan...which I tried with some watercolor paper that was handy (it isn't working great for water coloring of late, so try something else!) Basically I got pretty much a muddy look, but might be something I can die cut.
 
Oh yes, preparation of the work surface: Used a Dollar Store thin shallow aluminum baking pan, set the canvas up on 'legs' made from other small condiment cups (like applesauce comes in) - so that it would drip. We did do a little tilting to spread the paint too. As I said, it was not too bad, until we started getting mud. If you see the little 'spots' along the canvas, that is from the silicone oil. It dried faster than I expected.
 
Ok...that's it for me! Still working on Easter Cards. Best get crackin'. Ya'll enjoy the rest of the week and thanks for popping by. God Bless & Hugs.  Come again when you have time.


3/18/2018

Christmas Card Club - Christmas Flower

Welcome, and today is Challenge #6 for our Christmas Card Club. This is a group of ladies who make Christmas Cards and post every 2 weeks. Today's challenge theme was selected by Rachel who picked Christmas Flowers.


I decided to use a Stampendous cling poinsettia stamp, and work with watercolor again. Stamped and embossed with a new Brutus Monroe Ultra Gilded Gold. I'm very pleased that it seems to be very similar to my favorite Ranger Queen's Gold, which has been discontinued. Got out the Arteza water color pens to try. I had used Koh-I-noor mixed media paper which is supposed to be good for watercoloring. Well, folks, my water color skills are not great, and this paper pilled for me. Also I didn't find the Arteza pens to be quite as easy for me to blend as the Zigs. (not that I'm great with Zigs either!) Finally got out some distress inks and just touched the water pen to the surface and then tried to fix the hard edges on my work. Here's the result:


I didn't even bother to put this on a card. Was very tempted to just toss in the trash, but thought I'd share it here - yes, it's a wart. I keep trying with the water color & get so discouraged that it never looks very good.

Next effort - and once again tried the Arteza, thinking maybe my first image was too complex so I'd use a very simple shape. Used the same colors as above.

 
This image did color a bit better than the first attempt, but I still had to use the water pen direct to the Distress Ink pad to get good coverage. I had put layers of water color on the petals, but as it was starting to 'pill', decided I best go to the ink pad. This was done on 140# watercolor, and I didn't have a lot of water on the brush. Guess I was just going over the area too much perhaps. Die cut a red side fold card base to create an aperture. Die cut the image, then made a green frame. Once this part was adhered behind the aperture, cut another frame, used WOW embossing pad, then the Brutus Monroe Gilded Gold EP. This looked  pretty good, BUT as I was adhering the frame over the aperture shape with glue that is not supposed to leave anything showing if some of it seeps out....well, you could see a smudge on the paper. What to do? Had a purchasedt Christmas card (some of my relatives who don't save cards but give them to me)...so started to fussy cut some poinsettias to hide the boo-boo. One fussy cut led to another...and there it is. You ever start a card, that no matter what you do, it seems to get worse?!
 
Almost ready to pull out the copics, as time was getting short. Decided to give the water color one more try. Found another image, used water color paper, Distress Inks. WOW embossing ink, Brutus Monroe EP, then put a light blue wash over the embossing. My first wash effort made some of the gold embossing flake off, so got another piece of W/C card and did the above process again. This time I was very careful to keep the damp brush off the embossing as I was doing the wash. Then used the Distress Inks (2 greens for the leaves, even though you can't see the shading) -- Barn Door and Festive Berries for the flowers. Die cut, and the die made a frame as it cut. Used Brutus Monroe Gold to emboss the frame. Used a PTI cover plate to emboss the white background, but it doesn't show up in the photo.


I don't know if #3 was the charm, but I do know I was getting tired of trying to do watercolor, so that's it! It might be a while before I try to watercolor anything again. I get frustrated, and then after a while, I want to give it another go. I just don't like to admit something has defeated me, when I really want to be able to do it...and do it fairly well. I know it takes practice, practice, practice! Sorry for the long post. I'd be interested in your efforts if you struggle with this technique too.

Do check out the fellow team members whose blog links are on the right hand side bar. Have a wonderful afternoon, and my blog candy winner has contacted me. I've been finding some other goodies to tuck in, and hope to mail it early next week.

Hugs & Blessings.


3/17/2018

Happy St. Patrick's Day and Winner!

Hi, and let's do the important stuff first:

Random Generator picked a lot of people. When I checked that number & went to the blog, there was no  blog candy picture posted. Or, the number was for a person who had not visited in a long time so obviously no posted candy either. For other numbers, the blog had not been updated in many, many months or years, so again, no visits or pictures. A few followers don't have blogs, so I knew they couldn't post a picture, and that would not have prevented them from being a winner IF they had visited. Just about decided to forget about the picture requirement, (which didn't seem quite fair to those who _had_ posted the candy picture) and finally got a blogger name who had the picture in the side bar AND has visited regularly.

#166 - Lisa of A Mermaid's Crafts
 
 
Lisa, please contact me with your info by next Saturday, March 24, so that I can get these goodies mailed to you! And thanks for being a follower, and having that picture posted. (Comment moderation is on, so no one should see your private info).
 
Now for the last of the St. Patrick's Day cards. One is for the Mr. ( he's not Irish either! The only green he likes is the spending kind and cute frogs too)..


When I saw this cute little set, I just had to order it. These little Stamping Bella Irish chicks made me happy and were a hoot to color. There are lots of snippets from other cards on these 2 - and now all the stamps, papers, and green stuff have been picked up and put away for next year! (aren't you glad?!) On to Easter - Bunnies, eggs & Jellybeans.


Last one for the year. This may be a CC Stamping image called Teddy, but I can't remember. I can look it up if someone wants to know. This last one was for Mr. and he liked it.

We tried a little play last week doing dirty pour acrylics. I'd seen a couple bloggers whose work I love show this technique, of which I'd never heard. Youtube searching  commenced, and after looking a quite a few, had DH come in an look at one. He agreed it would be fun to try, so I gathered the supplies, and finally on a rainy afternoon, we gave it a go. Can't say we had stellar results, but it was fun (and messy). I'll share the results of our canvas when I get a chance to photo it.

In the meantime, congratulations to Lisa, hope you will contact me by March 24 (next Saturday) so I can mail the package to you. Thanks to you all for stopping to visit today, and Big Hugs.


3/16/2018

CAS Christmas Card - Holly

Good Morning and welcome - it's another sunny Friday here at this house, but we are expecting rain a bit later. Right now, the laundry is washing (mattress cover - which takes forever to dry, and then bedsheets); DH has gone to breakfast with Bro #2, and I'm having my coffee and some delicious fresh bakery cheese bread. Yummy - won't you come and join me?


There's a new CAS Challenge going on, and I've been trying to get a card made, in between the St. Pat's and Easter cards I needed. Saw a video that looked interesting so pulled out the DOX and worked on a background. Here 'tis.

 
First, here's the Youtube link: Patina Rusted Cards.   I pretty much did the same inks as Karen did, but I added in some Spiced Marmalade when smooshing the blue.


- DOX Vintage Photo, Walnut Stain, Broken China, Spiced Marmalade using 140# water color c/s
 
- Tim Holtz Sizzix Mixed Media Christmas Thinlits 661602  (For the Holly a snippet of package cardboard was used)
 
- S/Binders SPBS4904 Scored & Pierced Rectangles
 
- Rangers Queen's Gold EP for the Holly (2 coats) and the sentiment, which was from a clear Hero Arts Christmas set
 
The CAS Christmas Challenge is open until March 24, so hope to see you there with some CAS Holly!
 
Will be doing the 6th Blogaversary Candy draw very shortly and announcing the winner. Watch this space!
 
Hugs & come again when you can.


3/12/2018

A St. Pat's Bunny

Good morning, and welcome. Still working on St. Pat's cards and hope to get a few mailed today, so they will be received in time.... I just don't know where my time goes, as I don't seem to accomplish very much some days. Today's card was an image I colored while we were in Florida, but it finally got put on a card last week. Here goes:


Tried a little Mixed Media on this one. The white trellis was a snippet that's been hanging around for a bit (cut from recycled product cardboard - the backside was a nice white, just a little glossy) and the bubbles stamping is from a Carabelle art printing texture stamp.

The card front was assembled with the design papers, and then decided to do a little stamping with the texture stamp. Thought the little leprechaun leaping in the corner would give a clue as to what the sentiment should be, so I didn't add another one. That will go inside.

- Whipper Snapper Miss Patty
- Carabelle Studio Texture stamp (AP60012)
- Kaiser die for the trellis

That's it for today, thanks for visiting & I'll do my very best to get back to your blogs to see what you're up to. Sure wish I could figure out what's with the commenting issue. God Bless and Hugs.


3/11/2018

CAS Christmas Challenge March 2018 - Holly

Good afternoon...and welcome. Still having a problem with comment notification not showing up in my email, so have been checking the comments awaiting moderation on the settings menu. Even after I publish them from that area, some comments are still not appearing on the blog. I've tried many suggestions, but so far it's not changing anything. One blogger let me know she's had the same problem. Will try not to miss visiting you, but please forgive me if I miss returning a visit.
******************* 

There's a new CAS Christmas Challenge being hosted by my good friends Bonnie and Loll.  I've been trying to come up with an idea so that I could play along. I've got a couple more things in process, but decided to share this card today.


After seeing this video by Jennifer McGuire I decided to try Distress Oxide Water Painting.  I need some more practice with this -- perhaps try different stamps, but it was rather fun on this first effort. I did use the Misti to place the stamp around the edges of a die cut that had been masked on all 4 sides to create a border. Inked with Versamark, then used EP, and started applying the DOX. Dry embossed the card base.


Another thought I've had, is that using the darker colors of the inks yields a better result. I've got all the DOX greens that are currently out (I think!) but the shades I used don't allow the water painting to be as obvious as in the video. Still, it was quite fun. On the berries, I finally decided to just dab the brush onto the ink pad itself, rather than onto some spread on a craft mat. This got the berries to be a little more visible. I'll keep trying this technique.


So c'mon and join me over at CAS Christmas Card Challenge for March 2018 - Holly!

Thanks for joining me today, and have a wonderful afternoon. Hope all my USA friends remembered to change your clocks...Spring Forward! Hugs

- Shades of Distress Oxide Green & light blue inks
- SU Holly Berry Happiness
- S/B Scored & Pierced Rectangles
- PBlack Winter Whites & Greens (sentiment)
- Altenew Antique Silver EP

3/09/2018

Easter Egg

Good afternoon and welcome to a scheduled post. Hope you're having a great day.


- Cheery Lynn bunny (from the same die set as the egg shape) cut from a very old piece of card stock. The material has a mottled color, and think it came from a long ago class. It's a bit thick and I wasn't sure this wafer thin die would cut it well. It did though. The only thing I did to this shape was add a tiny Nuvo eye - thought the color of the c/s would be fine to show texture.

- Cheery Lynn egg shape cut a previously created Brusho background. Added some Judikins Diamond Glaze with a round blender tool and sponge, then buffed it.

- Ali Express floral die cut white snippet, which was colored to be an Easter Lily. This material was a 'stabilizing cardboard' from the bottom of a shopping bag. Decided to leave the centers of the blossom part of the die inserted, rather than removing as they are meant to be.

Memory Box sentiment die, and on this card, decided not to add back in the cutout bits of the letters, but let the blue gingham material show.

Blue gingham is from a Michaels 6x6 pack, on sale, and the paper is very thin. (This would make great Iris fold paper I think!)

Ya'll come back again when you have time. Hugs & Blessings.

3/08/2018

Apologies!....

Good afternoon. I must let you know something that happened here on the blog with comments getting published. I'm not sure of the cause. Didn't even know there was a problem until a sweet blogger let me know her comments were not showing up. Thanks Pat. I've had comment moderation turned on since starting this blog. When someone leaves a comment, I get notified on my email - then I can publish or weed out spam comments. Even though I've not been getting as many comments as I sometimes do on the posts, I didn't really give it a lot of thought. I was MIA for a long time last year, and I realize it takes folks a while to know I'm back in circulation. BUT after Pat advised me that her comments don't seem to be getting published, I started looking at possible reasons and got into the blog settings. Since my blog knowledge is not awesome, I even asked my guru (Loll) what she thought might be the problem. Neither of us came up with any ideas, and I wasn't aware of my changing anything. (of course I blamed Blogger!) Looked a couple times at the Settings, and then had a bright idea to check to see if I had any comments awaiting moderation. My goodness, there was 147! I apologize to all of you who were visiting, leaving comments, and these were not getting published. Since this is not the normal way I do the blog, I didn't even think about looking there at first. I published every comment that was in the list (and maybe some will be published twice!) Does anyone have any ideas why this happened, or what I can do to stop it happening again? All ideas will be gratefully considered & thanks for any help.

No card ready to post today (got one scheduled for tomorrow)...so I thought I'd share a photo our traveling buddy brought down to us recently. It was from our European trip last July, and was taken right at the foot of Edinburgh Castle. It was a chilly day, so we were bundled up pretty warmly.


Need to edit the Easter Chickie card too: that was a Memory Box sentiment die, NOT Cheery Lynn as the post reads!

Thanks for visiting, and appreciate any ideas on the commenting problem. I don't want this to happen again, and probably will forget to keep checking the settings since I'm not accustomed to blogging this way! :-)

Big hugs -


3/07/2018

Chickie in Her Easter Bonnet

Welcome, and thanks for stopping for a visit. Here's another Easter card, and this one was fun to color. Hunted through out the backgrounds box and was able to use a previously created background. Always great to use up supplies in that box. I liked the blue with the yellow motif.


- The bonnet looks more like a straw hat IRL, was colored with some copic E colors after a base of yellow cream. Sorry it looks like the same yellow as Chickie's feathers in the photo! Used copics on the flowers, then colored over that with Kaiser Neon gel pens. Die cut with a stitched oval, then a S/B beaded oval die from a Michael's 6x6 paper pack.

- Previously created brusho background (think this is from playing with cling wrap). Die cut with a stitched rectangle. After using a Deco gold pen to edge and not having great success, swiped the edges along a versamark pad, then dipped in Altenew gold EP. This showed up much better as a scant gold trim.

Cheery Lynn* die sentiment cut using gold mirror paper that had sticky back sheet on it. I made up an entire sheet with sticky back so I don't have to make it every time I want to do a little something.

Ya'll have a wonderful afternoon, and come back when you can. Hugs & Blessings.

*Memory Box die

3/06/2018

An Easter Hedgie

Good morning and welcome. First off, please help me welcome a new follower, Kara Lynne of Bright Hope Creations. It's always a delight to have  new follower and make a new friend; I hope you'll have time to surf over to visit Kara Lynne, say hello and enjoy at her stunning projects.

Easter will soon be here, so I thought I'd intersperse some Easter cards in with the St. Paddy's cards I've still got to finish up, and share here. Here is one of my favorite Penny Black hedgie......helping out the Easter Bunny.


- Stripe DP from a 6x6 purchased at Michaels - this is quite thin paper too.

- Green texture cardstock from the stash - cut with a Memory Box die

- Cheery Lynn egg die, glitter paper, decoration from glitter paper, a border punch....

S/B die for the mat and postage stamp die for Hedgie. Thought the waste from the Memory Box die cut look liked Easter eggs, so threw several under Hedgie's cart...they fell off!

Prayers for all of you enduring this stormy weather both in the USA and in the UK. Hopefully this will be the last blast of winter, before we can enjoy a lovely spring.

Come again when you have time, God Bless and sending many hugs your way.

3/04/2018

Silver Birches and Tulips Paintings

Welcome on a sunny, beautiful Sunday afternoon. Some of you are having such extremes of weather, and it makes me very thankful to be where I am this afternoon. Praying that all of you in the frigid cold and snow won't have to go out in it & that your power stays on so you can keep warm.

After my post for this card explaining for whom I made it, several of my readers asked if I'd share the paintings. Went outside to try to find a good spot to photo, but the best place for getting light and  not including my sunshine shadow, seemed to be setting on a window ledge on the back deck. Apologies for that, but I've cropped out a lot so that hopefully you'll just focus on the pictures.

Again, remember this lady started painting - probably about a year ago - and has had NO formal lessons. I think now she takes a picture of something she wants to paint, prints the picture, then paints from that, but I'm not positive how she selects the subject or goes about the process. I'm just amazed at her talent. (I take credit for her beginning to add her initials on the front, and a signature on the back of the canvas...:-) She was not doing that at first. Further suggested she put the date along with her signature, but the date is not on either of these. I hope she'll begin to do that as provenance. Who knows, she could be the next Granma Moses.


Kathy's Silver Birches

 
Kathy's yellow tulips
 
Hope you enjoy sharing these with us. I've certainly been cheered and inspired each time I pass by and see them displayed.
 
Ya'll have a good rest of the day, and come back when you can. Hugs and God Bless.

3/03/2018

Christmas Card Club - Robins

Hello, and it's time again for a Christmas Card Club Sunday - Challenge 5. Our Mrs. A chose the theme "Robins". Yay, you know I love the birds! Decision time: Do an English Robin or an American Robin? They look quite different, you know. Decided to go with an English Robin; remembered I had been gifted with some lovely toppers a while back by Sylvie (a CCC team mate) so hunted up the topper. Also remembered I'd gotten some Sue Wilson stamps recently and thought there was a robin motif (yep, there was, found that too. Stars are aligning here :-).

Found out it's a bit difficult to get the coloring on an English robin just properly done, printed out an image from the net so I could see the coloration better... My first effort had too much orange all over the head... Here's the 2nd image I did (and may still use the 1st one on something else - he just won't be an English Robin!)


When I bought some SWilson stamps, I thought I'd made certain I had the compatible dies. Well, this one ended up being fussy cut...Had dimensional tape behind the image.
 
Kraft background stamped with Colorbox (pigment) greens using an Impression Obsession Cover A Card Pine Branches stamp. VOS red & gold dp (sort of like mulberry paper in texture but it is not mulberry...just very fragile & I've had it forever I think).
 
MBox sentiment floated over the motif, added a gold textured twine bow.


Kraft cardstock used in Card #1 was die cut with an aperture for the topper.  Gina Marie die dry embossed the edge design and then spritzed with a gold mica spray.
 
Used Vellum and Altenew Platinum and WOW embossing ink over the vellum. Tore this & tucked some glue into places where it might 'hide' - using the PBlack embellishment. (this was 2 white snippet layers, colored with copics) Added another small sprig of holly in the corner, on the vellum and in one place on the topper -  to sort of tie things together. The photo shows this holly very brightly colored, but actually it's a darker look than what the picture is showing here!
 
Please do take time to visit my team members, whose blog links are listed in the right side bar.
 
And have a lovely Sunday. If you are anywhere that the weather is being awful, I hope you can stay warm & safe until this frigid cold is gone for Spring! Blessings and Hugs and come back when you can.


3/02/2018

Thank You Flower

Happy Friday & Welcome. We have glorious warm sunshine today, after a couple dreary rainy days. Sky is the beautiful blue our area calls Carolina Blue - and I'm not seeing any white clouds floating about. Always a good recipe for a happy weekend in my opinion.

We have a friend in Massachusetts who was born deaf, and didn't learn speech because of her deafness. Her Mom was a nurse & was exposed to measles in her 1st trimester of pregnancy. It was only when the baby was quite a few months old, that she suspected the baby didn't appear to hear. Many medical consultations, and years later, our young friend was enrolled in the American School for the Deaf. There was no school close in the area of Massachusetts where our friends lived, so every Sunday night, her Mama drove 90 miles down to Hartford Connecticut to take her child to school. Repeated the drive on Friday evening to bring her home for the weekend. This was the routine for 12 years of schooling. Over the years, other children were born, so Mom had an impossibly full schedule to care for ALL of her family. Mom learned sign language along with her daughter, but as she grew up, they developed their own shorthand signs to speak with each other. I never got the slightest intimation that Mom ever felt life was unfair, she just accepted what was, and got on with things. In my book, I think she's the closest person to a Saint I'll ever know. All of her kids and her siblings would heartily agree with me. I was blessed to have known her. I've also been in awe of Kathy, ever since I first got to know her...as she lets nothing stop her from doing anything she's ever wanted to do.

Now our handicapped friend has retired from work, she's started to develop a new career. She began going to the local Senior Center, and has learned to paint. No lessons, just pick up a brush and go. She's amazing. On our last visit to Massachusetts, she kindly gifted us with 2 of her paintings. She knows I love the white birches that grow so plentifully up in New England, but are not in our area of the country. So one scene was of white birches in the spring. Another was of beautiful yellow tulips against a deep purple-blue background. We went off and forgot to pack them, which made me feel badly (as well as major ungrateful!) When our BFF was here recently - it's his niece that is the artist - he brought them along. I wanted to send Kathy a thank you card for these paintings.


The image was inked with versamark, heat embossed with white EP, sponged with DOX in Lemonade right in the center. Then sponged over the entire area with Broken China. I was trying for a sort of 'glow' around the center. The outer corners had some extra Broken China sponged. Used Bristol Smooth Vellum cardstock, die cut with a stitched die.
 
Black snippet was embossed with SNS Opaque Detail White, after die cutting the shape with a tag die. The focal image has fun foam behind it, and the outside edge of the tag sentiment is raised up with 2 layers of dimensional tape so as to make it level with the flower.
 
Dry embossed the stitched framing around the focal image. I hope Kathy and you like it! I was rather pleased with it, myself.

Here's a beautiful sunset we had last night after the rain subsided. It was just awesome.


Thanks for stopping by. Sending hugs and many wishes that you will have a super weekend, and if you're where that intense cold is about you, stay warm and safe.


Blog Candy Sticky Post

STICKY POST
 
Please scroll down to get to the regular post, and thanks!


Hi, and this post will reference Blog Candy for the #6 Blogaversary that is coming up on March 12. Hard for me to realize 6 years have passed by, while I've been meeting new friends, and sharing my work online. Frequently I manage to order 2 of something or other, and if I don't pass the extra along to a pal, I save the item for future blog candy. Here's a picture of what will be currently on offer to a follower of my blog.


Rules to win:
 
1. Be a follower of this blog
 
2. Post a picture of the current blog candy in your sidebar with a link to this blog
 
3. Leave comments on the posts between now & March 15 (was late getting this post up, but the actual blogaversary is March 12)
 
4. Winner will be chosen with the Random Generator app and announced after March 15th.

5. Winner need not be a USA resident.
 
This post will stay at the top of the blog (if I've done things correctly - LOL) until after March 15. As any winner of my past blog candy will tell you, I always tuck in a few surprises in addition to what is shown in the photo. Sorry for the glare on the photo, but that stamp set has the matching die set to go with it.  Good luck and thanks for being a follower & hopefully a friend!