Followers

Showing posts with label Backgrounds. Show all posts

8/07/2018

Christmas Trees

Good morning, and welcome - I nearly missed Rudolph Day for August, and then there is a CAS Christmas Challenge going on...with trees as the theme. Now I have a lot of tree stamps and dies, so thought "Surely this time I can join in with the CAS Challenge". But as frequently happens to me, time just got away. So I hope this CAS card will do double duty here!!!


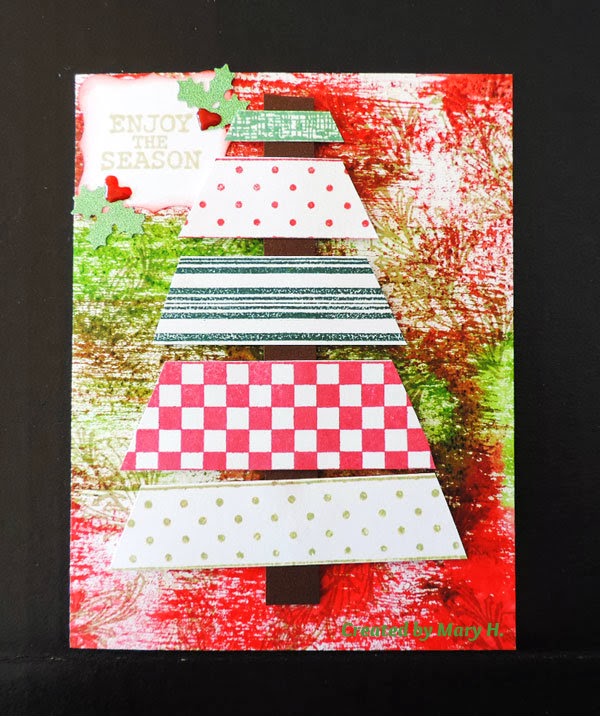
Way back in June I shared some Brusho Play on this post (scroll down past the card to see the backgrounds created by using brusho-s with an embossing folder). Decided to cut the MBox tree die from one of those backgrounds. The marbled colors show up in the photo, but the embossing texture doesn't show all that well. It does IRL however, and I was pleased. Also had some thin metal where DH & I had used Loll's Heated Copper technique (who knows when we did that!) - after placing the trees on the embossed card front, thought it needed a 'little something' - yet still keep it CAS. Took a cheapie tiny star die (probably a $1 find at Michaels) and to my surprise - the tiny die* cut that metal. I wasn't certain it would. It bent the star shape just a bit, and I had planned to straighten the 'legs' once I had the star down. Decided I liked it with the little curls. The center star looked lonely, and since the first cut had gone well, I added 2 companions! Die cut the tree shape from white, embossed that piece. Used 2 colored tree die cuts, with the white cut from the embossed piece to inlay into the front, and it has nice dimension.
 *meant to write punch!
Since today is the ending of Rudy Day I'm also going to jump over the pond to join in that challenge.
 
Linking to: August CAS Christmas Card, and July 2018 Rudolph Day Challenges. Looking forward to seeing your cards there too!
 
Thanks for joining me this morning, and ya'll have a nice day (that's what we say here in the South!)
Hugs.
 
Supplies: CuttleBug Snowflakes EF, Memory Box Pine Trio Background, Hero Arts CL343 clear sentiment set

5/01/2018

Thank You

Thanks for coming by for a visit, and to share this Thank You card with me, that I've been forever finishing. Pieces of it have been on my desk for some time, and each day I'd plan to finish it, something would interfere. Isn't that the way life goes? My life goes that way, anyhow!

So here it is:

- Memory Box die, cut from white cardstock. Heat embossed first with Ranger's Princess Gold, & I didn't like the look. Re-versamarked it, then used an SnS EP (can't remember the name of it) but looked much much better. A similar size piece of previously created background - from sprays or brusho-s I don't remember that either, as it came from the background box! - was cut to size and glued to the circle to create a background

6x6 card pack had some paper that I thought looked ok with the circle motif. A Hero Arts Infinity circle die embossed a frame for the circle before it was adhered to this DP. (you use the tan pad that embosses instead of cutting...if you are lucky! I have sometimes cut through if it's a thin paper like this was, instead of the thicker card stock. Placing an extra piece of c/s on top of or below the thinner paper is helpful. If you think to do it, which I usually do not, until I ruin the first piece of paper!!!

Stamped the sentiment on a snippet of vellum, heat embossed with the same color used on the circle die. It looks quite different when on the vellum. A few yellow pearls to trim - that's it!

Ya'll have a nice Wednesday. God Bless.

12/25/2017

The Dove of Peace

MERRY CHRISTMAS
 
 
Here's a prayer that your day will be or has been - just the most wonderful and happy day of 2017 for you. I wanted to post a Christmas card made just especially for all those who are so kind to visit here, share sweet comments about the cards & posts I do, and for those who often chat with me by email. Your support this past year has meant so much to me, and helped me get through some tough days. When I would feel down or blue, I'd get an email or a lovely card from one of you, and my spirits lifted. Many times it enabled me to face whatever the next day might be bringing. I know that many of my friends are also dealing with some tough Life's Issues...This thing called Life visits all of us at one time or another. My prayers go out to those of you who are facing these trials.
 
I think I've mentioned here that I seldom watch the news on television. It's depressing, always something unpleasant or hateful, and that's what inspired the card today. It's a very simple card, but expresses my Christmas wish for each of you AND the world we live in.


Background made using Silk acrylic - royal blue as a wash over watercolor paper. While wet, sprinkled Brusho Prussian Blue, Ultra Marine and a bit of white. Spritzed with Dylusions After Midnight spray to bloom the crystals. Let that dry just a bit, then spritzed a pearlized spray for some sheen, with just a little more water to make the colors spread all over the background. I wanted a deep royal blue, and this was exactly what I had envisioned behind this white dove.  
 
- Martha Stewart mega bird punch...5 layers of snippets layered to create some dimension. Added pearls for the eyes (wish I'd left that off!) and the flower center. Leaf twig colored with copics.
 
- Hero Arts Infinity Circles cut the blue background and the outer gold mat. An old Cuttlebug Dots embossing folder for the topper. Memory Box peace die cut from a snippet of mirror c/s that had Stickit backing on it.
 
I was watching Jersey Boys while I worked on this card. Franki Valli & the Four Seasons was the sound of my teenaged years; I really enjoyed the movie and those wonderful songs.
  
Blessings, Hugs AND Peace in your world -  ya'll come back when you have time. I expect all of us can do with a little time off during this holiday season. Thanks for popping in to visit.


12/08/2017

Thinking of You

Hello again, back with a couple of the snow pictures and a card that had to be mailed today. I'd done the apples to put on a Thanksgiving card, but decided the image would work well on this mica background. Just learned that one of my cousins has a brain aneurysm, and fortunately she got medical attention when the symptomatic headache started. I'm reading more & more - or hearing about folks - who develop intense headaches. These are people who seldom have headaches...then get a very severe one, that doesn't go away with aspirin or Over the Counter stuff like we all use. Then if the blood pressure is checked,  it's elevated. This cousin knew what had happened with SIL, so got a fast appointment to learn there's a problem. She will be getting it repaired next week. I know she's frightened, so thought perhaps a card might cheer her, to know prayers are being said. One of my brothers said "We're all falling apart". True!!!


- The background was made using Saffron Mineral Burst as a wash on 98# mixed media c/s. Then sprinkled some of the red brusho crystals over it. I was careful, as I didn't want to lose the lovely golden color of the mineral burst. I tend to get a bit carried away when I'm sprinkling the crystals, as it's such fun to watch the colors bloom.

Used a pretty EF with a pattern at top and bottom, just for a little dimension. The apples have some WoS on some. This image was a boo-boo. Had colored an image, die cut it, and was trying to sponge an antique looking edge around the diecut. Well, that just made a big mess. Cut out that basket, but stamped another one and colored, die cut. Used the messed up one behind the re-done one, and used a stylus on both images to create a little lift to some apples. IRL it looks nice. Doesn't show in the photo.

- Stitched fish tail banner with the sentiment, remembered to tie a ribbon before adhering to the cardbase, and it's done, mailed today.


Here's some Snow pictures of our surprise today.


Thanks for the feedback on the font size change. I do appreciate all who took time to let me know their thoughts.

Added a pretty card to the Cards by Friends page, which I hope you will take time to enjoy.

Hugs & have a great weekend. Thanks for visiting. I'll try to catch up visiting over the weekend.


12/03/2017

Backgrounds, Tree, Snippets

Happy Sunday afternoon. We're having a gorgeously sunny & most pleasant afternoon after an overcast & rather gloomy day on Saturday. Today I'll share a couple so-so cards, finished from salvaged bits (snippets) and  boo-boo.

Here's the first - the boo-boo

 
- Background created from mica products(Mineral burst, color burst, pearlized sprays) using #140 watercolor paper. This was the first try with the liquid mineral burst, and I was quite happy with the results here.

Used several sizes of snowflake dies and glitter paper to layer the medallion. Cut the Penny Black die from the same paper, but letters of this die were very tricky to handle. There's 3 layers, and each layer was difficult to get adhered together straight. After it was placed on the background, it didn't look at all as I wanted. After looking at it, took a gold gel pen and outlined around the words, and decided 'that's it'. I hated to toss the pretty background.

Tried this as a square card, and it didn't look right. Used the 5.5x4.25, added a border of gold glitter paper top & bottom, and some SU sequins to cover the join. This is one that may stay in the stash box and get cannabilized for something else. Not real happy with this die either...too fussy to have to work with (for me anyway!) It's a very pretty font on the die though.

- this one is the Snippets one! The tree was cut from a ?Hero Arts? die that cuts the tree shape and the little branches, which are then lifted out from the surface. Used a mica created background for this, then rubbed some Nuvo Mother of Pearl mousse around before lifting the branches. The Nuvo MoP. had been closed properly, still has the inner seal, but it had dried out quite badly. I'm wondering if spritzing a little water into the container might rehydrate...anyone have any thoughts on this? I'd only used it once before, but it's been a while. I had a problem with the small pots of Inca Gold old formula some years back.Wondering if the mousse is going to give me similar problems. It does give a nice sheen though.

A snippet that had a circle die cut from it, was handy and another piece that had some embossing paste....used the cut out as a stencil atop the paste piece, and sponged various shades of dark blue to create a night sky. I was trying to create a way to use the tree, as that was the jump off point for this card. Added some white gel stars. Torn paper with Sparkle n Sprinkle Twinkling Clouds spread over liquid glue to create some snow drifts. Decided to add 2 little Art Impression birdies, and the sentiment. Done!

Now for just a couple of the Thanksgiving cards that got made, but not mailed in time.


The next 2 were sponged DOX & embossed background. The image is an old Art Impression cling that I have always enjoyed coloring.

Still have a couple more Thanksgiving cards I may share, where I was experimenting with the Whitewash technique.

Thanks for joining me this afternoon. Hope that you had a good weekend, and ready to tackle the  seasonal rush that is beginning! Hugs & Prayers.


11/30/2017

Dry Embossing Christmas Trees

Good afternoon, and thanks for stopping in. Hope you've been having a good day, and enjoying whatever it is that you might be doing.

Here's another background card from playing with Ken Oliver Mineral Burst and other products, using mixed media card stock and a Sizzix 3D embossing folder. This time the background dried overnight, was dry embossed with this folder, then  spritzed some different mica sprays over it. I'm trying to teach myself to keep the sprayer about 18" or more back from the card surface. I've been finding if I spritz, let dry well, then emboss, the piece still doesn't feel the 'hardness' to yield as good an emboss result.

Had some bits & pieces from previous backgrounds, so they got pulled into use for this card too.


The Impression Obsession die cut tree was cut from a snippet of created background. Used the foam tap that comes in a 'line' form (rather than the squares). Cut into skinny pieces to be able to pop up the tree. Colored the tape with a copic so it was not so visible from the side. I was trying to position the tree trunk between the raised letters, so it's not evenly placed; hence the sentiment out to the left side. Hoped to create a more balanced look. Thought this worked with the embossed sentiment. The sentiment was cut from 3 layers of snippets, and is from an Echo Park die set. Snippets were just big enough for the die to fit - the 2 back layers were from a messed up Halloween scene. Goes to show, those little bits come in handy :-).

Ya'll have a wonderful afternoon, big hugs.


11/29/2017

Spiral Christmas Tree for Rudolph Day

Waay Haay! Finally, have a simple card ready in time for Rudy Day. In case you don't know about Rudolph Day, it's hosted by the very fabulous Scrappymoi (Maureen), is open every month from the 25th to the end of the month, and the only rule is that the card have a Christmas theme. Pretty simple, yes?

Have been playing with some products, making a few backgrounds if I had a little time and was in the mood. So today's card is the product of those efforts. Found a Sizzix 3D EF at the local Hobby Lobby, had a coupon, and well, you just couldn't not buy one, right?


Background made from sponging DOX in blues and lavenders, with some iced spruce to tone down the colors just a tad. Sprayed some pearlized water over this and dried overnight. (A tip: Do the embossing and _then_ spray with the pearlized stuff...; tried that next time and that seemed to work better for me)
One caution on these Sizzix 3D embossing folders: Check the sandwich with _your_ machine, as it would be easy to break the machine. After a few efforts and the machine felt 'too tight', I just opened  the tabs on the multi-purpose platform, put the EF down with no bottom plate; added a shim from some saved die backing (like you get the S/Binders dies on), added the top cutting plate. It rolled through with no forcing and I still got a nice impression. It was not the sandwich suggested on the Sizzix package.
 
Impression Obsession Swirl Tree die cut from another play piece made from Ken Oliver Mineral Burst, colorburst crystals and pearl spray.
 
Sentiment from an Echo Park word set, cut from the same tree paper... used some snippets from other spray pieces to make 2 more layers to add dimension. Added Glossy Accents after this was adhered, then sprinkled some white glitter over the wet. It's quite bling-y after drying. Did the same on the star as well.
 
Very simple to do with pieces handy. So now I'm off to join some lovely folks over at November's Rudolph Day Challenge.
 
Didn't include links to products used, but if you are interested, will happily try to provide the info.
Thanks for joining me, and have a wonderful blessed day! Hugs


11/25/2017

Christmas Card Club - Mixed Media

Hello and welcome to a Christmas Card Club post. This great group of cardmakers have a challenge every 2 weeks, and one member selects the challenge for that week.  I've not participated in a long time due to all the family things we've dealt with for a while. However, since I picked this week's challenge, I felt honor bound to try to get something ready to join in. (hanging head in shame for being away from my CCC pals for such a long time. We're praying that 2018 will be a quiet year and we can get back to our normal routines once again).

So here goes:


- Ken Oliver Metallic Sky Mineral Burst applied to Mixed Media c/s. This is a liquid product that spreads easily as a wash, and is a gorgeous blue. It can be mixed with acrylic paint and other products, and Youtube has some good videos on it. While this was wet, sprinkled Color Burst Osta Blue and some yellow Ken Oliver Color Burst (more powdery than the colorburst crystals). Spritzed some pearlized spray over the surface to help the crystals & powder bloom. After using a spritz tool to blow the puddles around the card surface, let this dry well. This certainly doesn't look as though it started off blue, does it?!
 
Stamplorations Christmas Tree stencil used with Golden Glass Gel Beads to create the dimensional tree. It's been a while since I used this product, and left it a bit thicker than it should be.
 
Let the piece dry overnight, trimmed down. Added 2 mirror gold strips to each edge. A Memory Box tiny snowflake stencil used with pearlized texture paste to add dimensional edges at the sides.
 
- Echo Park die cut from the same gold mirror paper. Remembered to use double side adhesive to the c/s before die cutting. Usually think about that as I'm tediously applying glue to the letters. Recently got a Penny Black O Holy Night die, tried using it, and the slender shapes of the words made it very tricky to glue & put in place properly. (that was the first card I meant to use today! May share it later, but needs some TLC first). Added a few little bits of color around, and called this one done. Mixed media is always fun to experiment, even when it turns out not like your first plan :-)
 
Please do visit my fellow team members to see what beauties they shared today. You will see links to each member's blog in the right sidebar.
 
Would encourage you to check out some new Thanksgiving cards shared on the Cards by Friends page as well. We were so blessed to enjoy these gorgeous cards by such sweet friends.  
 
Also would like to extend a warm welcome shoutout to a lovely new follower, Mac M. of The Sweetest of Peas. Thanks so much for becoming my newest follower. It's been a while since I have been able to make some new friends, so I was delighted to see your name in the lineup! Do check out Mac's work...you'll enjoy it, I promise.
 
Thanks for joining me today, and I'll try to get back to post a couple Thanksgiving cards that were made, but not sent. I seem to be developing a very bad habit with that! Certainly need some improvement on the Christmas cards!!
 
Hugs & God Bless.


10/04/2017

Birthday with Oxide Background Stenciling

Good evening. Thanks for such a wonderful response to my post yesterday. It was such fun seeing old friends again. I'm still trying to get back in the groove, and will share some of the pictures of our trip soon. This post is a card from August, for my #2 Brother's 87th birthday. It was a tough day, and all his kids and grandkids, some neighbors & ourselves showed up for a cookout. The hard part is that SIL's birthday was 2 days after his, and usually his daughter had a party for the both of them. But we got through it; by and large - it was nice. I think it was just a bit much for him though, although he hid it well. We didn't tell him so many folks would be there, just that a couple of us would be at the cookout. (Not my idea to surprise him...I didn't think it a good idea not to be straightforward about it).


The background was made using some DI oxide inks through 2 different stencils (which I don't remember what they were, but will check if someone is interested).
 
The leaves were cut from a die set (thought it was Lawn Fawn**, again I'll look it up if need be). Cut from white c/s, then used versamark, copper, gold and silver embossing powders.
 
The sentiment was also cut from white c/s, then heat embossed with the same gold as on the leaves.
 
Mounted the leaves on a stitched die cut rectangle, called it done. It was one of the cards made from bits and pieces that had been done earlier. I thought it had a bit of a rustic feel to it. Planned to add a twine bow to it, but that looked too much so I didn't.**
 
Added some cards sent by lovely people on the Cards by Friends page...hope you have time to look at those.
 
Until next time, God Bless and many hugs. And thanks for looking in.
 
**Edit: Enlarged the picture to check it and realized I'd used a Paper Trey Cover plate, with a feather quilt design to emboss this background.


**It's Concord & 9th.. Thanks Anita for sending me the info so I didn't have to hunt through dies :-)

2/22/2017

Penny Black Hedgie Says Happy Easter

Good evening, and thanks for stopping for a visit. Thought I'd give you a break from St. Pat's cards, and finish up an Easter card. This cute little PB Hedgie lady was colored years ago. It's a clear set called Tiny Wishes.  Found the colored image in the stash, added more contrast to her dress, selected a S/Binder to die cut, and off I did go.


- Miss Hedgie was shopping (I think), but decided to go with the 'Easter Bonnet' and use this as a card for Easter. When I was a child, everyone had an Easter outfit to wear, and the ladies wore hats (sometimes the little girls did too). I think that's a tradition that has disappeared these days. Copic coloring, WoS on the Rose, and although the photo doesn't show it, a little drop of Nuvo Jewel Drop (Grey Mist) - which dries clear and looks like dew on the flower. These Nuvo Crystal and Jewel drops are easier to control the size of the 'drop' (at least for me) than the liquid pearls were. Really like the ones I've used.

- S/Binders Oval Bliss to die cut Miss Hedgie, then used Memento Dewdrop sized inks to add some color at the edge. After making the background, thought there needed to be another color between Ms H and the background, so found an oval S/B that sort of fit the shape, to do an underlayer.

- Artplorations Delicate Leaves stencil - embossed over white c/s, then used brushes to add color: DI Milled Lavendar, Dewdrop size turquoise shade, keeping the corner areas darker. Then used some old small floral stamps to add darker pink & some turquoise flowers over the stenciling. Trimmed down this piece, added tiny strips of the same turquoise mat shade at the edges of the white card base.

- Sentiment stamped and punched with an oval punch. Yay, first Easter card done!!!

Big Hugs, and hope it's nice where you are this afternoon. It's been overcast here with some very early morning rain. Come again when you have time. I'll be back to visit you too. Sometimes when leaving comments, I'm not always certain Blogger publishes - if I have time, when I go back to check, I don't see my comment. I know with comment moderation on, it won't publish immediately - but I do try to get back to all my sweet visitors.

11/15/2016

Oval Cornucopia

 
Good morning - wake up to a scheduled post. We have a very early dermatology appointment (Mr made it, I didn't!) so back here sharing another of the Fall/Thanksgiving cards I've been trying to get finished.


- Sweet & Sassy clear image stamped & colored with copics, some WoS, white gel pen. Got a smudge by the leaves around the right, bottom pumpkin. The clear set has an extra leaf, so stamped a few, colored & fussy cut out to add over the boo-boo. Think it got hidden pretty well! Die cut with the S/B beaded oval. Used another oval die that would fit the shape to cut teh coral mat (this may have been a faux mat, where the outside was traced and fussy cut...)
 
- background started as kraft c/s that was left from another project. Taped TH Mesh stencil (a gift from a sweet blog friend) in place. Dry embossed with the Big Shot, then used 'orangey' shades of DI to sponge over the embossing. The kraft color shows in the stencil pattern.
 
- 1/4" scor-tape added top and bottom, then covered with Orange Glitter Ritz, burnished very well.
 
- added some of the soda can metal leaves. Might be too many leaves with the boo-boo fix ones, but hey, it is what it is. Didn't think about this until I saw the photo! Am I the only one that does this???
 
An old sunflower button was on the crapalanche pile, so thought it might make a fitting embellie. Used Dark Walnut Nuvo Crystals to cover the center (where the button eyes are). Had to appy 3 layers of the Nuvo. When it dried, it would sink into the depression where you'd sew the button on. Finally after the 3rd time applying, it stayed raised up. This will definitely need some padding when it goes into the mail.
 
- stitched tag cut out the sentiment that is in the same small set...another one ready for an insert.
 
Ya'll enjoy the day. Thanks for joining me  here. I'll try to get back this afternoon to post a tag.
Big hugs and prayers for those friends who are in need of comfort & strength just now.


7/21/2016

Distress Paint Background Overstamped with Silhouette

Good Morning! YAY...the tile guys are here!!!! Lots of activity going on, so maybe our master bathroom might be tiled at day's end.

Had a play with Distress Paints a while back (remember this card?). The background on today's card was from that session, and this piece still had more ink on it than I wanted. The backgrounds have been in the Crapalanche, waiting to see if anything was usable. Found an old Hero Arts silhouette stamp (?Wildflowers?), inked in Memento Paris Dusk, and here's what resulted:


- Spritzed some pearlized & gold sprays over the stamped background, let it dry.

- Dark blue mat cut to fit the background.
 
- S/B EF, Overlapping Circles, (one of the newer ones, so you have to watch the 'sandwich'..just used a top plate and the Sizzix multi platform.) After embossing a white card front, used DI blues, reds & greens to sponge over the white.
 
- MB Painted Happy die, which was cut from a piece of cardboard that backed an MFT die. Mixed some Reflections white and Reflections pink, added in a bit of WOW Red Glitter EP, and this color is the result. A trio of sequins and it's called Done!  Mixing these powders is sort of fun, you just never know what will result. Again, a dark color would have worked better perhaps, but this is ok. Another one for the stash...could be used for happy Anything!!
 
Thanks for coming by, and have a good day. Big hugs


7/20/2015

Lavendar

Hi, thanks for popping in. Thanks for all the lovely comments on the Poppies (or tulips) cards - you all made me feel so special! I liked that stamp and it was easy to card up. I want to try one more - using an embossed black against a pretty background. I think that will look fab too.

Here's another flower card, no sentiment decided upon as yet. I love the smell of lavender (well some of the lotions or candles don't always have the fragrance that I'm expecting, but the flowers themselves do. I've tried to grow it but unsuccessfully).


- Stamp was purchased at a garage stamp sale last month, and I think it's a PSX*. (which is why I spied it). Stamped with a light gray, colored with copics, WoS, and a Sakura silver star gel pen.

- a snippet of textured and rather glossy Bazzill was cut with a S/B (don't remember which one, but had to do some creative trimming, as the snippet was just not 'quite' large enough, and cut off a tiny sliver on one side.

- largest open die from the same set cut the turquoise mat, and it's got a sort of mulberry texture - but is not mulberry paper. (Guess I'm trying to say it has purplish slubs in the pattern & is pretty IRL).

- you've guessed that the background is a brusho effort using purple and turquoise, which was intended to go behind the image. It didn't look right, so thus the other papers came into play.

- card base is a top fold textured green also from the snippet box, but it was a pretty good size snippet, so perhaps doesn't rightly qualify for the term.

A sentiment will be added when the occasion arises to need this card. I have lots of relatives who like flowers, so it could be a get well, thinking of you, happy birthday, whatever. A die sentiment or a small stamped tag would work just fine at the time.

Ya'll have a good evening. Come by when you can visit a while. And I'll do my best to return all visits. Sometimes I'm not always certain that my comments get published, but I do try to make sure to always return visits to those sweet people who leave wonderful comments. Big hugs.

*Double checked this stamp and it does not say PSX on it..in fact, I can't find any markings, but it sure does have the look of a PSX image I think. However, I'm pretty sure that PSX stamps were labeled with identifying marks, and this wooden stamp has none that I see! Just tryin' to be honest, folks!

8/08/2014

Digi Vellum Rose

Hi Ya. Happy Friday. It's gently raining and rumbling thunder here at our house this afternoon. Moi has a haircut appointment here in a bit, but wanted to share a quick card first.

Let me also welcome Cara of My Creative Chaos who became my newest follower. Do pop over and say Hello to Cara and enjoy some wonderful inspiration. Cara is a guest designer over at Mrs. A's Butterfly Challenge - so that's quite an honor.

Here's the card:


- the free digi came from The Graphics Fairy - quite a long time ago. Tested the new Canon printer when it was first installed, using a piece of vellum, just to see how the printer liked vellum (Epson won't print it). It printed beautifully, and has been floating around on my desk for a while. At least it had time to dry well. Die cut with a S/B deckled oval.

- Card front is w/color paper, spritzed to dampen, then used gelatos in yellow, pink & green. Dabbed a smidgeon onto an old cd (makes a great palette), then using a small slightly wet brush, spread some of the various colors across the w/c paper. When I didn't get as good coverage in places as I liked, I took the gelato - lightly daubed the color directly from the tube in different spots. Used the damp brush to spread it out before it had time to 'harden'. I liked the look and texture that the w/color paper created. Used a smaller oval deckle die to cut the aperture and emboss the edges of the opening. This piece is mounted on dimensional tape and placed on the off-white card base.

- Sentiment is a recent Elizabeth Craft die (purchased the day of the Silhouette class - store had gotten in a new shipment of some of the newer dies). There's 3 layers cut from design paper, glued together, with Glossy Accents applied over the top. (saw that done here & liked the dimensional, shiny effect). Have seen this on several blogs, but saw Diane's card while working on this one. Monkey see, and all that...

- Leaves punched from white c/stock snippet, colored with copics. Tried to create similar shading as the vellum leaves. Finally gave up that idea as none of the various greens, grays & toner colors replicated that shade. Went with the color you see, adding some white gel veins. Green twine added after adhering the rose & leaves.

- Rose was punched from the same dp as the sentiment. Punch is 5 petal flower, and there's 5 layers in this rose. I'm still working on making flowers-- {sigh}. You'll see a few more on other cards from my 'rose night' - did this while watching 'Sex in the Wild' on PBS. (No, it's NOT pornographic either! But it's very interesting to learn about these different animals - makes me very glad to be a human). Loved the show about the elephants.

So that's it for today. The next few posts will be scheduled posts, as we are having our kitchen and bathroom cabinet doors replaced. (another big Sigh...and a wish that I might not have decided to do this. The cabinet door replacements are looking good, but oh, so many stumbling blocks. This was supposed to have been started and finished early in June).

Thanks for popping in and Big Hugs. See ya soon.

2/21/2014

Friday Fun Day #38 at Jo's Scrap Shack

Happy Friday afternoon. I hope you've had a marvelous week and now ready for a super weekend..doing what makes you happiest.

Here's the latest for Jo's Scrap Shack Friday Fun Day where our sponsors are StampArt Designs and Stamping Chef. Team A was sponsored by Stamp Art and I chose  Full Bloom for today's card & a sketch provided by Jo's Scrap Shack.


- digi printed on GP cardstock, colored with copics - Wink of Stella for added glimmer and some Viva Décor Pearls in the flower centers. Printed the image 3 times to color base image - then colored the flowers only for other 2 prints & fussy cut.  Used a stylus to shape the flowers & leaves on each piece, then glued each over the main image. Don't think the dimension shows in the photo, but quite nice IRL. Die cut with a S/B classic circle.

- green mat die cut with corresponding size S/B scalloped circle.

- Marianne Createables (LR0168) for the dark lavender doily.

- background: Impression Obsession Cover a Card stamps...first using Wisteria Colorbox Fluid Chalk Ink on Tapestry 2 (CC025). Then used  Warm Green Colorbox on Greenery (CC018) to overstamp first background.

- green border snippet, covered with green glitter ribbon & purple gauze ribbon side-by-side. A piece of old lace from my sewing days covers the join of the two ribbons.

- sentiment stamped in black using a stamp from the new 3 Twenty Crafts Simple Sentiments set. Traced the sentiment using a black Spica pen for some glimmer so it would show up better against the background.

So why not show us what you can do for this challenge! Use the link up tool found at Jo's Scrap Shack for your chance to win top 3 and get entered into our monthly prize drawing. The rules are posted at Jo's blog and linking is very easy. We'd love to have you join in the fun.

Thanks for visiting this afternoon, and many Hugs.


2/20/2014

New 3 Twenty Crafts Stamps Release and Blog Hop - Day 4

Hello and welcome to day 4, our final day of the 3 Twenty Crafts 2nd Release! This week has been so much fun and I have had a blast sharing each new stamp set and all my projects with you. So thank you for stopping by each day this week and joining the fun.

You should have arrived here from Kristin's blog but if you would like to start at the beginning of the hop, simply go to Jo's Scrap Shack .
Today we are showing you the new and awesome stamp set “Personalize It” This stamp set coordinates with Project Life and Smash Books.

Here is what I created using this new stamp set:


- Heavyweight stone colored card base. Red mat die cut with a S/B card shape. Kraft stamped with SU white using an old Hero Arts wood stamp, then another in SU Real Red. Used a Fiskars punch on the white. Adhered pieces of the 2 colors together, and die cut with the smaller S/B used for the red mat. Had to be a bit creative as this size was not quite long enough. Cut part of the shape, flipped die to the opposite end of the kraft, hoped the alignment was correct. It was, thank goodness.

- the list stamp from the set was stamped on cream paper with SU Real Red. Chose different sentiments from the set (notice what most of my goals are!) and then used a red rhinestone for a tick in the box.

- bottom border is the negative from the punch, with red rhinestones for trim.

That's it! I'm happy that you had time to stop for a visit this afternoon. Your next stop on the hop is Mayra's blog.  Have a great time as the Design Team has really created some gorgeous projects that will surely inspire you.

To win today’s stamp set “Personalize it”, make sure to stop at each blog along the hop, become a follower and leave a comment. The winner will be chosen randomly and nobody knows which designer’s blog the winner will be chosen from… so don't miss out on your chances, make sure you complete the hop and leave some comment love!

I hope you have had an awesome time this week and maybe you could be a lucky winner of one of these amazing new stamp sets! Good luck and stop by 3Twenty Crafts on Sunday for another sneak peak & mini hop of an extra stamp set to this new release! Thanks for hopping!


1/25/2014

Congratulations with an LOTV topper

Good morning, and WHEE, it's Saturday. Even though I've been retired for a while, I still love Saturdays - and Friday evenings. Silly--yes I know. I worked longer years than I've been retired, so I guess that's my excuse. You know what? I think I got more done when I worked. I guess because I had to manage my time better. Now I can tell myself, "Oh well, I'll get it done tomorrow". Then I go take a nap or find another way to piddle away my time.

OK, here's my card to share this morning:

- LOTV topper that I've had for a while, and thought it was appropriate for the occasion. Diecut with the MFT pierced circle and edged around the outside with DI..Antique Linen and a bit of Broken China to blend with the DP. Card base was a pale blue parchment type of paper.

- banner is a Dylusions sprayed piece, sentiment done with Elizabeth Craft die.

- MS punched Butterfly & border trim,

- EK Success punched photo corners.

- Think this is a Sizzix EF, but I can provide specifics if you ask.

I hope you are staying cozy & warm where you are. We've been fortunate to have beautiful sunshine, but the temps have been low for our area. We were having some cement done by the shed to enlarge the entryway where DH has to drive out his lawnmower. So we're hoping that no rain shows up until it's cured in well. Enjoy your weekend, and thanks for your visit this morning. Hugs!

11/20/2013

3 Twenty Crafts - Borders Set

Hello my crafty friends and welcome to Day 3 of Jo’s Scrap Shack’s Surprise Blog Hop!  
Today’s hop is day 3 of a 4 day hop for the new launch and release of a brand new company called  “3 Twenty Crafts”!

For those of you who missed the news, Jo has decided to launch her very own company and stamp line!!! Very exciting time indeed! Every day we will show you a brand new stamp set from 3 Twenty Crafts and trust me, you don’t want to miss this!

The stamp set that we feature each day will be given away to one lucky winner, but in order to win the set you must hop along and visit each design team member’s blog, leave a comment and then comment on Jo’s blog to let her know that you have completed the hop! The winner will be randomly selected and we have no idea which blog the winner will be chosen from. So make sure to visit each blog and leave some bloggy love!

 Today we are showing you the new and awesome stamp set “Background Builders”.


This is what I created using this featured stamp set. 


I've not used very many border stamps, as I can never get them aligned properly (these are clear so that shouldn't be a problem with these border stamps ). Had seen a folk art Christmas tree recently and when I saw these borders, realized they were perfect to create that look. Selected several red & green SU inks, inked & stamped away on white C/S. Didn't get a very good impression on some of the stampings. Hmmm...the stamps were clearly inked well. So decided to try the Colorbox Fluid Chalk inks...worked _much_ better with the next stamping. Now ya'll may already have known that SU doesn't seem to work well for clear stamps (and maybe it was the Operator in this case!) but I didn't. I can report though, that for me the Colorbox ink worked well for a clean impression, the SU didn't.
 
Next I created the background using this card for my inspiration. Shirley does the most fantastic backgrounds with the DI's and Acrylic Block technique. I keep trying that, but have not achieved anything I was pleased with, as yet. I debated on using this one, created with Mowed Lawn, Shabby Shutters and Festive Berries; misted the block with water, then dragged over the c/s. This was my 3rd try, time was growing short, so I went with the last effort. Decided to stamp the twig from yesterday's Winter Wonderland set in Colorbox Creamy Brown to create a pattern on the background. MS corner punch for the holly trim, and Viva Décor Pearls for the berries on the sentiment, stamped in Creamy Brown, punched with an SU Curly Label punch. As I looked at the tree when photographing, I thought I should have distressed the outer edge of the border 'branches'. I will try this one again, use DI Tea Dye & won't that look very country & folksy???
 
Here's the 2nd card. I really did want to try a stamp as a border - but I wasn't brave enough yet to try aligning - even the with stamp positioner I can manage to boo-boo. This border was long enough to cover the card without repositioning. A Dylusions background was handy, so off I go to ink with the Colorbox inks, which worked well over the sprayed background. Doubt that the SU inks would have been as intense (and perhaps I need to re-ink the pads?). Liked that look, so inked Happy Harvest Turkey with Rich Cocoa onto a white snippet; Black Tuxedo for the the pilgrim's hat from the same set. Colored these with copics, fussy cut, mounted on dimensional tape. I thought Mr. Turkey looked very chic & well dressed with his hat, ready for the holiday table. Stamped the sentiment from Happy Harvest in Versamark, embossed with Queen's Gold. Added corners punched from a Dylusions snippet, adhered tiny black pearls, and we are dressed for dinner! 

That's it for my project for today. Hope you will enjoy the cards.

Now just a reminder....to win Background Builders, visit each blog along the hop and leave a comment! Also, all four sets that are released this week will be available for purchasing on Thursday, November 21st at 3pm and will ship out on Monday, November 25th!

Soooo are you ready for some Blog Hoppin Fun???

I'm the last stop on the hop,  but if you get lost along the way, just start at
Jo's Scrap Shack at the beginning!

Thanks so much for stopping by and hopping with us today and make sure to join us tomorrow for another sneak peak at another great stamp set by 3 Twenty Crafts! And thanks for joining me this afternoon, and welcome to some new followers. I will provide links to their blogs after the blog hop posts. Hugs from me to you, and  have a wonderful afternoon.


11/18/2013

3 Twenty Crafts - A New Stamp Company


Hello & good afternoon to all you lovely bloggers at the start of another week.
 
Welcome to Jo’s Scrap Shack’s Surprise Blog Hop! Why a “surprise” hop? Well up until now it had to be kept as a surprise but today…is the day another dream comes true!
 Ready for the surprise? Today’s hop is the first day of a 4 day hop and the new launch and release of a brand new company called “3 Twenty Crafts”!
Jo has decided to launch her very own company and stamp line!!! It's so exciting, right?? Every day we will be showing you a  brand new stamp set from 3 Twenty Crafts and you certainly don't want to miss this!
The stamp set premiered each day will be given away to one lucky winner. To win the set you must hop along and visit each design team member’s blog, leave a comment and then comment on Jo’s blog and let her know that you have completed the hop! The winner will be random and we have no idea which blog the winner will be chosen from. So make sure to visit each blog and leave some bloggy love!
 Today we are showing you the new and awesome stamp set “Happy Harvest
  

 This is what I created using this stamp set.

 My first card with the new 3 Twenty Crafts Happy Harvest clear stamp set uses a Sizzix EF over one of the Dylusions backgrounds I had created earlier. Did a bit of shading on the leaves & tree trunk and some shadows around the tree & fencing. The pumpkin motif from the set was stamped on a snippet of another Dylusions background using Memento Rich Cocoa. Colored with Derwent Inktense pencils.  Apples were stamped on a snippet white Xpress paper, colored with copics. Highlighted with a white Signo pen, and pumpkins & apples were fussy cut. Popped up with dimensional tape. The sentiment from the Harvest set was stamped on another snippet with Rich Cocoa, cut in a rectangle, rounded corners, edged with DI Spiced Marmalade & Barn Door. Used Antique Linen and Tea Dye to avoid the very 'white' look. Added the 2 apples and this is a finished card! I quite like it. Loved the stamps too.
 
 
I could only fit one of the cutout pumpkin stamps on the 1st card (and since I had worked hard coloring these I wasn't about to not use them!) I decided to make a second card with the new Happy Harvest stamp set. Card base covered with a glossy pumpkin motif paper from a small DCWV stack of seasonal appropriate paper. The brown border is from another DCWV that was a textured companion of solids to the patterned pack. Used an MS twig border punch for the edges. Another harvest gold piece was trimmed, embossed with a favorite dots folder. A small snippet of the brown rectangle was embossed with Versamark, the Ranger Queen's Gold for the sentiment. Popped up my pencil colored punkins and at the last minute added the little flower as I spied it lurking a-top the mess on my desk!
 
If you've any questions about the products used on these cards, please leave a comment, and I will edit the post to answer.

Well my friends that is my project for today. I sure hope you have enjoyed hearing the great news and I hope you are as excited as I am about this awesome-ness!! LOL
Just a reminder.. In order to win Happy Harvest, visit each blog along the hop and leave a comment! Also, all four sets that will be released this week will be available for purchasing on Thursday, November 21st at 3pm and will ship out on Monday, November 25th!
 Soooo are you ready for some Blog Hoppin Fun??? I'm the last stop on the hop, but if you get lost along the way, just start at Jo's Scrap Shack at the beginning.  Don't forget to check in at Jo's Scrap Shack to let her know you visited all the Team Members, so that you can be in the running for the prize stamp set.

Thanks so much for stopping by and hopping with us today and make sure to join us tomorrow for another sneak peak at another great stamp set by 3 Twenty Crafts!
 
Also, thanks for visiting here on Carolina Cards and have a wonderful day. Hugs.