Followers

5/30/2015

DeeDee's Digis - Daniel's Sweetheart

Hi...

Back with a very quickly made card using a sweet DeeDee's Digi image. What I really like about these digi images, besides the fact that all of them are so doggoned cute, is that you can be as simple or elaborate as you chose, using them in your cards. I'm a slow card maker, so when I can put something together, fairly quickly, then I'm a happy card maker. And I don't want it to look like I did it quickly either.


- DeeDee's Digi Daniel's Sweetheart precolored image, but I did a bit of shading using copics & multi-liner pens. The set comes with some nice sentiments, but just now birthday cards are needed at my house. A niece & I share a birthday, so I think this one's going to Julie. She's really a "bear" person, but I think she'll like Ducks too.
 
Die cut with a SWilson Canadian Collection - Vancouver(CED6205), the largest open die. Shaded with Memento Summer Sky & and a Hero Arts xxxxxx.
 
Traced outer part of the SW die & fussy cut to create a scant mat from a white snippet. Decided that the mat needed color. Spritzed mat with water, sprayed some Lindy's Stampgang Starburst spray (Water Poppy Teal) and while still wet, sprinkled some Brusho Ultra Marine watercolor crystals onto the mat. I must say that the prettiest part of the marbling was - of course - right in the center. Usually die cut the portion underneath away, and use for another time. So there's a lovely piece to use on another project.
 
- Scored lines around all 4 edges of the white card base.
 
- Impression Obsession sentiment die cut from white snippet, colored with Copic B45 - layering to get the shade of blue needed. Added 2 blue rhinestones over the i's.
 
Can't get any easier than that! And fun to do as well. Hope you will like it.
Thanks for your visit, check out these great digi-s, where there is a Show us Bright and Colorful  challenge going on just now. Blessings.
 
Linking to The Snippets Playground Week 178 & 179. C'mon along & say Hello to my little buddy Parsnip. He's very friendly.

5/29/2015

Happy Little Stampers Christmas

Happy Friday! This card should have been finished & published on Wednesday evening; intentions were good, but hey, you know what they say about good intentions!

So here we go & will say right up front, this card looks much better IRL; for some reason the image & gold embossing did not photo well.


- Brusho & shaving cream* background were inspired by Kylie and here's the link to the video tutorial.
Who knew that spray starch could be such fun? Didn't have the cling wrap handy to use as it is done in the video, but _did have_ some plastic bubble wrap with 2 different sizes of bubbles. Both were right to hand, so to speak. Once I had the brusho & starch wet on the Canson Mixed Media paper, started to blot with the large bubble. Let that dry for just a moment or two - it stays fairly wet - then pressed the smaller bubbles into the wet surface. I really liked the look too. (and yay, there's another piece, that has a slightly different look). On this one, finished off with a gold spray before the piece dried completely, and that gave lots of sparkle. If you want to do something with your starch, besides using it for ironing clothes (Yuck!), try this!!! It's such fun.

- Inkadinkadoo wood block tree, inked with versamark, heat embossed with WOW gold. Transparent sentiment image placed on the finished card where I wanted it, used the Misti to stamp it, then same WOW to emboss. It was a bit hard to see if all the script got a good coat of Versamark, and that was probably the hardest part of this card. I think the sentiment did ok. Trying to decide if I like this gold as well as my favorite Ranger Queen's Gold. Think the Ranger is a brighter look, but this is quite nice too.

- Stampendous Special Delivery wooden stamp- on Copic Xpress paper - colored with Copics and a bit of WoS. Used a fine line Staedtler pen for the red berries in the wreath, and a Slicci gold Pentel to do the jingle bells on his saddle.

Off to link up at Happy Little Stampers, where there is a DT call out for the Sketch & Christmas Challenges. Join in the fun.

Be sure to check the Cards by Friends tab. Added 2 new lovely goodies for you to share with us.

As always, thanks for your time in visiting. Love reading the comments, always appreciate the feedback. Hope you're all set for a good weekend. I think ours might be a bit busy tomorrow. Hugs & Blessings.
*My BAD EDIT: This should have read Spray Starch...NOT Shaving Cream! Sorry! Thanks to those bloggers who commented on the shaving cream, which caused me to check this post!

5/27/2015

Rudolph Day - May 2015 - Vintage Santa

Hi Again. Gosh, 2 posts in one day (and who knows I might yet get one more in later tonight? After such a dry spell as I had, I feel like I'm really on a creating roll! Don't get too excited, it won't last long! LOL). Also have some pretty cards I've been blessed to receive from some super talented bloggers, which I will photo and share soon.

The Rudolph Day Challenge for May 2015 opened May 25 and still has 4 days to run, so I  hope you'll find time to make a Christmas card, get a head start on having plenty of holiday cards ready by December 25, and have fun while being in the running to perhaps win a nifty die.

Off we go:


- LaBlanch image stamped with Versafine Sepia on white Copic Xpress paper. Used Bonnie's Best Speedball Stamp Press to get a good inking. I've not always had the best success with getting a good sharp image with several of these LaBlanch silicone stamps. They are certainly lovely though, when it does stamp out clearly; this one is a fairly large stamp, and the press helped get a crisp image of this very detailed stamp. Decided to color with the Polychromos pencils. When using Copics, I usually know which markers will give me the color I'm attempting. Not that confident with the pencils, and especially for the flesh tones. Had to do some experimenting with colors to try to get Santa's face right and not have it look garish. On the holly, I started with a light turquoise base for some of the leaves, and then added different greens. Berries were given a base of red pencil, then used a Staedtler fine line pen to brighten them up, as just the pencil did not show up well.

Once the piece was 'done', background was much too white. Used Copics E41, E42 & airbrushed the background, keeping a bit of paper towel over Santa's face & beard as best I could. The beard has shades of light blue & gray toned pencil coloring over the shadows. As I see the photo, it looks a bit pale, but IRL it does look nice, I think, not garish. I did want the added holly to look brighter though, hence the copic marker coloring. Gold pen was added around the edges. Sentiment will be placed inside.

- white snippets for the PBlack holly die cuts were colored with copics.

- Design paper card front is from an Authentique 12x12 Christmas pack - several years old.

Off to join in with May 2015 Rudy Day and the Snippet Playground (weeks 178 & 179). Hope I have encouraged some of you lovely readers to jump right in and join us. There's a pretty nice prize on offer at the Playground too. Big Hugs & many thanks for visitin' today.

Happy Little Stampers Sketch Challenge - May 2015

Good Morning friends, and welcome. So far it's been a rather overcast day, and we had a most intense rain & thunder storm last night. Thankfully, it didn't last long, but that rain was so hard when it came down & we had several hard cracks of thunder very close by. However, it was nothing like to what those poor folks out in Texas had and are having to endure. Prayers go out to those families who lost or are still searching for their loved ones.

Today's card is an entry into the Happy Little Stampers Sketch Challenge, one I've not participated in so far. Let's get right to it - and actually it's another UFO:


I'm not great with sketches, but here's my take:


- Background is a Brusho gone wrong. Still liked the colors but it didn't work for what was in mind when messing about with it at first. While doing a bit of cleaning on the stamp desk (remember when I was looking for missing stuff earlier? LOL) found a Zen sort of looking stamp...decided to stamp it with Versafine Onyx and just have a play with Pentel and the Staedtler pens.  Still didn't really have any ideas about what to do with it - but just doodling one night while watching Netflix.
 
Located a brass stencil in the floral shape that you see in the top right. (Jennifer McGuire has a recent video on using intricate dies to emboss which gave me the idea*). Embossed that onto the paper, liked it better. However, the embossing would not have shown up in the photo. So...took a sponger and some DI Faded Blue Jeans and wiped it over the embossing. Hooray...that showed very nicely.
 
- Bottom white part was embossed with an Anna Griffin EF that is still in the pile, then die cut the edge with a S/B Curved Bracket. Hmmm...if I put the 2 together, that might work for the HLS May Sketch Challenge.
 
- SU scallop punch for the snippet sentiment, a clear stamp from a Gina K set received last week. Lesson learned: stamp it, then punch it. Used the Misti to place the stamp, but it was tricky to keep this little bit of paper from moving when the Misti cover is opened for inking the stamp...even with the strong magnet holding it. Because the bit is so tiny, when placing the stamp in place for inking, then lifting to ink it - the tiny scrap would slip - just a tiny amount. Finally got it done though, and I think the sentiment looks straight!!!

Hoping that this card fits what the sketch is meant to be, I'm off to link up with HLS Sketch Challenge for May 2015, which is still open for 3 days. Thanks for visitin'...come again when you can.  Hugs

*Tried to find the link to Jennifer's video, but was spending too long searching for it. Believe it was done last week.

5/25/2015

Memorial Day - To Honor Our Fallen Heroes

Good Morning, and if you are in the USA, Happy Memorial Day. This is the day when we honor those fallen in the service of our beloved country:
 
a day on which those who died in active military service are remembered, traditionally observed on May 30 but now officially observed on the last Monday in May. Also called (esp. formerly) Decoration Day.
 

That's the definition Google gives 'Memorial Day'.  When I was a child, it was called Decoration Day and was the 30th of May. That was the day Dad would take my Grandma to the family church cemetery, to clean the graves of our family dead. These days were long before perpetual care. I can remember playing along the tombstones, reading epitaphs and being told "Don't walk on the graves, but between them". For some reason, you were not to speak very loudly and of course, no running. Didn't really understand why, as there was nobody to hear me or be disturbed by my running. At the time, I didn't understand that this was a way to 'Show Respect'. We always left flowers and would place tiny American flags on those of our kin who died in the line of duty. Of course the other community families would be doing the same. Doubt much of that is done now-a-days, since this church has a company taking care of the grounds. I expect the local community residents remember with flowers & perhaps a flag. When we visit my hometown, as we recently did for a family reunion, I always walk out in the cemetery and pay my respects: first to my parents, and to many of my ancestors' graves. My grandparents sleep behind the back wall of the church, so they are easy to find. Have to take a walk to find some of the other kin, because I don't remember exactly where they lay. It's a very interesting place, as such places go, because there are some graves that go back into the mid-1700's. Not really that old, perhaps, but it is for our little Southern town. It's intriguing to see how many relatives from both sides of my parents are buried here. Great-Greats on Mom's side are here as well, although it was more my Dad's people who lived in this community. Some of the inscriptions are interesting to read, and some of the tiny infant stones break your heart..to see so many losses in one family- lots were in sequential years.The church that stands there guarding these ancestors is about the 3rd or 4th that has stood on the site.
 
OK..on to the simple card that I hope will say Thank You for all of you who have Veterans who died so that we could enjoy those freedoms that we still have today. Hope you will accept it on behalf of their dedicated sacrifice.

Edit: Just received the link to this very emotional video, which expresses all the thoughts everyone in any country should be thinking. All our countries have sacrificed to one war or another. Warning: it will bring some tears, but we ALL need to think about these things:

 
Hope the link will open for you. At the beginning, the author explains how the video came about. Listen to the words of his song as you see the photos.
 
 
- White c/s was swiped with DI Barn Door and Fired Brick, then embossed with a stars EF, die cut with a stitched hillside die (think was Lawn Fawn)
 
- Memento Bahama Blue swiped over another white c/s, then used DI Faded Jeans. Hillside die, then a starburst EF. Both these pieces were adhered to a white card front with dimensionals.
 
- Sentiment computer generated and die cut with an MFT xstitch rectangle. (the white part of the sentiment had to be sort of grayed...of course the white lettering would not show up, but at least it kept to the idea of Red, White & Blue).
 
- Cardbase is from a 4th of July Paper Studio 12x12 purchased some years ago.
 
That's it. Hope it conveys my Thanks to those who so deserve it.  Thanks for coming to visit, and have a grand day.
 
Don't forget it's the start of Rudolph Day - which will be open until the end of May. 
 

5/24/2015

Christmas Card Club - Gifts

Hello & welcome to another Christmas Card Club Sunday, and our theme for this week is "Gifts" chosen by our own Zoe T. of Stamping Scene. Had to give this one a bit of thinking, as my first impulse was to do a Nativity card. After all - that was our greatest Gift ever. Thought about some Christmas tree stamps that show gifts under the tree. Then found these precolored images by Elizabeth Bell, not sure where I got these. These little ones are definitely waiting for some gifts, yes? Hunted around for an Elizabeth Craft gift die that had been purchased some time ago. Finally located it, and so here is my take on Zoe's Gift theme:


- the precolored Elizabeth Bell image was circular in shape. Just got some new MFT Crosstitch dies, so used one a bit larger than the image (from the snippet box) to cut a mat.  Inked around the image with some DI Antique Linen, then Abandoned Coral to tie in the reds.

- Elizabeth Craft Gifts die, also using several snippets .  This die has the box shape, the stripe overlay, the bow, and several other parts to die cut trims. The blue gift was a tiny white snippet colored with WoLuna and used the fall out bits from the 2 trim pieces. Gold bows also started out as white snippets, which were colored with a Pentel gold pen. Added some rhinestones for the bow knots.

- Starform sentiment sticker started out as silver, colored with a red Pentel pen.

- card base was white textured Win-Win c/s, embossed with a WeRMemory keepers EF found today in our local Hobby Lobby.  After embossing, used remaining Abandoned Coral DI ink on the sponge used to distress the white circle to lightly ink the raised embossing.

Thanks Zoe, for a good challenge theme. It was productive, not only in creating a card, but in forcing me to do a bit (very tiny bit!) of straightening up, trying to find the gift die!

Thanks for joining me today, and please do go over to see what my team members will be sharing. Their blogs are listed on the right side bar. Happy Sunday. Hope you have a grand day, and thanks for coming. Hugs.

PS: don't forget that Rudolph Day starts on the 25th. A chance to build up your Christmas card stash and perhaps win a nifty prize.

5/22/2015

Another Floating Inlaid Die Watercolor

Hello. Still on my finishing UFOs roll, and here's the 2nd card I did with the floating die technique I saw on a Catherine Pooler Floating Inlay die video.


- Stamped the image with Versamark, embossed with white EP. Used Tim Holtz watercolor markers in shades of yellows to color. The photo looks quite washed out, IRL it looks more intense.
I didn't position the watercolor image properly to insert it behind the cutout on the stripe paper just right for the petals to fit. So....after watching Catherine's 2nd video, where she used acetate, I partially trimmed the w/c paper portion, adhered to some clear packaging acetate, and made it fit into the space as it needed to go. Worked just fine. Whew! However, where the 2nd flower is placed, there was just a slight gap.

Decided to color the image that had been fussy cut from the strip dp, and use it to cover the gap. This was done with Copic Yellow markers with a red fine line pen to outline the stamping. When I was placing the 2nd flower, the stripes were matching the card front. However as I was photographing, I noticed I had not placed it in line with the stripes when I stuck it down. Too late to pull it up (I did try :-0), but it was down pretty good. Decided to leave it as is, and call this my Amish touch (you know, when a quilt is made, there is a deliberate flaw...if you're a quilter, I'm sure you've heard of this!). At least the wonky stripe patterns make it stand out a bit.

Oh yes, the sentiment was done with the Sizzix Adventure set of dies...quite a few in the set. There is pale yellow c/s behind it, and I saved the bits from the stripe dp die cut, to add back in the letters d,s,o,e. It looks quite odd otherwise.

One more UFO done except for the insert! Thanks for your visit and come again when you can. Blessings.

5/21/2015

Impression Obsession Happy Birthday

Welcome & Good morning. Back again with a birthday card made with an Impression Obsession image by Gary Robertson called Wagon Wheel. Gary is one of my favorite of the IO artists and his images are always so evocative of a bygone time..very detailed and take time to color. I decided to use Polychromos pencils on this one. Thought it would give a more vintage look to the final card. I keep trying to improve my pencil blending, but it doesn't come easily to me.  Our family has a lot of birthdays during the summer, so this is one of the first ones due for a nephew.


- Image was colored, then die cut with a S/B deckled rectangle.

- coppery background was an attempt to create the faux tile technique I had seen on SCS, done by Dina Kowal. Mine didn't turn out as nicely as did Dina's, but I liked it anyway. Covered a piece of cardboard from a Cola 6 pack carrier with gesso, and while it was wet, covered it with aluminum foil. Let that dry overnight. Next used some metallic copper acrylic paint, spread with a brayer, several coats.

- C/B oriental motif EF to emboss this piece, and discovered the aluminum can tear easily.
After this embossing, used some Inca Gold (in the larger containers. I've found that the small pots of this stuff - which may be an older formulation - dry so completely that you cannot rehydrate them. So I will not buy any more of this small pots!!!). Spread this with my finger - trying to get just on the top of the embossing. Then carefully wiped this down with a paper towel. I think the places where the silver foil peeks through adds a bit of patina.

Some Starform gold stickers for the corners & sentiment finished it off. As I look at the photo, the sentiment is not showing up as well as it should. However, it's down well, so I am not about to try to change it now! Been there, done that, and wished I had just left things alone.

Base card is just a slightly textured brown. I think it will work well for a guy. Hope you like this one.
Hugs


5/20/2015

Happy Little Stampers May 2015 CAS #2

Hello...Gosh I seem to be on a roll this week, after being so lazy the last few weeks. At least I am managing to clean up some UFO-s that have been hanging around.

Here's my 2nd card for the Happy Little Stampers May 2015 CAS Challenge. Let's get to it:


- MBox Tulip Bouquet die used for the die part of the challenge. The background behind is watercolor paper, using Koi watercolors. After cutting the die from the white c/s the frame of the die cut piece was colored with a red Pentel Slicci pen for the flower part, and green on the leaves and stems. Replaced a couple of the die bits on the leaves as those areas had not gotten filled in on the w/c paper. The other leaves just show the watercolor background.

- added a few clear rhinestones. I never really know how to properly place these things...just know that it's best to use odd numbers.  The top layer was raised up by using white fun foam per Jennifer McGuire's technique.

Off I go to link up! Thanks for coming and hope you will have a wonderful day. Hugs.

5/19/2015

Happy Little Stampers Challenge for May 2015

Hi, and welcome. I've been trying for quite some time to get something finished that would fit into the Happy Little Stampers Challenge. Finally I did get something that I think will work. In fact, 2 somethings! Lately I've been trying to finish up a bunch of UFO's, that have been hanging around - seems like forever. Hunting for some things I ordered, put in a safe place...and can't find. Finding other things that I'd looked for earlier. Sound familiar?

First though, help me welcome a new friend, Kathy, of KTKrafts.  Please take a few moments to go over, enjoy Kathy's wonderful blog, and say hello. You won't be sorry you did! It's been a while since I had a new follower (have been seeing them disappear, then reappear), so it was happy, happy to see a new friendly face show up in the pictures' list.

Now, on to the card:


- MBox Ringo Tile die* cut out the white c/s, and Sizzix XandO EF. It is not showing well, but there are 2 scored lines separating the embossed section and the panel. Behind the panel is a previously done spray piece (believe it was Dylusions..I've been experimenting with Brusho-s and Dylusions - so there's plenty of background pieces. I _should_ write on the back of the piece what product was used, but ...)

- Frantic Stamper sentiment die cut from the same color.

- added a few sequins...and folks, that's my CAS!

*First tried die cutting the MB die with some textured Win-Win c/s (it's like Bazzill). Did lots of passes, but it did not cut well. Added a metal shim, still not a clean cut. Tried with varying thin card stocks...flipping & rotating the die as it was being cut. After working with some good sharp scissors to cut out bits of the panel, I gave it up. Decided to try one more time with just the cheap Walmart brand of GP cardstock, just a few back n forth passes - no shims - the die cut very cleanly. Only had to poke out just a couple of bits. The main panel was raised up on thin white fun foam - a technique I've seen Jennifer McGuire doing lately.

I'm off to link up with Happy Little Stampers Challenge for May 2015.

Thanks for joining me today, big hugs all round, and hope if you've not been feeling well lately, that you're on the mend! God Bless.

5/18/2015

DeeDee's Digis - Grown with Love #2

Hi - it's Monday once more. When I was working, I always dreaded having Monday come around -- even when I liked the job that I had at the time. Just something about having to get up early, go to work. Much nicer to have the day to sleep in if you want, make your own choices as to what you will do that day. Plus, you don't have to put up with office politics. Yay!

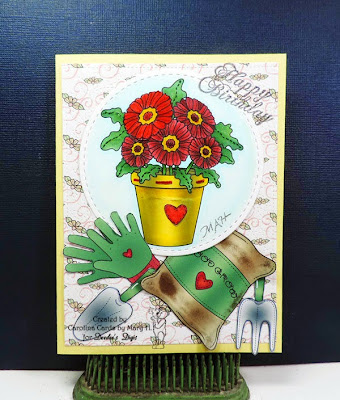
Here's the 2nd card made with the DeeDee's Grown with Love set. The background DP came from the set Chance of Showers.  Just FYI, there are some great sets for the Upcoming Father's Day as well. An added bonus of these DeeDee's sets is the ability to combine elements from the different sets that fit in with whatever it might be that you are currently working on. Resizing the designs is another feature that I enjoy, along with the precolored images if I don't have time to color the line art that is with all the sets. Some of the sets have digi papers, some do not. All of the sets have appropriate sentiments too. Nice to have available, to use whenever you might need it.


- Bouquet die cut with MFT Stitched Circle die. Background colored with Copics, and added WoS to the heart and flowers.
 
- Gloves, garden tools and sack were fussy cut and adhered to the collage. The sack was shaded a bit with copics on the front side. Corners were curled a bit, so added some heavy brown copic shades on the back side, knowing that it would bleed through the front and give a 'used look' to the bag.
 
- Photo doesn't show it well, but the dp was embossed with a PTI Cover Plate: Stitched Die. It gives a very faint impression. Since the dp was thinner paper, a piece of normal card stock was placed behind so that the die would not cut through the paper.
 
- Card base is a pale yellow. This will go to a SIL who loves to garden. She is happiest when she is outside working in her flowers.
 
- Misti helped to place the sentiment which is from a very old Inkadinkadoo clear set - Personal Impressions.
 
It is  the middle of the month so if you haven't made up your card for DeeDee's  Digi of the Month Challenge now is the time to start getting serious! You have 2 weeks left since the challenge will run to May 31st.

This month "Dad's Day Off" is featured. (available here for Non-EU residents or here for EU residents).
 
Here's another joke that arrived in our email last week. I laughed, so I hope you will too.
 
*****************************************************************************

A woman was at her hairdresser's getting her hair styled for a trip to Rome
She mentioned the trip to the  hairdresser, who responded:  " Rome? Why would anyone want to
go there? It's crowded and dirty. You're crazy to go to Rome. So,how are you getting there?"
"We're taking Continental," was the reply. "We got a great rate!"
"Continental?" exclaimed the hairdresser. "That's a terrible airline. Their planes are old, their flight
attendants are ugly, and they're always late. So, where are you staying in Rome?"

"We'll be at this exclusive little place over on Rome's Tiber River called Teste."
"Don't go any further. I know that place. Everybody thinks it’s going to be something special and
exclusive, but it's really a dump."

"We're going to
go to see the Vatican and maybe get to see the Pope."

"That's rich," laughed the hairdresser. "You and a million other people trying to see him.
He'll look the size of an ant. Boy, good luck on this lousy trip of yours. You're going to need it."

A month later, the woman again came in for a hair do.

The hairdresser asked her about her trip to Rome.

"It was wonderful," explained the woman, "not only were we on time in one of Continental's brand new planes, but it was overbooked, and they bumped us up to first class. The food and wine were wonderful, and I had a handsome 28-year-old steward who waited on me hand and foot.. And the hotel was great! They'd just finished a $5million remodeling job, and now it's a jewel, the finest hotel in the city. They, too, were overbooked, so they apologized and gave us their owner's suite at no extra charge!"
"Well," muttered the hairdresser, "that's all well and good, but I know you didn't get to see the Pope."
"Actually, we were quite lucky, because as we toured the Vatican, a Swiss Guard tapped me on the shoulder, and explained that the Pope likes to meet some of the visitors, and if I'd be so kind as to step into his private room and wait, the Pope would personally greet me. Sure enough, five minutes later, the Pope walked through the door and shook my hand! I knelt down and he spoke a few words to me.."
"Oh, really! What'd he say??!!!"
He said, "Who screwed up your hair?!!"
************************************************************************************************************************
LOL! Come again when you have time, and have a great day. Hugs & Thanks for visitin'.


5/17/2015

DeeDee's Digi-s Grown with Love

Happy Sunday afternoon. It's been a lovely sunny day in our area, and a fairly quiet weekend. Got a few house chores done yesterday while DH was off to a local carshow, where he got sunburned. I _told_ him to be sure to use sunblock...Oh well!

Today's card has been in the making for a bit; just had to sit Self down to put it together. The DeeDee's Digi set is Grown with Love and is bound to be useful for those gardeners that are on your card list. Most of the images in this set were fussy cut. I had enough to make 2 cards, and here's the one shared this afternoon. Hope you like it.


- Seed packet and flower pots dumped on the grass are from the set. Actually the seed packet looks a bit too large for the wheel barrow, but wanted the face of it to show well.

- IO Die165-H for the wheelbarrow, cut from a white snippet and colored to be cheery using Copics.

- MB flower pots from white snippet and tucked in the wheel barrow.

- MB simple hummingbird die was cut from a snippet of Dylusions sprayed paper. His bill was colored with the Staedtler fine line pens, and then used the black to free hand some feathers.

- IO Die156-H birdhouse - white snippet colored with Copics. The red heart was colored red, then added some WoS & added back in the opening. The elements are not proportional, but I like all of 'em on here anyway. I think it's a Happy card.

- Grass was done with various Copic greens, just flicking the blade strokes.

- Background was a previously done Dylusions background piece that I thought would look ok, as it had greens, blues & yellows - just like a summer day.

- Misti used to stamp the Inky Antics sentiment, from Magnificent Men. I think this might be DH's Dad's day card, if I don't manage to get another one done before the day. He really IS my hero - Most of the time anyway!

Since I do have quite a few Snippety bits on this one, and since there is a new week (177) at the Snippets Playground), I think I shall just zip over the pond to say Hello to little Parsnip. Won't you join us?

Also do yourself a favor and check out the wonderful digis that are available, both to International and USA shoppers at DeeDee's Digis. There is still time to enter the monthly challenge that ends May 31. Remember, you have until May 31 to share your own creation made with this set and link it up to the challenge post in order to receive next month's featured set for FREE.

Another one from the Rogues' Gallery! Can't you see they are having a good time?

And I'll close with a joke...hope it gives you a little smile. Come again when you can. God Bless

****************************************************************************


The Power of Believing in One's Friends


A contestant, Sally, on 'Who Wants to be a Millionaire?' had reached the  final plateau.
If she answered the next question correctly, she would win $1,000,000.
If she answered
incorrectly, she would pocket only the $25,000 milestone money.

And as she suspected it would be, the million-dollar question was no
pushover. It was,
'Which of the following species of birds does not build  its own nest but instead lays its eggs
in the nests of other birds?

Is it:

A) the condor

B) the buzzard


C) the cuckoo

D) the vulture
  

The woman was on the spot. She did not know the answer. She had used up her 50/50 Lifeline
and her Ask the Audience Lifeline. All that remained was  her Phone-a-Friend Lifeline. She hoped
she would not have to use it because her friend was, well, blonde. But she had no alternative.

She called her friend and gave her the question and the four choices.

The blonde responded unhesitatingly:  'That's easy. The answer is C: the cuckoo.'

The contestant had to make a decision and make it fast. She considered 
 employing a reverse strategy
and giving Meredith any answer except the one that her friend had given her. And considering her
friend was a blonde that would seem to be the logical thing to do. But her friend had responded

 with such confidence, such certitude, that the contestant could not help but be convinced.

'I need an answer,' said Meredith.

Crossing her fingers, the contestant said, 'C: The cuckoo.'

'Is that your final answer?'

'Yes, that is my final answer.'

And Meredith replied, 'That answer is.... Absolutely correct!

You are now a millionaire!'

Three days later, the contestant hosted a party for her family and friends,
 
 including the blonde who
had helped her win the million dollars.

'Joni, I just do not know how to thank you,' said the contestant. 'How did you happen to know the
right answer?'

'Oh, come on,' said the blonde... 'Everybody knows that cuckoos don't build nests. They live in clocks.'

Sally fainted...........................


5/14/2015

Brusho Background, with Lavinia Stamp on Sue Wilson dies

Good evening, Sweet Bloggers. Thanks for popping by. It's been a hot day here at our house, but we just enjoyed a nice dinner with #2 Bro & SIL...some good southern bbq. Yummy.

Now on to the card for tonight:

- Background was made with Eileen Godwin's Ranger Spritzer tool and Brushos.

- Die cut with a Sue Wilson die - forget which one! But if anyone wants to know, I will happily provide the info.

- Lavinia Stamp - Dancing Til Dawn - stamped in Versafine Olympia Green using the Misti. Stamped it twice to get good coverage. Then sprayed the piece with Tattered Angels gold spray mist, let it dry.

- Another SWilson die cut the black cardstock base. Again, not sure which one, but can add the info.

- Turquoise blue glitter paper behind the filigree.

Left the sentiment off the front, and have it as part of the inside verse.

This is my first Lavinia die. I wanted to get the Poppy Pods seen on Eileen's Brusho video. Since the shipping was a bit pricey, got a few other stamps in the order. This is the first fairy stamp I have, and now I see another one that I'm longing for. Oh me...

Enjoy your evening, and as always, thanks for your visit.  Come again when you can. Big hugs.

5/12/2015

Floating Inlaid Embossed Watercolor Flower

Good evening, and welcome. We are back from our little adventure, and I'll tell you all about it, after this card:


Recently saw this video done by Catherine Pooler on doing what she called  Floating embossed inlay. Thought I'd give it a try and this is my version.
 
- Believe this was a Hero Arts wooden stamp, inked with versamark, stamped on watercolor paper. Heat embossed with White EP.  Used Tim Holtz w/c markers to color the petals, because the recipient is someone who excels at watercolor. She was the inspiration for this effort (and she will know who she is). Stamped the same image on DP, hand cut the image out of the dp to create the aperture. Very carefully fitted the watercolor image behind the aperture.
 
- Avery Elle die to create the sentiment. The base card is pink - saved the 'bits' from the die cut to add back into the h, e, l,l & o, as it looks quite odd with those parts missing. This was a little out of my comfort zone, as I'm rather rubbish with watercolors, also had never done the die cutting effect this way.
 
Now - to share our little adventure with you. We found out that Our Darnell was making a family visit to a small North Carolina town that is a few hours north of us.  It was an opportunity to meet this fabulous lady who is renowned in Blogland, and was  one of my very first encouragers when I started blogging. Another surprise visitor who showed up was Bonnie K,  another quite well known card-making blogger, who also has been so kind, friendly & supportive of my efforts. It was something that I didn't want to miss, but with the DH's health situation, it was chancy until the last moment, hoping nothing happened to ruin the plans. Because we had never traveled in this part of North Carolina, we decided to leave on Monday afternoon, drive up leisurely and find our meeting place. DH suggested we have lunch at Scrapbook Creations which is on the route we take to NC. Of course I had to have a browse around in the store, and visit with some of the staff.
 
We got to meet Darnell's lovely sister Diana, and had a brief visit on Monday afternoon. Said our goodbye, as D&D had some commitments, & we headed to another nearby little town to find lodgings for the night. On Tuesday Bonnie & her sweet DH drove down to join in the fun. After visiting a bit at Diana & Darnell's pad, we all went to lunch at a lovely restaurant. Here's a few pictures Darnell emailed this evening, and hopefully I will share some more in a later post. Can you tell we are having such fun getting to meet face-to-face?


Bonnie & Darnell

Mary & Bonnie

Bonnie, Bruce, Diana, Joe, Mary (Darnell took the photo)
Joe H. & Bruce K., our sweet hubs
Diana is a photography whiz, and she took most of the pictures. They will be joined by 2 other sisters tomorrow for a Sisters' Retreat. Doesn't that sound just wonderful?
 
Let me just say that it was such a delight to meet these ladies who have been my inspiration on so many occasions - with the beautiful work that they both do - and find out that they are just as lovely & kind as I knew them via Blogland. This is one of the most unexpected Blessings of this Blogging business. It's always rewarding to get to know each of you via Blogland, email, etc, but then when the chance to meet face-to-face  happens, it's just so unbelieveably incredible.
 
Thanks for joining me this evening. I'll do my best to get round to visit all those of you who left comments on the Penny Black birthday card, and hopefully can make a start on that tomorrow.
Have a great evening, God Bless.


5/11/2015

Penny Black Hello Dear Happy Birthday


Good afternoon and so glad you could pop in for a Monday visit. Today's card has been received so can now be shared with you. Hope that you had a happy & lovely weekend.


- Penny Black Hello Dear image, colored with copics, some WoS added, and die cut with a stitched rectangle (either MFT or Lil Inkers). While still in the die, used Distress inks in blue & green tones to do some edge shading.  A fine line Staedtler pen was used to add detail on the grass. (the Amazon link is cheaper than the price paid at Target...but then you'd probably have shipping. These are great fine line pens though).
 
- background is either done with Brusho or Dylusion sprays, and then embossed. It was a piece that was done previously, and I'm sorry I don't remember the specs for it.
 
- Darice Lily die also cut from a similarly done piece. The tiny flicks of gold in the lily fronds came from the negative pieces of the sentiment outline sticker. After the card had been finished, the lily looked as though it could use a bit more detail. Saw the bits on the sticker sheet and hmmm...maybe that might add a little more detail. What do you think?
 
Just wishing you a grand afternoon. This is a scheduled post, as we are off on a little adventure. Will share the details when we return in a few days.Also will try to catch up on my return visits as well.  Big hugs and thanks for visiting.


5/09/2015

Christmas Club Card - Village Scene

Hello and welcome to another Christmas Card Club post;  today's Village Scene theme was chosen by our very sweet Rita of RMG Creations.  Had to give a good think and some hunting* for something that would fit the bill ---- remembered this Stampendous Snowy Postcard stamp that I had used some time ago. I hope it will serve as my Village look! Here goes:


- Stamped with Memento Rich Cocoa, colored sparingly with copics. Center oval was inked with a very fine tip  Pentel Slicci gold pen.  Outside of the scene was distressed with DI Tea Dye and then one of the Ranger distressing tools. The snowflakes in the sky and places on the ground were dotted with a silvery Sakura gel pen. Looks quite nice IRL.

- Elizabeth Craft Holly die (white snippet), colored with copics, with some Glossy Accents on the berries. Snipped the die apart to fit it around as I wanted it.

- Memory Box Merry Christmas die for the sentiment, again with a white snippet, colored with the Pentel gold pen. The space was not suited to the entire sentiment, so just used the Merry. Might have looked better done in red, but I wanted the holly & berries under it to show, so I used the gold to complement the gold oval frame.

My intentions were to cover the oval space with an oval cut from Sookwang double side tape, then to use Ritz cool white micro glitter over it. However, this idea didn't work out, solely due to operator error. So I still have the 2nd oval scene I had stamped on some double sided tape, which I applied wrong side to - on a piece of card stock. So will get recycled on another project - someday! I rather like the old fashioned look of this one - hope you will too.

Also hope that you'll have time to visit my Club pals' cards - their blogs are listed on the sidebar. You're sure to see some extraordinarily lovely cards, as these ladies are a talented group of bloggers.

Since I've got a few snippety bits on this one, and since I've been so neglectful of late to the Snippeteers and little Parsnip - I'm zipping over the pond to enter the Snippet Playground Challenge.  Besides the chance to make some lovely friends, see some gorgeous entries, there is also a super Sheena Douglas prize on offer. Now I know you must have Snippets (British for Scraps!) - so why not look in and perhaps join us?

Happy afternoon. Big hugs. Come again when you can...I love my visitors.

*While I was hunting for this stamp, I turned up the 2 Northwoods Christmas stamps (Hope & Peace) that I had been searching for earlier. Just goes to show: when you ain't concentrating on finding something that you know has to be here, there it appears. I think we have Gremlins in this house!!! LOL

Cardinal Thinking of You

Good afternoon on a gloriously beautiful Saturday afternoon. There's a lovely breeze coming through the house - along with plenty of yellow pollen. It's just so wonderful to air out the house. Prayers that all my friends who were in the path of the Midwestern tornados last week had no danger from those awful storms. Also, thanks for all the good wishes for DH - he's had a decent week; and thanks for your positive thoughts for our Sweet Brenda. Bloggers are such compassionate & supportive people...I'm so thankful that I've come to 'know' so many of you wonderful folks.

Today's card has been received by a very special person, so can share with you now. Hope your day is just as pretty where you may live, as it is here in Upstate South Carolina.


- WPlus9 Flora & Fauna clear Cardinal stamp (Miss Bonnie was the sweet enabler on this one!). She mentioned that she had ordered another Flora & Fauna set, so of course I had to go look. You know I was lost when I saw this cardinal! It was such fun to color with copics.

- S/B deckled oval

- Cheery Lynn Italian Flourish doily (DL103), cut in half to form the trim

- S/B A2 Scallop Borders One formed the edge of the card. The same bracket die was used to cut the black edge on the interior of the card.

- PTI Basic Bookmark 3 die was used on the inside to stamp the verse. (another item that Miss Bonnie had used & I loved the look)

- paper from a 6x6 pack in the stash. Flowers punched from a McGill punch using a pink snippet and tried my hand at flower making once again. Ho Hummm...

- Dee's Distinctively die cut sentiment, black snippet - 2 layers for dimension, and some WoS applied. (Forget which manufacturer the die came from, but if you are interested, I can provide the info :-)

I'll be back tomorrow with the Christmas Card Club post, and hope to get some scheduled posts done for next week as we'll be away for a few days.  Sending an early Happy Mother's Day wish to all my USA friends.

Thanks for joining me. Now we can go sit on the front porch swing, have some nice Southern sweet ice tea, enjoy the birds & breeze while we watch the world go by. Mr. is cleaning the pickup - get it ready to take a little ride. Ya'll enjoy the day. God Bless & many hugs.

5/05/2015

Flowers and Vines

Good afternoon and thanks for taking time to stop in for a visit today. MoJo has really been absent at this house lately. There have been things in process, but just couldn't get the motivation to finish up. However, today's card was finished last evening, (well almost), so here 'tis.


- Background done using a TCW Mini Climbing Vine stencil using DI colors of light blue, green and the new Fossil Amber yellow. Golden Gel Beads for texture were added with a Memory Box stencil (think it was Tiny Dots) and allowed to dry overnight.

- focal piece is a snippet oval salvaged from another project. I'm not sure if this was a Brusho or Dylusions background, but think it was brusho-s. Clear stamps from PBlack Flower Sparks were stamped in turquoise and green colors.  Some were done as second generation stamping. I was just experimenting to see what looks would emerge. Finally decided it was 'done', used a white gel pen to add some dots, and liked it.

- Rounded the bottom corners, and it's complete. I'm undecided about adding a sentiment to the front, as I rather like the clean look it has. It's going to be an anniversary card, so I think I'll just add the sentiment to the verse that will go inside.

It's been such a long time since I had a chance to give my little bear buddy Parsnip a big hug. So I think I will dash over to Pixie's Snippets Playground and see what all the little Snippeteers have been up to. Won't you come along and take a look at some fantastic inspiration cards, and perhaps join in, take a chance on winning a nice prize? We all have snippets, right?

I'd like to ask a favor for a good blog friend known to many of you, who's having such a rough patch of Life just now.  Brenda (Friends Craftin' with Friends) could use some prayers & positive thoughts big time. She's one sweet lady, who just gives and gives, and many of you know her. She's my 'other daughter' and if you could, spare a moment to send some positive energy her way - in whatever way suits your personal beliefs best. Thank you!

Big Hugs, come again when you can. I hope to get better about posting - no real good excuse for not doing so. Thanks once more for your time taken to visit here.