Good afternoon and thanks for stopping for a visit. We're still in So. Fla., and today is a typically lovely Fla. day...sun is shining, balmy - not windy - air, lots of boat traffic going by. We just watched 6 dolphins - in 2 groups - playing around out in the water. There was a boat passing, and the boaters stopped to watch these critters frisking around. Sort of obscured our view and I wanted to shout "Move on", (but I didn't!). We have the sliding door open to the deck which is right by where I'm sitting and typing away on the laptop. Worked on cleaning up some of my Pinterest Boards this morning. When I first started on Pinterest, I set up a Board entitled Inspirational cards. Well, I put everything I liked on that board. Did the same with Recipes (not that I cook much, mind you. I collect cookbooks too. Funny story: Used to always buy a cookbook from each place that we would visit...so as to have some regional dishes to read through. The sales person commented to DH "Boy, your wife must be a really good cook". DH replied "Nope, hardly ever cooks...she just collects books". LOL. Pretty well the truth too. Anyway, I have all sorts of recipes pinned and need to separate them as to crockpot, breads, etc. Something to keep me busy while we're sitting & waiting for DD to return from some errands. Then we think we may go to lunch - if we can last that long until she returns - maybe do a little shopping. I can almost always shop! So I would like to take the opportunity to wish each of you a very Happy New Year, in which I hope you will receive whatever blessings that you are needing, that you will have good health & happiness. I pray that our Lord will hear our prayers that so much of this awful stuff we see taking place everywhere in the world will pass away. That those who are committing these violent acts will see that all it does is cause pain where none should be. And hopefully that all of us crafters will be able to enjoy more time to do what all of us love & love to share. God Bless & have a wonderful, safe holiday. Hugs and come again.
Edit: Just noticed that I have another new follower, so Welcome Theresa. Folks, we're getting closer to that blog candy! When I get back to SC, I will be collecting some items, and when I can post pictures again, I think I'll add a little tidbit along to show what things will be given as blog candy. Spread the word....And Thanks!

12/31/2012
12/29/2012
Miscellaneous
Good Morning from rainy Southern Florida. It is a gloomy gray day and it's fortunate that we lived in So. Fla for over 40 years so not terribly disappointed with no sunshine. (It's raining in our hometown as well, plus it's colder in SC). Anyway, thought I'd pop in to say Hi, and paste a link to this fabulous Pinterest board I just browsed upon (http://pinterest.com/dmts/card-techniques-memory-box/ .) I know there are quite a few of you folks that love these Memory Box dies just as much as I do. Let me tell you: I was so humbled looking at these cards...makes me wonder how I ever dare post anything I make! If you have time to spend a few minutes drooling over cards, I recommend you check this Pinterest Board. Here's the story on how I found this board: I follow Heather Telford (another lovely blog) - she of the sponging background skills. I get notification when Heather posts something new, and today her inspiration was a card she saw on a Pinterest board. Well, I had to go look to see what inspires Heather as she is so awesomely talented herself, and then I followed THAT board to another board, and etc. Good way to entertain myself on a rainy morning while thinking of what we can do to pass the day. (Sure beats vaccuuming the floors - which is what we had told DD we'd take care of for her today). Yesterday we went out and hunted through the local Costco Warehouse to see what this store has that might be different from our store at home. (Do you do that too? DH said "They'll have the same thing WE do, why do you want to go there?). Well, they DID have some different stuff! Actually I was scanning the streets as we drove to see if there were any stamping stores...saw one but we got by it too fast, plus were in the wrong lane to make a turn, and I think it was a scrapbook store anyhoo. Checked out a Michael's & JoAnn's around this area....not much left after Christmas. Or maybe it is just that I have too much "STUFF" awready? I'm thinking of what I will gather as blog candy if I ever get to 100 followers. Or the blogaversary which is coming up too. Got some lovely Cheery Lynn & Memory Box dies that I've managed to collect duplicates, so I think it will be something good. So have a grand Saturday, and hope the weather is pleasant where you may be. Or if it is not, that you have some fun inside things to keep you happy. Hugs and come again.
12/27/2012
Miscellaneous
Good evening, and we are winding down to the finale of 2012. I just read an email, that I thought expressed quite well, some things I'd like to share with my blog followers:
Where
did the year go? Suddenly it is December .......again - and we realize that with
giant strides we started in January and within a blink of an eye, 2012 is on its
back!
A big "Thank You" to each and everyone of you, for the impact you had on my life this year. Especially for all the e-mails & lovely comments I received.......without you, I'm sure that 2012 would have been extremely boring.
May 2013 mark the beginning of a Tidal Wave of Love, Happiness and Bright Futures.
And to those who need someone special, may you find that true love.
To those who need money, may your finances overflow.
To those who need caring, may you find a good heart.
Thanks for being my friend!
All the
best in 2013
Folks, I can't say it any better than this! Have a wonderful Friday, thanks for stopping for a visit. Hugs.
12/26/2012
Miscellaneous
Hello and I hope all of you in Blogland had a wonderfully Merry & Happy Christmas. Ours was quiet, but we were with our daughter & son-in-law, so we had the most important ingredients to make our day a lovely one. We were so blessed to have been able to be with them, have a nice meal, a nice home to share it in, loved ones around the table. We stopped to count our blessings, realizing there are so many in the world who do not share in these things which we frequently take for granted. All the presents and hoopla that have become such a part of the holiday seem to have obscured what it really IS all about: Giving to others and appreciating the simple things of life...maybe not so simple after all. I try to truly be thankful for each day, and all the wonderful things I've had and still have in my life. I guess now is a good time to think of all that, and remind myself not to forget it in the hubub of everyday living.
We are in So. Florida, and our Christmas morning started out beautifully sunny, about 76 degrees.(and it was raining, gloomy & cold in our SC hometown). Then Mr. Sun decided to hide and the remainder of the afternoon was a bit overcast. Today was much the same, then we had a little thunderstorm, with some rain. More overcast and some strong winds. I have been sitting this evening & trying to get to visit all my blog followers' blogs as I had gotten so behind. I brought some images to color while I sit around, but didn't bring along supplies to actuallly make a card. Brought my camera with intentions of sharing some pictures. My desktop has a cardslot where I can just slide in the memory chip. Laptop doesn't have such, and I didn't bring the camera usb cord, so no pictures can I share. Ah well, we know what kind of a photographer I am anyway. So no big loss to Blogland. LOL.
Just wanted to pop in, and say Hi, to anyone who buzzes in to see what's going on. So I'm just ramblin' on, and I'll say goodnight, and hope you have a wonderful day planned for tomorrow. Blessings and Hugs, and as always, thanks for visiting.
12/25/2012
Christmas

MERRY CHRISTMAS! Good morning and welcome. This is a scheduled post, so I hope Mr. Blogger cooperates with me in handling this post the way I intended. I want to say a Big Thank You and extend my very best wishes to you & your loved ones to enjoy a wonderful day, hopefully spending it with those you love best, in good health, happy. I also want to say Thank you to those of you who signed on as blog followers, because you have gladdened my heart each time I see your faces on the sidebar. I'm so grateful to each of you for taking the time to join, leave comments. I'm also thankful for ALL who have visited the blog, and left encouraging comments this past year. You'll never know how much you have meant with your support, and how much I've enjoyed 'chatting' with you. I consider each of you a blessing, and have made some new 'blog friends'. Ok, for today to share with you: These are some clear ornaments I got (on sale!) at Michaels. The surface is rather flattish, so it's easy to do the Sookwang sticky tape gig. I used a SU scallop punch to cut out the tape (which was a sheet - rather than the roll...easier to manipulate); then removed the backing, adhered the punched circle to the ornament. Burnish it down very well, removing as many creases as possible. I used a bone folder and my fingers, lifting the tape up to check that I had gotten the tape down well. It leaves a sticky (and visible) surface when you peel away the Sookwang label side of this tape. Then I removed the outline from an Elizabeth Craft poinsettia sticker, applied to the sticky surface on the ornament - using tweezers. You want to keep your fingers off this tape as much as possible. I replaced the waxy Sookwang side of the backing tape over the sticker, burnished the outline sticker down very well. Did all 4 ornaments this way, leaving the backing tape in place, until I was ready for the Ritz Glitter part. Dusted each ornment generously with Ritz Glitter Cool White Highlight, using a soft brush to clean off excess. Once I felt I had a good coating, I burnished, burnished, burnished. After doing all 4 ornaments, I used copics to color the inside of the outline sticker. (Ah, colors used were R81,85, R56, YG05, YG63, Blender pen). I varied the R85 & 56, trying to get different shadings on each flower. Barely touch the nib at the end towards center of the petal with the darkest color, then a bit more of the lighter color. Use blender pen to draw the colors down towards the point. Did same with the leaves. Once all the flowers were done, I used a light & dark yellow for the centers. Sorry, don't remember which these were. These ornaments are for DD, and I was working about 3am this morning to finish this last minute decision to make these. I am prone to last minute stuff!!! Once again, a VERY MERRY CHRISTMAS to you all, and thanks for visiting. Hugs.
12/24/2012
Christmas
 |
| Recycle envelope |
12/23/2012
Christmas

12/22/2012
Christmas
 |
| Brenda's card |
Here's another picture of the way these cards are displayed. Years ago we found this 'angel tree stand' at some store, and even if we don't put up many decorations - as some years has been the case - this is one that we always get out of storage. It's probably not a very good way to display the cards, because some get hidden and you have to 'look through them' to really appreciate the cards. Yet I love it. Another of my 'passions' along with cardinals, is that I love anything Angel. Happy Saturday before Christmas and many hugs. Come again.

12/21/2012
Christmas
12/20/2012
Christmas
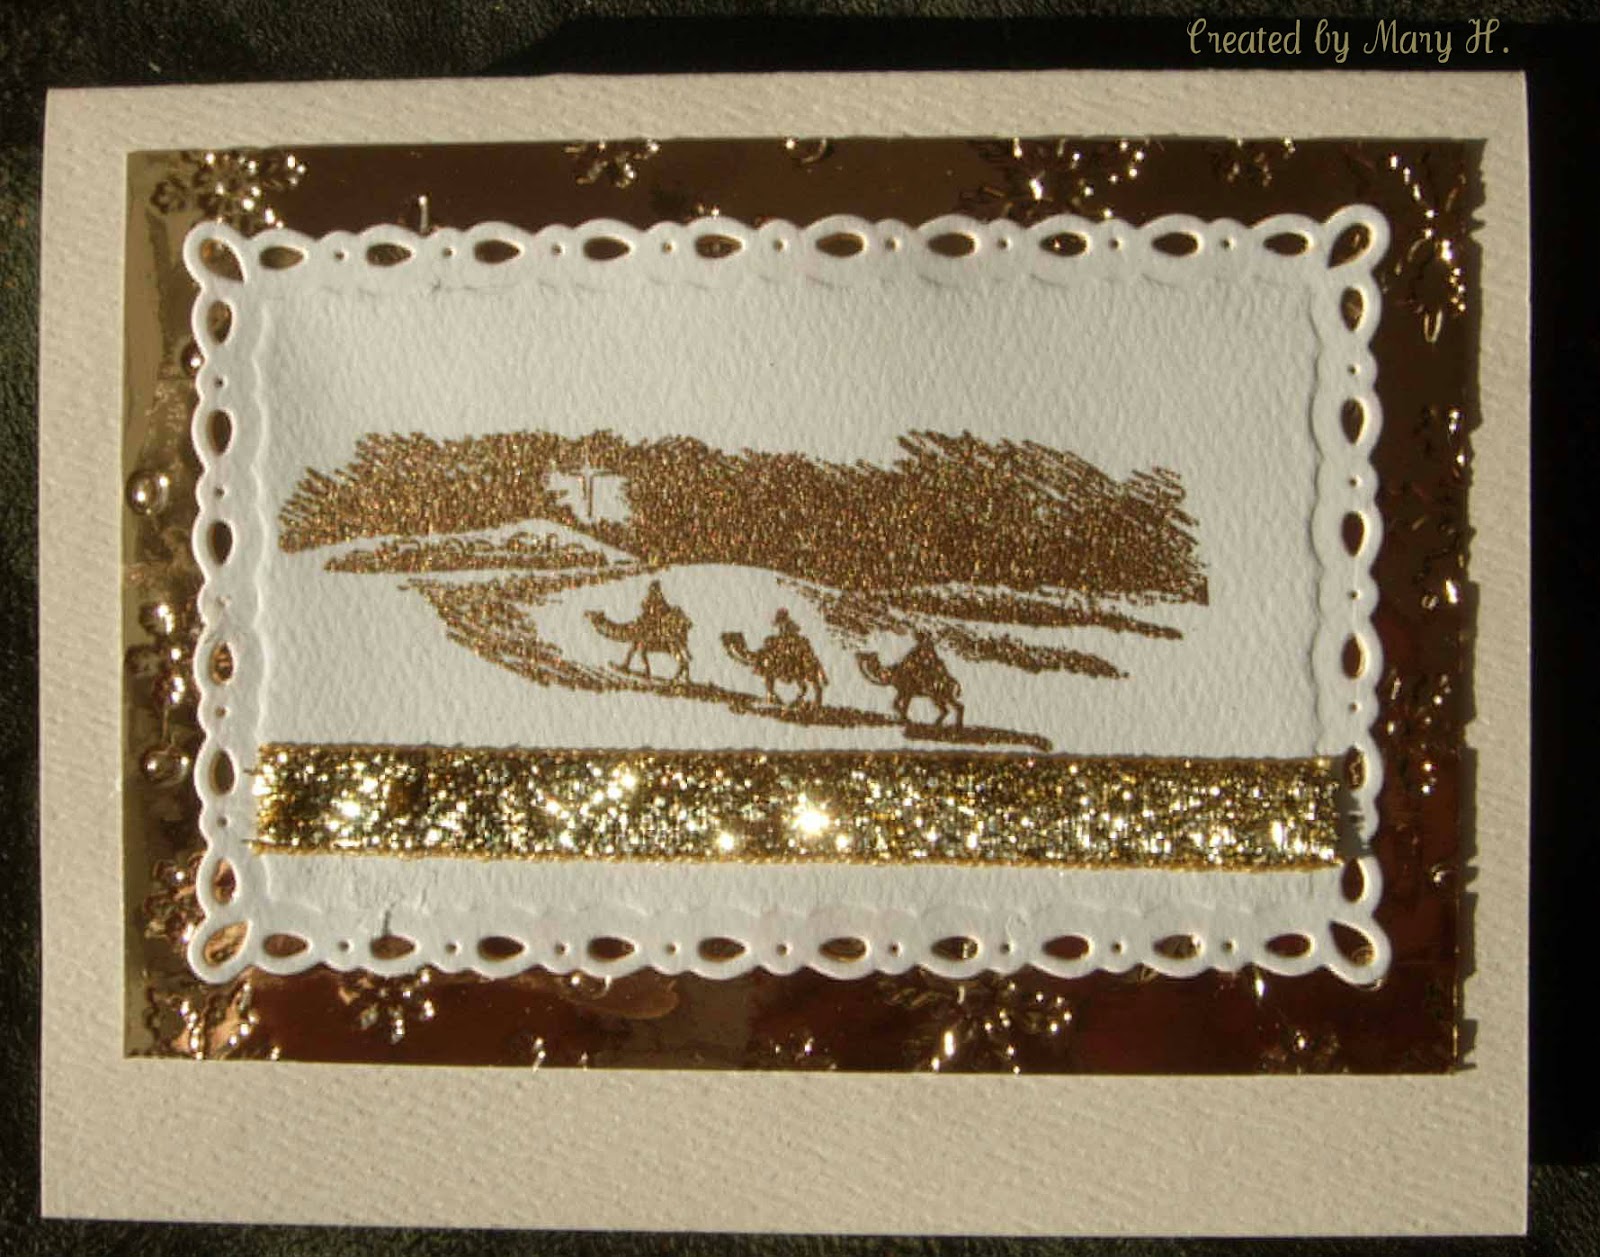
Good evening & welcome. We are having a chilly rainy night in my area. The rain is needed so not complaining at all. Our day started early with a post-op check at my eye doctor's. On our way saw the most astoundingly wonderful sunrise. Good news is doctor is pleased with the results, and said I should improve daily. I'm not seeing any change as yet - I'm 20-40, which I was pre-surgery, but hopefully that will continue to get better. Had breakfast out again, while waiting to get the yearly mammogram and then a bone density, which I get every 2 yrs. Tomorrow is Orthopedic checkup for my Achilles, and YAY! Finally (God Willing!) done with all doctors for the year! Boy, I never thought I'd spend so much of my retirement time visiting doctors! The positive aspect of this is at least I made it long enough to do that!!!! LOL. I wanted to share 2 more beautifully done & lovely cards we received today from my stamp buddies. The photography just does not do justice, and for this I apologize. I hope you can enlarge the pictures and see just how gorgeous these cards are. The Nativity scene, especially - was hard to get the glare removed. That silvery-blue moire ribbon is just so elegant, and the nativity scene is embossed with a glittering silver against the dark blue--absolutely stunning. Elaine has used one of my favorite MBox dies, and some embossing on the side part of the white c/stock...and this is just so elegant. I'm blessed to have such talented stamping friends; equally so that they took the time to think of us, make us a wonderful card to say Merry Christmas. Enjoy....come back again soon.
 |
| Elaine's Blue & White Tree |
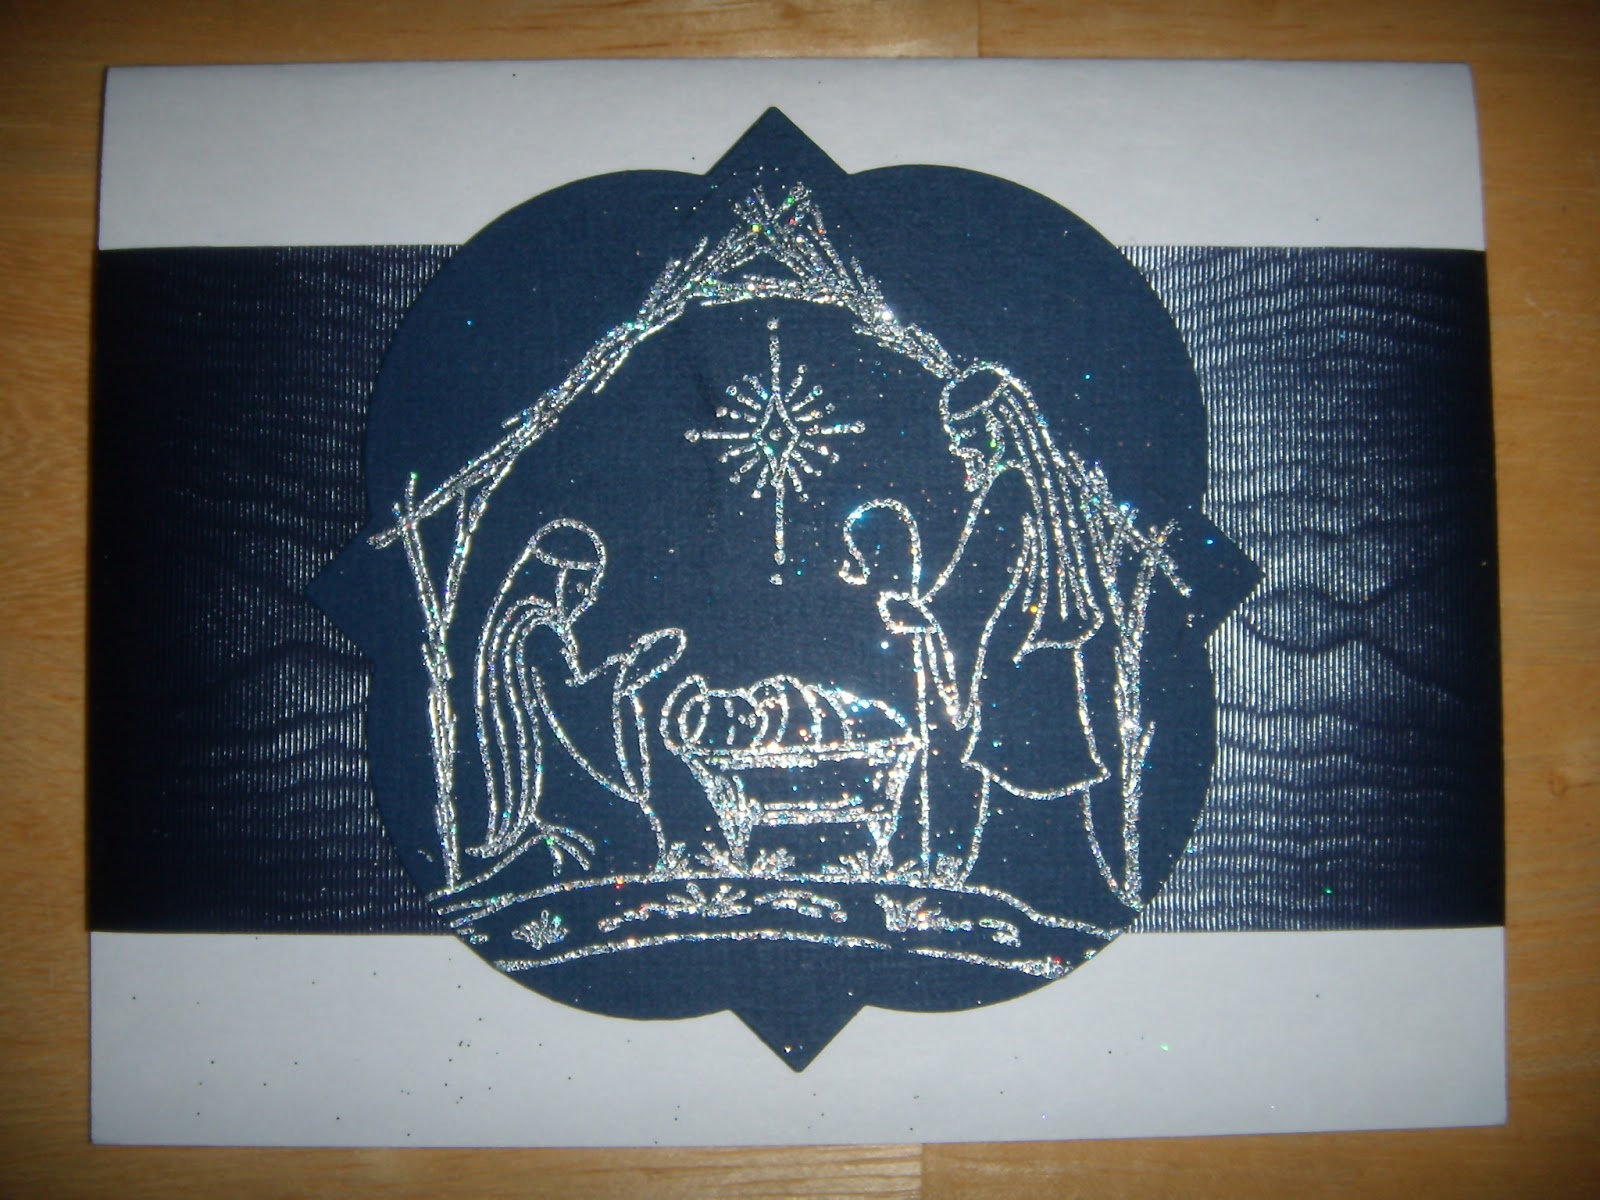 |
| Stepahnie's Blue & Silver Nativity |
Christmas
 |
| Charlene's Madonna Card |
Hi, thanks for stopping today. I promised to post some of the most lovely handmade cards I've received this year. I have captioned them, so won't go into details. Just enjoy these. I have a few more, but didn't want to try to cram them all into one single post!!! I'll be recuperating from cataract surgery, so I scheduled these for while I'm not on the pc. Have a lovely day, and many hugs.
 |
| Donna's Flourish Card |
 |
| Faye's Trees & redbird card |
 |
| Julie's Christmas Surprise card |
12/19/2012
Christmas
Hello and welcome. Here's another post with some lovely handmade cards that we've received this year. Aren't these lovely cards? And the photos do NOT do the cards justice, because each is truly beautiful. I can tell you that the Cardinal on Holly is a PSX stamp, because it is one of the first stamps I ever bought...and didn't know PSX from ABC or any other company. You can probably guess why it was a purchase! It languished for years with my 'stuff' and then one day I 'got into' stamping. Started hearing about PSX, learned the company had gone out of business and I couldn't buy any of the neat stamps my buddies had. So I was looking through my 'stuff' for a bird stamp, found this beautiful fella, and happened to look at the side of the wood block. (See me doing the Happy Dance while saying "Oh, Oh, THIS is a PSX stamp." Poor DH must have thought I'd lost my mind. - well, truthfully, he thinks that a lot anyway. LOL). This image is colored so beautifully, and the sender will know that I truly enjoyed receiving this card. Such a surprise too. Now the Swing card is a Stampin' up bird stamp I'm pretty sure. It actually was not technically a "Christmas card", but more on the lines of good wishes for my eye procedure. I wanted to show it on the post, because it is so pretty and well done (those nifty folds!) and it cheered me up so much. Firstly - just to look at it's beauty, but also to think someone took the time to think of me with a handmade card. Folks, to me, that just can't be emphasized as much as to how a handmade item can mean so much more. Someone thought enough of me to give me their talent, but ALSO their TIME! We all only have a finite amount of that. When you share your TIME and TALENT with me, well, that just cannot be done with mere money!! Hope you will enjoy these cards as much as we did. Thanks for stopping in.
 |
| Diane's Cardinal |
 |
| Candee's Swinging Redbird EDIT: Wanted to say the doctor said the eye procedure went well. I am home, doing the eye drop post procedure routine. I have a follow-up check early in the am. We stopped at Cracker Barrel (a local restaurant chain for those of you who are not familiar with this place) and had a wonderful breakfast...which I was SO ready for. Came home, did the drops, got my clothes changed and into the recliner did I go. ZZZZZZZ. On another note: There's a lovely blogger named Bernie of http://berniescraftcloset.blogspot.com/ who could sure use your prayers. I'm sure that many of you 'know' Bernie from following her blog. Bernie is going through a very rough patch right now, and would appreciate any prayers you may care to offer in her behalf. I will share a little more news at a later date - or Bernie will be posting after receiving some news from some tests she has been undergoing. She has not been posting of late, and I think the Power of Prayer might place a ring around Bernie and be a good thing. Not sure how much she's on the pc, but if you want to leave some good wishes at her blog, maybe she will see. I asked for her permission to share this with you. |
Christmas

12/17/2012
Christmas

12/13/2012
Christmas

Edit: This was a scheduled post, and now that it's 'live', and I had 'snippets' (LOL), I will mosey on over to Pixie's Playground 'cause she had some lovely looking yummies for dinner, and who knows, might be a bit left in the pot for stragglers. Let's check & see, shall we? If not, there's bound to be something gorgeous to look at with everyone's cards that the girls bring along! See you there. Ho, Ho, Ho.
12/12/2012
Christmas
.jpg)
Edit 1: I had this post scheduled as the daughter was here, and I wanted to save my time for her. I had some cards ready, so got them scheduled to post. Now that this post is live, and has some snippets, I'm headed over to Pixie's Playground to sample some 'good' eggnog, enjoy the festivities. Those girls know how to throw a party! Hope you'll pop by to see what's going on. Lots of lovely cards to browse through while you're having a cup of something.
Edit 2: Got an email from Sizzix today, asking if it was acceptable to me for them to replace my defective BSE with a Vagabond. Now folks, THAT is what I call real good customer service!! So if you are having similar problems to what I described above, you may wish to contact Sizzix while they are still willing to stand behind the Electric Big Shot (which is called the Big Shot Express, I think.). Hope I have helped someone else by posting this info.
12/11/2012
Christmas
 Hi and thanks for stopping in for a visit today. This card was made with the cutest Art Impression Polar Bear stamp sets that were new last year. I just got around to inking the cling stamp. The coloring was very easy, but I had a boo-boo with the red stripes bleeding, and each time I tried to clean up with the blender pen, it seemed to get worse. I tried for several days, dabbing & blending out, letting it dry well, trying again. Finally I decided to cut the image out, as the rest of it was ok. So, used my Snowflake embossing folder to create a background for the carolers, then tore a piece of green Bazzill to add to the bottom. After adding some Rock Candy Stickles along the torn edge of the Bazzill for a little glitter, I popped up the caroling bears. Found some rub ons that were lines & various size snowflakes. Used an exacto knife to cut off just the snowflakes, placed them around the embossing background. Then I decided to add a smidgen of stickles to the lamp glow, and a gold pearl to the top of the shade. I may add a Merry Christmas sticker on the front, or I may just stamp the sentiment inside. Haven't decided yet. Happy Day to you, and hugs a plenty.
 12/10/2012
Get Well

*Edit: The pattern paper is from Paper Studio, Old World Winter 4.6x6.5*
12/08/2012
Miscellaneous
Hi ...I'm back once more this evening. Background story for this post: I had a follower post a nice comment on one of my cards recently, and since I'm so behind on visiting my lovely followers, I wanted to go say hi at this particular blog. Well she's showcasing some other blogs today, and I followed one of her links to THIS blog. Now people, all of us are so blessed, and I am especially so, in so many ways I can't begin to count, and when I read about this special little boy, I got some tears. I hope you'll follow the link, and maybe you can find time to make and send a card to this brave & courageous (and totally adorable in his pictures too!) little fella. His teacher is the blogger, and she has shared a truly heartwarming tale of how this wonderful child has enriched her life. I'm going to do the best I can to get some kid cards made & sent. (Now I don't have a lot of 'kid type stamps!', but I'll be looking for some.) So please, if you have a moment to spare, check this post, and I think it will make you feel the same way it did for me! Thanks to Lisa, at http://decossesdynamitedoodles.blogspot.com/ for sharing the link to Ginger's House. I've got both sites bookmarked, and I will be going back to visit & enjoy some beautiful projects! (when I get caught up myself!!!). Thanks for visiting. Hugs.
Miscellaneous
 Hi, and I'm back again this evening with a little 'info' post. I've gotten a few questions about the Sookwang I use, so I thought I'd take a picture of it to hopefully show you what the product is. It is also known as Score Tape. You can see that I have a large roll, in the biggest width that I had the opportunity to buy. I think it was about $60+ in my local stamp store, and I've seen it for similar prices at some online places. It also comes in smaller, less expensive sizes, different widths - for different applications - and in flat sheets. The brand name on the tape is Sookwang, so that is what I was taught to call it in the Ritz Glitter classes. Cut off the amount that you need for your project, cut to shape, & remove the outer backing that has the name on it. (*you can save this piece for another use*).Once you remove this outer backing that you see in the picture, the product is extremely sticky, and you want to keep your fingers off it as much as possible. This then adheres to the surface of what you want to glitter. I use the Tim Holtz scissors to cut it to the desired shape as it sticks to the scissors. I think the TH scissor is made from a non-stick material, so works a bit better than just regular scissors. Once the Sookwang is down on your project, you peel off the remaining backing, sprinkle your Ritz glitter very generously over the surface, brushing off excess back into your glitter container. As I said previously, I dumped the tiny jar into a plastic container, use a spoon to brush the glitter over the project, then seal the container with its lid once I use a soft brush to wipe off the excess glitter. This glitter is a mite pricey I think, as it is a very tiny jar, but it really goes a long way. I bought it locally, but there are online places to purchase it also. I took a picture of the Stampendous Santa stamp used for my latest project. I love cling stamps for their ease of storage, but sometimes I don't always get a good sharp image with these stamps. My Bonnie's Best Stamp Press is the greatest whenever I have this problem. Some of my clear stamps don't give a crisp image (I'm sure it's Operator Error), so I really like this tool. There's a marvelous Youtube here that you really should check out, if this glitter technique is of interest to you. It's really an easy technique, and gives a fantastic look to your cards! Hugs and have a wonderful evening. Thanks for visiting.
Christmas
 Hello, and I hope it was a brighter day around your area than it was here in Upstate SC. It has been just a gloomy, gray day, misting rain late this afternoon. I had some errands to run, so have accomplished zip today. I did get a card finished last night, so here it is. On to the card: Stamped the Stampendous cling Santa with Memento Espresso ink (a brown) on 2 pieces of white card stock. Cut the sharpest image of the 2 out as an oval. (oh yes, I used the Bonnies Best Stamp Press to get a sharp image, by the way, And I fussy cut the tree that hangs over the frame). I used daubers - like Qtips - to color the areas using appropriate Memento inks. Cut a piece of Sookwang sized to the oval, removed the backing so it would stick to my image. Rubbed the surface to get good adherence. Removed the top backing; holding it by the edges to keep fingers off the sticky part, dumped Ritz Cool White Highlight glitter over the entire surface. Brushed off the excess glitter back into the container. *I dumped the tiny jar of glitter into a square plastic container and it sort of spreads out a bit*. Much easier to apply to your project from a larger container than the tiny jar. Ok...then burnish very well with finger, to bring up a lovely shine. You can see this as it develops. Next trimmed my second image to desired size, and using Distress Inks Tea Dye, Vintage Photo, sponged around to create the vintage look I wanted. Used a gold gel pen to go over the swirls. I had previously used copics to color in just the frame. Before I adhered my glittered Santa to the 'postcard', I decided to use a gold pen to outline the oval edge. I used the Gold Gel pen to extend the swirls from the postcard over to the glittered Santa so that the look would 'flow'. Used an Elizabeth craft sticker for the sentinment, gold tree, and star. There is a mirror gold scant mat behind the postcard, and the layers were taped to a red textured Bazzil, top fold, embossed with Darice Damask EF. I tried to dry brush some Viva Decor gold paste over the raised surfaces, but the little pot is all dried up. (Got to check to see if I can add water or something to get it back to paste consistency!). So then I used the Tsukineko Delicata Gold with a little finger dauber to add a little gold on the embossing. This stamp was a sweet gift from my good buddy, Bernie's Craft Closet and you might remember an earlier card I posted, just using copics to color. I like this one much better. Hope you will like it as well, and thanks so much for visiting.
12/06/2012
Christmas

12/05/2012
Birthday

12/04/2012
Winter
 Hello, and thanks for stopping to visit. I've decided to label this cardshare Winter, as it's not strictly a Christmas card. The stamp is by Impression Obsession, cling rubber C2891. When I saw him in a sample, he just made me smile. So cute. He's colored with copics, diecut with Spellbinder Ovals, sponged with Memento Sky blue, which gave a sort of 'icy' feel to the look. The scalloped S/B oval mat is from a 6x6 of Cosmo Cricket, Mitten Weather - oldy from a couple years ago. I used the same paper snippet to mat the oval sentiment. The sentiment was stamped with a tiny little stamp (on another snippet)using the Memento Sky Blue - handy - and I used Judikins Aegean Silver to heat emboss. IRL it looks brrrr... swiped the edges with the Sky blue. The cardbase is a burgundy lightweight textured Bazzill, diecut with the smallest of the Grand Big Scalloped Ovals. *To diecut for a card, place top die edge just outside the fold for a hinged card.* There is a snippet of a regular scalloped oval inside for the sentiment. Was trying to clean up some of my snippet mess on the desk, and Voila, there's a piece I can use for this card! Used some silver mirror paper and S/B Build-a-Snowflake 3 to cut the flakes, and a small handpunch for the one on Snowy's left. The silver was also a snippet left from cutting the Memory Box ornament a few posts back. I had some sparkly glass beads that I adhered with Glossy Acents, for a bit of Bling. (been waiting to say that! LOL). Now I'm going to grab up some 'nog & scurry over to Pixie's Playground, where there's rumors of lots of fun going on, (and I won't say nuffin bout what's goin' in the 'nog, but the chickens are standing by. Remember I'm from the South, and you know what gets brewed back in the Mountain Hills). I've heard talk about tree lights, mulled wine, concerts, so if you come - AND I HOPE YOU WILL! - bring yer own cup! Have a wonderful afternoon. Hugs.
12/03/2012
Miscellaneous

Christmas

12/02/2012
Miscellaneous
I just wanted to add a big Congratulatons to Maureen , Sally H, and Valery Anne for winning the blog candy at Shaz in Oz. Ladies that was some super nice blog candy, most generous of Sharon to offer. I wanted to say WELL DONE to ALL of you!
Christmas

12/01/2012
Christmas

11/28/2012
Christmas
 Hi once again. I had some images colored up and with so much flurry going on around here, I finally got a chance AND the motivation, to get these images onto cards. This one was colored back during the summer while I was lolling around in the recliner. As you may have noticed if you visit here much, I LOVE anything with a cardinal. A friend had this lovely Northwoods stamp, showed me a card, and well, you can guess the rest of the story. This is another easy image to color...the hardest part is trying to shade my little red guy, cause he's so small. The Red copic color family is a hard color range for me to work with - it tends to bleed for me, as I have a somewhat 'heavy' hand. I also used some Spica glitter pens on the pine needles and ribbons. Diecut with S/B deckled rectangle. Green glitter mat was diecut with a larger size of the same set. Interior part (covered by the image) was cut out with a smaller die, to save weight. The bonus is that I now have that piece to use elsewhere. The silver glitter paper was just trimmed out to fit the cardbase. Ah, now for the snippets - that was the red glitter strips. (Saved from cutting out the inside of a die used in another project, and Voila, here it gets repurposed.)The strips are adhered down top & bottom, but do not run the width of the image. This glitter paper is quite thick, so would make the card entirely too bulky (at least for mailing). I have a few more of these images colored, so I have to think of some other designs to use 'em up! Also going to take Red over to Pixie's Playground since it just barely qualifies for the Snippets Challenge and then onto to Rudolph Day. Someone said (I'll call no names), that my eggnog needed something else, so maybe I'll add a warming ingredient. Whatta you think? Com' on along, and join in the Christmas fun. Cheers!
Christmas
 Good afternoon and welcome. Update on my cataract surgery which was scheduled for today: Got postponed! After I had gotten myself all geared up to do it, get it over with, the doctor (very wisely) decided to wait to get some 12 yr old pre-lasix eye measurements from my Florida clinic...and that's IF these records can be found. Long story - but the short version is: the clinic has relocated; since I'm no longer an active patient, my records were archived to a central storage facility...may or may not be able to get located. But the doctor wanted to have the effort made. So now I'm tentatively scheduled for Dec ?5?. Anyhoo, all the scurrying around, dealing with 2 different clinics in 2 different states, several different nurses, techs, etc. - is why I've been MIA for a couple of days. OK...enough on that. It's in God's Hands, and I'm happy to leave it there. For the card: The image is by Impression Obsession-D8295, very easy to color. I used some Chromatix markers purchased at A C Moore. Added to my collection this past Black Friday. These have a small nib & a brush nib. I liked the small nib for the tiny area coloring, but I don't think these blend quite as nicely as the copics (could be the operator also). Diecut with a S/B Classic Oval - sponged with a bit of Memento Sky Blue, which gave the nice grayish tone at the edge - which I liked. The Distress Inks were too bright for this effect. Then diecut a bit of burgundy-ish Bazzill for a mat. The teal cardbase was a snippet that was in the pile, so embossed it with the Crafts Too Christmas Ornament EF, dabbed a smidge of Delicata Gold ink onto the embossing. Diecut a snippet of some greenish paper with the Cheery Lynn Carnivale die, then added a small strip cut from Authentique 12x12 Festival Collection, just because I thought the trim needed a touch of brightening. Since I do have a few snippets on here, perhaps I might just take a pitcher of eggnog over to Pixie's Playground and see what those mischievous pixies are up to. I'm tellin' ya, those girls have the mostest fun. Also it's the final Rudolph Challenge over here at Stamping for Pleasure, so I'll enter this little card in that Challenge. Another place where there's lots of fun to be enjoyed. Check out both these places, and you're in for a treat! Have a great day, and Hugs & thanks for the visit.
11/24/2012
Miscellaneous
 |
| Cuttlebug Snowflake EF |
Fall
 |
| Gloria R.'s Thanksgiving Card |
11/23/2012
Fall
 Good afternoon. Thanks for visiting. On this Black Friday, in the USA, DH & I got up very early - as in 3:45am, to head over to our A C Moore which opened at 5am. The first 100 people got a $5 shopping card, plus total purchase was to be 40% off. My goal was to pick up some more clear storage containers, but I think I got just about everything else BUT those! Lots of paper pack sales and I got some more of the Chromatix markers, which I've been testing. I'm finding they work well for doing fine line work, when my copic nibs don't give me a clean thin line. (It's operator error, not the marker!) It's been a while since we did something crazy like this, getting up that early to go shopping! One lady told me she'd been in line since 2am - and yes, her hubby was with her too! DH said he heard some of the ladies comment they'd been up all night, hitting some of the stores that were open all night. Well, it was fun, impulsive, and the store was not so crowded it made shopping unpleasant, but we were glad to get back home, change clothes, and crawl back in bed for some more sleeping!!! Oh yes, we did stop at a McDonald's that was located in the same plaza for a quick bite to eat and some peppermint hot chocolate.
Here's a fall card with an image I had colored earlier, finally got put upon a card. I tried another fold card, using lightweight green Bazzill. The panels are brightly colored leaf motif paper purchased as single sheets from Hobby Lobby at a sale a few weeks back. The stamp of the fall harvest is labeled as Heather-M-36-HK, bought at a stamp show back in September. Diecut with S/Binders classic circles, sponged with DI Tea Die. Mat is from a Colorbok paper pak, diecut with the Scalloped Circle, edges distressed with Vintage Photo, as it was too 'red' for my taste. The distressing browned up the red to a somewhat more fallish tone. I remembered to be careful where I put the tape when I adhered the 2 circles together, so this time I was able to center the image on the folded card, without having it stick to the off side. The sentiment is from a Just Rite clear stamp set, stamped first with Memento Rhubarb Stalk, then overstamped again with Memento Bamboo Leaves. This was punched out with a tag punch, trimmed down to fit the space on the card. There were some thin strips from trimming the panels, so glued them top & bottom on the sentiment. On the inside center panel, adhered more of the panel paper, so now it's ready to get something appropriate stamped inside. This one goes into my box of cards for next year. Isn't it wonderful to have a card ready ahead of the season? (Now if I just remember next year, where I put the box!!!! LOL.) Have a wonderful afternoon.
11/22/2012
Birthday
 Happy Thanksgiving to those who celebrate the holiday, and Happy Autumn to those who may not. WELCOME to everyone, and thanks for popping by this beautiful day. Today's card is for an early December birthday for our best friend. DH just said "He won't like that", & when I asked why, his comment was "That's a Ford & you know he's a Chevrolet person". I don't have a chevvy truck stamp, so tough cookies!!! LOL. OK, here's the scoop: The stamp - Mark's Finest Papers, a Heinrich Company. Image was diecut with S/B Label 3, sponged and distressed with Tumbled Glass, then Antique Linen. Traced around the outside of the die to get a scant mat - which I handcut. This came from a 6x6 paper pack, and I've been buying these packs whenever I see them on sale. I have trouble with the larger 12x12 designs, as I never know how to use ones with huge designs to best effect. The houndstooth design paper is from a Paper Studio 4.5x6.5" Stonewashed paper pack. The cardbase is lightweight Bazzill, embossed with a Lifestyle Whimsy folder (this got covered up pretty much, doesn't show up here very well). I decided to use a piece of the same houndstooth to diecut a S/B Fancy Label and stamped Happy Birthday in Colorbox Fluid Chalk Aquamarine ink, sprinkled with Ranger fine detail clear & embossed. I have some early January birthdays so I'll try to intersperse those with Christmas cards so you don't get too awfully bored with seeing just Christmas cards here. (Ok, so maybe there might be a few more fall cards! I have some images colored up that I need to get done up into cards!). Anyway, ya'll have a super lovely day, and I hope you're blessed to be able to enjoy it with some or all of your loved ones. Let us ALL remember it's a day to think upon our blessings, whether we celebrate the day as Thanksgiving, or whatever. We have been truly blessed, with being able to enjoy our hobby, have the supplies with which to create, the support & friendship of the other crafters who encourage us here in blogland, and too many other countless ways to mention. HUGS!
Subscribe to:
Posts (Atom)