Followers

Showing posts with label HLS Christmas. Show all posts

6/04/2016

HLS Christmas Challenge - June - Twine

Welcome to the June HLS Christmas Challenge, and this month our challenge theme is:

Our Sponsor is Happy Little Stampers:


Recently had a play with a NBUS SU Woodland EF after being inspired by its use on many blogs and Pinterest. Used several different inks in the process, and it's amazing what different looks can be created. There's an earlier post, using a tan cardstock which turned out nicely, but here are 2 cards made for the HLS Christmas Twine challenge.


- SU Woodland Texture EF inked with Memento Sky Blue. Added some gray shading on the trees using a dauber. This was the 2nd effort, after inking the trees at first, then realizing it's the background that is meant to be inked. It looks good to me, done either way, just depends on the look you're going for.
 
- MBox birds cut from white snippet, then colored with copic reds, Black spica pen to create the birds' masks, with Orange Spica for the beaks.
 
- HLS Mixed Christmas Sentiments  stamped with Memento Love Bug red, heat embossed with Rangers Clear EP. Hand cut the fish tail tag. Added some bakers twine, red mat and called it done.
 
Actually this was the first effort at embossing the Woodland folder, and I inked up the trees using Hero Arts Unicorn Pigment ink instead of the background. The c/s is a mottled pale blue gray - very old stash. It's not showing well in the photo since there is less contrast because of the lighter c/s. IRL, this looks very much like heavy snow flurries among a grove of these trees. The cardinals stand out beautifully if they are about in such weather. Added some SnS Twinkling Clouds over all this, to create some dimensional & sparkling snow flakes, ---again, it's not showing well in the photo.
 
MBox birds die cut from a white snippet, colored with red copics, Black spica.
 
- HLS Mixed Christmas Sentiments stamped with Memento Nautical Blue ink, then heat embossed with a Silver Pearl EP, which created some shimmer over the ink. Punched with an EK Success punch, edged with the Nautical blue, then added clear rhinestones. 
 
- Recollections dark gray mat, over a SU Marina Mist mat, adhered to white card base. Blue Twine, and done!


- Green & yellow Brusho crystals sprinkled on dry w/c weight cardstock. Sprayed with Dylusions in green & yellow. Let the blooming and puddling take effect, used a Ranger Spritzer tool to move some of the puddles. Then dropped some Colorburst Gold Metallic (this is a liquid) in spots, dragged that around with a paintbrush. After drying, used a Jenny Bowlin leaf stencil and Gold BoBunny Glitter embossing paste to create some bling.  Let this dry overnight, then die cut with a S/B Astoria Die.
 
- JRL Design old wooden Feather Christmas tree image - colored with copics. Stamped the base of the tree on pattern paper that looks like burlap, and paper pieced that portion. Stars punched from glitter paper. Die cut with a S/B deckled rectangle, DI Antique linen to distress the edges, creating a white border. A matching size S/B long rectangle traced to create the faux mat from green snippet, inked edges with Memento Northern Pine to create a darker green for more contrast. .
 
Added some gold & natural bakers twine, used HLS Mixed Christmas Sentiments  heat embossed with Ranger Detail Gold - stamped over another background created using the 'mop up' from the brusho-o and Dylusions sprays. Edged with Northern Pine. Adhered to a purchased kraft card base. 


- MBox Trees Trio sponged with SU Suede, then smudged with Hero Arts Unicorn White (pigment ink). A 2nd layer of white was added behind the first layer, offset slightly. This was popped up with dimensional foam once the gold-natural twine was added.
 
- background created with SU Suede, Unicorn White, them embossed with a snowflake EF, which had been inked with the Unicorn white.
 
- Martha Stewart punched branches (from the snippets stash), Fiskars punch for the red bow, which started as a tiny white snippet.
 
- Paper Studio copper tape (found on 50% sale recently), then Wplus9 die sentiment from green paper snippet, colored with copics to darken the green. Backed with a white cardstock layer from a small snippet. This was one of the easiest cards I think I've done...and the idea came from a card I'd seen on Pinterest. 
**********************************************
This will be my last post on the HLS Christmas Design Team for now. It was such a pleasure to be on the team, with lots of extremely talented crafters, and I'm grateful to Kylie for giving me this opportunity. Many thanks, Kylie. We have things going on just now at home and within the family, that necessitated my stepping away from this fun team. Pssst... you might want to check out the DT call that is open. While you're there, do please see what my fellow HLS Christmas team mates have shared to inspire you, and perhaps add your own linkup using something with twine. You could win a nice prize!!!
 
PLEASE REMEMBER YOU DO NOT HAVE TO USE HLS STAMPS TO ENTER OUR CHALLENGES
 
As always, thanks for stopping in and come again when you can.


5/04/2016

HLS Christmas Challenge - May - Gifts

Welcome to the HLS Christmas Challenge.  The challenge for the month of May is Gifts.


The May Christmas Challenge is sponsored by Happy Little Stampers.Shop
Winner will receive one stamp set from HLS
 
Let's get started with what I've done for this challenge. Had several techniques I wanted to try out with a couple of gift dies that were in the stash..


- Cottage Cutz die using Sookwang tape, then applied Gilding Flakes over the top of it.  EF was inked with Delicata Gold and embossed using paper from an old 12x12 Christmas pack. This particular EF cuts deeply and that's why some white shows in the embossing. Used a sponge to go over that lightly with the gold ink. (message to self: Emboss 2 papers when doing this, so the folder does not emboss so deeply.) Added some gold ribbon placed like a wrapped package. Then decorated the ribbon with Nuvo Crystal Drops (this was Apple Green). Previously I've never had much luck using Liquid Pearls to shape this kind of embellishments. Am pleased to say this Nuvo product is working much better for me..and when the pearls were dry, they held the shape. Easy to use the bottle tip without clogging too. Hope it stays this way!  The sentiment is a small sticker.
 
 
 Another Cottage Cutz Stacked Gifts die cut from a different brand of double sided sticky paper - which I discovered did NOT work very well with the gilding flakes unless I used some extra glue. After recutting the die, used versamark, and the WOW Pearl Gold. Added a few Nuvo pearls. This time another EF was used to emboss a Coordinations c/s - which is much thicker than the paper used in the first card, and worked better. Used a sanding block to bring out the core color. Again, wrapped as a 'present'; stamped a little package, colored with copics and WoS, and punched with a SU scalloped punch. Still playing with the Nuvo crystals. Sentiment sticker.
 
Since I was not best pleased with either of the above cards, tried once more to do a card I was happier with the results.

 Boo-boo on the placement of the right hand package. Did not notice this until I saw the photo.
 Boo-boo fixed with placing the package ribbon in the proper position


used 2 S/B bracket dies to cut the edges to fold over the inside of this card. Fussy cut some gifts from an old foil 12x12 Paper Studio cardstock stack, and tied with a gold ribbon


PBlack clear Party Time image, colored with copics, WoS. Added in a Woodware Forest tree stamped in green, then embossed with clear.  Used Copic W gray to ground the scene. Matted with green and gold mats, tucked in another present from the foil paper stack. Sentiment is from the HLS Mixed Christmas Sentiments, stamped in versamark, heat embossed with Ranger's Queens Gold.

THEN using some bits from the You-know-where pile, made one last card, because I wanted to use a foil set of the Cottage Cutz gift die that had been made while I was trying different products.


Cottage Cutz die, from the non-Sookwang tape, (it's sticky, but not sticky E-nough!); added some Nuvo glue, burnished on some Deco foil, then ran through the Big Shot. This actually looks much better IRL than it does in the photo. All the white patches you can see in the photo, are not visible to the naked eye! Had this snippet from Brusho play, which had been embossed. It has sort of a 'leather' look to it. The turquoise looked nice with this (at least I thought so!). The blue bubbles border is from another Brusho play, and the sentiment was die cut from a snippet of white water color paper. Glued this down, then colored with a Turquoise Pentel Slicci pen (it looks blue in the photo, but is really a turquoise that quite matches the foil). Added a bit of WoS over the top of this, matted on a turquoise top fold card. Whew!

Hope you will join in with this fun challenge, get a head start on building a Christmas card stash for 2016 & perhaps win a fab prize too!

PLEASE REMEMBER YOU DO NOT HAVE TO USE HLS STAMPS TO ENTER OUR CHALLENGES

Thanks for joining me today. Big hugs. 


4/04/2016

HLS Christmas Challenge - April - Die Cuts

Welcome to the HLS Christmas Challenge. The challenge for the month of April  is to use some die cuts on your card.


Our challenge is sponsored by Happy Little Stampers where the prizes will be:

 $30 gift certificate to the winner
$10 gift certificate to each of our Favorites


Since I'm a die junkie the hardest part of this challenge was deciding which dies to use - LOL. Recently had made this card using frame die cuts, so had snippets left from that project. Rewatched Catherine Poolers' youtube, decided to combine the snippets with poinsettias, and Voila. Lots of die shapes.


- added remaining halves of the double frame die cuts which were from different 6x6 paper packs; overlapped the frames, instead of leaving spaces as on the previous card. This was a much easier effort than the spacing. Arranged in a pattern so that there would be space at the top folding card to add a cluster of poinsettias & leave space for a sentiment.
 
-Memory Box Blooming Poinsettia (861) and Small Blooming Poinsettia (902), die cut several times from white snippets...colored with copics, shaped with the McGill stylus - formed into flowers. Added some tiny beads in the center of one flower.
 
- Used HLS Mixed Christmas Sentiments with a new product: Nuvo Glue Pen and some Heidi Swap Minc Gold Foil.  The Nuvo glue is water soluble, so after cutting the transparent sentiment apart to make it fit the area, covered it with the glue. Used the Mini Misti, stamped twice - 'reinking' on the 2nd time. Used fingers to burnish the foil over the sticky glue, placed the card between some folded printer paper to make a carrier, and ran through the Big Shot. (here's a video showing the process).
Works great with no laminator or Minc.
 
I really like the look, but learned 2 things: (1) Do the foiling prior to applying anything with dimension that you don't want to get crushed - (2)a chunkier, bolder stamp image would show off better. This is a lovely Calligraphy stamp, but since the letters are slender, you don't really get the beautiful effect of the foiling as much. Still very pretty, and is giving me lots of ideas for using some of the other bolder font HLS Sentiment sets I have.
 
Hope you will join in with this fun challenge, get a head start on building a Christmas card stash for 2016 & perhaps win a fab prize too!

PLEASE REMEMBER YOU DO NOT HAVE TO USE HLS STAMPS TO ENTER OUR CHALLENGES

Thanks for joining me today. Big hugs. 


3/04/2016

HLS Christmas Challenge - March - Shaped Card

Welcome. It's time for Happy Little Stampers March Christmas Challenge, and this month our theme is a Shaped Card.

 Our Challenge is sponsored by Happy Little Stampers.


It's been a while since I did a shaped card, so here goes: (and this is my 2nd card. My first one had some wrinkles in it - and a totally different concept. )

- Pine branches are from a Simon Says Holly Berries clear set. I was inspired by an Ornamental Pine Embossed card done by Dawn. I had been wanting to try this technique, and this seemed like a good time to do so. Used Versamark as Dawn shows, and added the same SU Dazzling Diamonds EP and it really does glitter nicely.
The Lawn Fawn Winter Owl was waiting to be stored away, and thought he'd look good with the pine branches. Used Memento Northern Pine & Olive Grove, sometimes stamping off for the shadows. Add a few pine cones from the Holly Berries set using Espresso Truffle. Stamped some extras for around the sentiment. Added some more shading to these after fussy cutting.
Die cut with a S/B Classic Circle large, sponged SU Espresso around the edges. Came back with Memento Espresso Truffle, and DI Scattered Straw to have a bit of golden look at the edge.
- Owl stamped on watercolor paper with Versamark, heat embossed with Ranger Fine Detail gold. Used Zig watercolor markers to color. (a little hesitant with this, since my w/c skills are rubbish at times. This guy turned out ok, I think. Fussy cut him, not sure if there's a die available on this small set. He's popped up with dimensional foam.
Die cut the card shape using a S/B Grand Circle. Edged the top of this with Versamark, then heat embossed with Ranger Queen's Gold.
HLS Mixed Christmas Sentiments was embossed with Ranger Fine Detail Gold, die cut with a S/B fancy tag, the ends of which have been covered by the embellies. Pine cones from the Holly Berries set, and tiny twigs from an Impression Obsession die set.. these were cut from a green dp, but then colored them with Copics in dark green shades.
Hope you will join in with this fun challenge, and get a head start on your Christmas card stash for 2016!

PLEASE REMEMBER YOU DO NOT HAVE TO USE HLS STAMPS TO ENTER OUR CHALLENGES

Thanks for joining me today. Big hugs. 


2/04/2016

HLS Christmas Challenge - February - Tic Tac Toe

Welcome. It's time for Happy Little Stampers February Christmas Challenge, and this month our theme is Tic Tac Toe.


Our Challenge is sponsored by Happy Little Stampers.

 
Winner will receive one stamp set from HLS
 
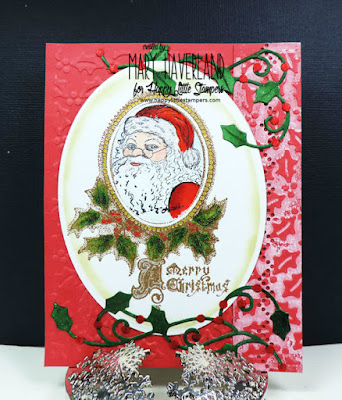
I decided to take the white, Santa & red for my theme, so here goes:


Two  wooden Great Impressions stamps were inked with Versamark, embossed with Ranger's Queen's Gold EP. The oval aperture of holly image was die cut with a S/B classic oval that fit best in the opening. Trim around the opening colored with a Pentel Slicci gold pen, and a Slicci silver pen was added to the embossed gold of the sentiment. Holly & berries colored with copics.
 
- Santa image stamped separately & colored. Used some glitter on the white of his hat, and Glossy Accents on the glasses. Copics for the coloring.. Placed behind the oval opening. Then die cut the piece with a S/B oval, edged with DI Antique Linen and very light touch of Shabby Shutters to tie in the green of the holly.
 
- red was embossed with a Holly EF. Tried inking the EF folder with some pigment white on the folder, then embossing. Didn't like that look for the entire back, so cut off a piece to use as a border accent.
 
- Elizabeth Craft holly die, cut from white, colored with copics, then added some WoS. That's my Tic Toe Toe entry for February's Christmas Challenge.
 
Hope you will join in with this fun challenge, and get a head start on your Christmas card stash for 2016!

PLEASE REMEMBER YOU DO NOT HAVE TO USE HLS STAMPS TO ENTER OUR CHALLENGES
 
 
Thanks for joining me today. Big hugs.
 
Edit: a very sweet blog friend suggested this Santa would fit in with the current Merry Monday Challenge, so will link there. Thanks Bonnie!


Edit #2: Some sweet blogger let me know I didn't provide the link to the current HLS February Christmas challenge. So I've added it in at the top. Thanks Sylvie!


1/04/2016

HLS Christmas Challenge - January - Jingle

Hello and welcome to the first HLS Christmas Challenge for 2016...and our challenge theme to start the year is: Jingle


Our challenge is sponsored by  Happy Little Stampers
Winner will receive one stamp set from HLS
 
 
So let's get started on the card I'm sharing for this month's theme:
 

- Elizabeth Craft Cardinal (RS021) - colored with copics and some WoStella;
 diecut with a stitched MFT Oval. Matted with paper from stash (12x12 Paper Studio Christmas Traditions foils, bought a few years ago) using S/B Lattice Motifs.
After image was die cut, masked the outer edge of the oval, and used a mask over the image, stamped with an IO CAC Twas the Night Before text stamp that had been inked with DI Tea Dye.

- Crafters Companion Embossalicious EF - Christmas Merriment - for the white mat directly behind the focal image.

- Silver outline stickers to define the sentiment space - which is stamped with the HLS Mixed Christmas Sentiments. Used SU Real Red, then Ranger's Fine Detail Clear EP over this.

Got a little red smudge off my inky fingers so used Impression Obsession's tiny holly leaves to cut some snippets of a tartan plaid paper and add to the corners. I rather like this one.

HLS has some great stamp sets available, and I'm finding the sentiment sets to be so versatile, with the various sizes & styles of the stamps.  Now do be sure to check out what my fellow DT members have shared for the HLS January Christmas challenge, and perhaps you could win this month's prize stamp set.

Thanks for joining me today, and Happy Stamping. Hugs.


12/04/2015

HLS December Christmas Challenge - Star

Welcome to the last Happy Little Stampers Christmas Challenge of 2015! This month our challenge theme is STAR.


Our Challenge Sponsor is Happy Little Stampers


The winner of December's challenge will receive this stamp
 
 
Let's get started with my first card using some created backgrounds:


- Lil Inker Stitched Stars from bkground created by rubbing DI Blueprint Sketch, directly to c/s, generous inking. Spritzed a floral stamp with some pearly spray, and did a ghost stamping over the inked paper. Didn't show up very well, so.....die cut the stars. The top right star was rolled through a crimper to give some texture. Both stars had some Delicata Silver color rubbed around. Silver paper and silver glitter paper star centers added.
 
- another background, sprayed with Dylusions London Blue, spritzed with a Tattered Angels gold spray. While still wet, sprinkled some white brusho crystals over it. Then die cut with a Wplus9 Starry background die (this is small, so did the first cut, then reversed the c/s and cut the other side. This left a small impression, so the rhinestone snowflakes were added to conceal this). Gold glitter paper placed behind the starry background.
 
- Vellum stamped with HLS Mixed Christmas Sentiments  using Delicata Silver, then heat embossed with Judikins Aegean Silver. Tiny silver stars cut with MB Precious Stars (small die); added in some of the Starry background confetti stars.
 
OK...I wasn't totally happy with #1 so decided to work on #2, and go for a more natural effect.


- Paper Studio Handmade Paper (VOS) covered the top fold card.
 
- Balsa wood 'paper' cut with the Simon Says Chisholm Wreath and very pleased to say it cut this fairly intricate die quite well on this thicker paper product. Used several passes, but it cut nicely.
 
- MB Precious Stars(large die) cut from some Very Old Stash old gold textured paper. I liked the texture look.
 
-  HLS Mixed Christmas Sentiments stamped on vellum, inked with Delicata Gold, and heat embossed with Sparkle n Sprinkle Pebbled Copper Opaque EP. This is not a detail EP, and so it didn't give the fine detail on the lettering. However, I decided to go with it as is, because it sort of goes with the 'natural' look of the rest of the card. The tiny cardinals are part of the Chisolm Wreath set, cut at the same time as the wreath.  
 
HLS has some great stamp sets available, and I'm finding the sentiment sets to be so useful. Now do be sure to check out what my fellow DT members have shared for the HLS December Christmas challenge, and perhaps you could win this month's prize stamp set.
 
Thanks for visiting, and hope you enjoy both of these STAR cards! Hugs & God Bless.   

11/04/2015

HLS November Christmas Challenge - Tags

Hello and welcome to the HLS November Christmas Challenge, and this month, the theme is TAGS!


Our Challenge Sponsor is Happy Little Stampers


The winner of this month's challenge will receive a free stamp set from HLS, so we hope you'll find time to join in with your Tags, anything as long as it's Christmas Themed, have some fun, perhaps be a winner. Here's what I came up with (and remember, I'm not great with tags! So if I can do it, so can YOU!)


- Tag created from 140# watercolor paper and an Elizabeth Craft Tag 3 & More die to die cut.
 
- used Viva Décor Inka Gold and some Maya Inca Gold ** dabbed on a craft mat, spritzed with water, and 'smooshed' the w/color tag around through it. (here's an excellent tutorial by Loll, and while I didn't have exactly the same products Loll used, it still creates some wonderful looks) 
 
 (**Photo of smooshing products below)
 
After the tag dried, used a TCW Christmas tree stencil, and some Viva Décor Glitter paste to make the dimensional trees. (not sure that the link is the color that I have, but you can see the product). It was extremely thick and hard to spread - and yes, I am always careful to put the cap back on quickly when using these pastes, so that it doesn't dry out. Doubt I will use this stuff again, but I might try to see if I can thin it.
 
Snow bank was torn paper, spread out some TomBow liquid glue, and sprinkled some Sparkle n Sprinkle Twinkling Cloud over the sticky glue, and pressed it down, shaking off the excess.  Makes terrific snow.
 
- Lawn fawn Toboggan Together clear set for the penguin fun, stamped on white Xpress, colored with copics, then some WoS, and a coat of glossy accents. The companion die set used for the penguins, but after deciding to add in some more stamped trees, those were fussy cut with scissors.
 
- SU scalloped oval punch on a snippet of white, then stamped with HLS Mixed Christmas Sentiments. A couple of Jolee packages & a Spare Parts Penguin brad were added for some more dash.
 
Happy Little Stampers has a brand new stamp release this month. There's some really darling sets available, and you won't want to miss seeing these. Now do be sure to check out what my fellow DT members have shared for the HLS November Tag challenge, and join in the fun. Hey, you could be the winner of a lovely new stamp set!
 
 
Thanks for joining me & Big Hugs & Blessings.
 
**Here's the products used, and the backgrounds made from the 'leftover smoosh'. The center bkground happened to be a piece of glossy c/stock and it really turned out nicely. On this center one, used a piece of plastic small bubble wrap to pounce into the 'smoosh liquid' and then over the c/s with a twisting motion. The others were just dragging the cardstock through the liquid on the craft mat.


10/04/2015

HLS October Christmas Challenge - Poinsettia

Hello and welcome to the HLS Christmas Challenge for October...this month our theme is Poinsettias.

 
Our challenge sponsor is Happy Little Stampers


The winner of this month's challenge will receive a free stamp set from HLS, so we hope you'll find time to join in with your poinsettia cards, have some fun, perhaps be a winner.
 
 
- Whispers stamp inked with Memento Rich Cocoa, colored with copics, some WoS, a white gel pen for highlights. Added some Viva décor  gold paste in several areas (not one of my best ideas as it did not burnish around on the leaves as planned.  Was able to scrape off most of it with my fingernail.)
Die cut with a S/B, edged with DI Peeled Paint around the edges, then with Tea Dye.
 
- Green textured Bazzill for the basecard, die cut the bottom edge with a S/B curved border. Viva Décor Gold paste over cut out areas.
 
- HLS Mixed Christmas Sentiments stamped with Versamark, heat embossed with Ranger's Queen's Gold. Because the cardstock is textured, the sentiment did not stamp out quite as crisply as it should have (memo to self: remember this when stamping on texture). However I had used the Misti to place the transparent stamp, so reinked with versamark, stamped it again perfectly placed. Just sayin' that a smooth cardstock yields a sharper, crisp image. Still looks quite nice.
 
- Used 2 different Martha Steward Poinsettia punches and some design papers to make the dimensional poinsettia in the corner. Still practicing my flower making LOL! Added a purchased Recollections holiday bow from the stash. Pretty easy card. On the inside there is a piece of Poinsettia design paper so that it would show in the cutout area. A cream colored S/B shape will be adhered later, to stamp the Christmas verse.
 
Do be sure to check out what my fellow HLS Christmas DT members have shared on the month's Poinsettia theme. Thanks for popping in, Big Hugs.